On 17 September 1944, Operation Market Garden surprised the Germans when Allied airborne troops dropped behind the front lines around Eindhoven, Nijmegen and Arnhem. Although scattered elements of the SS 9th “Hohenstaufen” and SS 10th “Frundsberg” Panzer-Divisions were around Arnhem at the time, the Germans still had to rush all available armour units to counter the Allied airborne troops. One particular unit was Panzer-Kompanie Mielke, a training unit which fought against the British 1st Airborne “Red Devils” at the Arnhem bridge and then the US 82nd Airborne “All American Division” northwest of the Nijmegen bridge.
Panzer-Ersatz-und Ausbildungs-Abteilung 11 was a training and replacement unit for Panzer Regiment 11, 6th Panzer-Division located near Bielefeld, Germany. In September 1944, the unit’s Panzer-Kompanie consisted of seven PzKpfw IVs and eight PzKpfw IIIs. Panzers in training units were called “Fahrschulwanne” which is a combination of “Fahrschule” (Driving school) and the German term “Wanne” (Tub). The panzer crews were mostly untrained men who were not or only partially familiar with panzers and most did not know how to handle tactical combat situations.
PzKpfw IVs parked in a garage at the barracks in Senne (south of Bielefeld).

A PzKpfw IV Ausf G painted in camouflage colours at the Senne barracks.

A PzKpfw III at the Senne barracks preparing for an exercise with infantry.
This tank fought at Arnhem and Nijmegen and later survived the fighting.

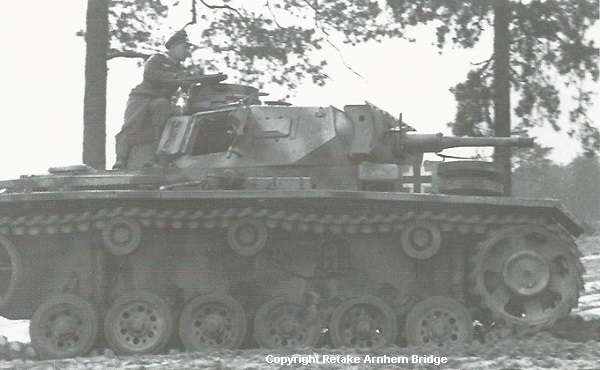
A PzKpfw III with 50mm KwK L/42 gun on the training grounds at Senne.

A side photo of the same PzKpfw III which is probably an Ausf H.
Note it also updated with 20mm spaced armour on the turret mantled.
A PzKpfw III Ausf M with “Fahrschule” sign on the rear hull to the right of the muffler.

At that time of the war, gasoline/petrol and diesel fuel was scarce in Germany and Panzer Fahrschules were forced to use vehicles equipped with either wood gas (Holzgas) or Stadtgas (city gas) which was stored in LPG compressed gas bottles mounted on the outside of the tank chassis. Stadtgas was produced in urban production by coal gasification.

Oberleutnant Wilhelm Mielke
Mielke was an experienced combat officer who had risen through the ranks. His combat career began with the 6. Panzer-Division during the drive to Moscow in late 1941 up to the early battles at Rshew and Juchnow in 1942. In December 1942, the 6. Panzer-Division was sent to Stalingrad to relieve the encircled units before conducting a fighting withdrawal to Rostov via the area of Kotelnikovo. Between March and June 1943, he fought in the battles of Karkov after which he was posted to Panzer-Ersatz-Abteilung 11 possibly due to an illness. He was out of action for less than two months before being sent back to the eastern front as a reserve officer in Heeres Gruppe Mitte. On 13 August 1943, he became a Zugfuhrer within Panzer-Kompanie 221, Kavallerie Regiment Mitte and fought in the Gorki area (60 km southeast of Orscha). On 7 October 1943, he was posted to the 6./Panzer Regiment 31 of the 5. Panzer-Division. He was awarded the Eisernes Kreuz 2. Klasse (Iron Cross 2nd class), Panzerkampfabzeichen im Silbe(Armoured Badge in Silver) and the Ostmedaille.
However, on 2 December 1943, Mielke was involved in an incident which affected his career. He commanded five panzers which were supporting an infantry attack on the village of Golewizy about 10 km east of Kalinkowitchi in south-eastern Belarus. He ordered his panzers forward while his panzer remained behind and provided fire support. Due to communication problems, the Hauptmann in command of the infantry believed Mielke had a “defeatist attitude” because he withdrew his panzers leaving the infantry without support until the next day. He was charged and sentenced to nine months in prison but his sentence was reduced to five months and he was not to be promoted until October 1944. After his imprisonment, he was posted to Panzer-Ersatz und Ausbildungs-Abteilung 11 on 15 August 1944 and in early September 1944 he became the commander of the unit’s panzer kompanie.
17 September 1944
Panzer-Kompanie Mielke was alerted and ordered to move to the front. The crews and mechanics hastily prepared the panzers for combat which required removing the Stadtgas bottles. All 15 panzers were loaded on railcars and transported to the village of Zevenaar in Holland (southeast of Arnhem) because its station possessed the closest unloading platform to Arnhem.
Due to roaming Allied air cover attacking all rail and road movement, this PzKpfw III on a railcar is covered with foliage and this photo was probably taken at Zevenaar.

18 September 1944
After uploading, the panzers traveled by road to the village of Duiven (northwest of Zevenaar) which was also where their Tross (Quartermaster/Supply train) was set up. In Duiven, Panzer-Kompanie Mielke was attached to Kampfgruppe Knaust which at that time consisted of Panzergrenadier-Ausbildungs-Bataillon 64, a training and replacement battalion from Bocholt, Germany. Commanded by 38 year old Major Hans-Peter Knaust, the Kampfgruppe was equipped with only one half-track and four infantrie kompanies. Its soldiers were classed as “not quite fit for front line service”. Panzer-Kompanie Mielke became the 5th Kompanie of Kampfgruppe Knaust.
A PzKpfw III Ausf M parked at the corner of Rijksweg and Ploenstraat in Duiven.

The same corner in Duiven today. Note the building in the background on the left.

In the early morning, the first infantry elements of Kampfgruppe Knaust arrived in Arnhem by truck and Kampfgruppe Knaust came under the command of the SS 10th “Frundsberg” Panzer-Division. Meanwhile, Mielke’s panzers followed behind traveling northwest by road towards Arnhem. They crossed the river IJssel via a bridge near the village of Westervoort and then traveled along the river Rijn (Rhine) entering Arnhem from the east. Upon arrival, they took up positions in the area of Nieuwe Kade along the river and at the housing estate Rijnwijk. Sources state that only two PzKpfw IVs (1 Ausf G and 1 Ausf H) and six PzKpfw IIIs (Ausf F, G, H and M) arrived in Arnhem. The other panzers were probably either knocked out by Allied air attacks or had mechanical problems while on the train or traveling on the roads.
19 September 1944
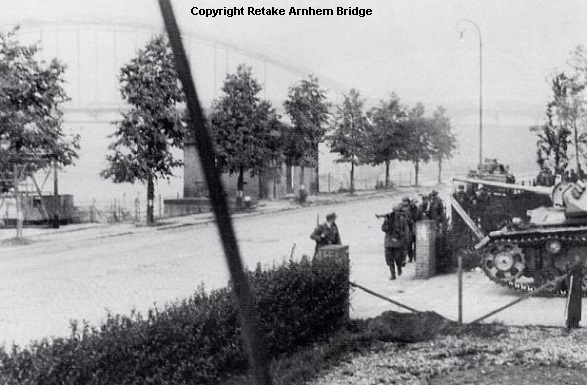
The day started with the usual shelling, mortaring and infantry infiltration attempts around the bridge. At mid morning, the PzKpfw IVs and PzKpfw IIIs started their attacks on the houses south of the Van Limburg Stirum School along the east side of the bridge’s north ramp. The panzers supported the grenadiers by firing on the buildings and church towers. British paratroopers using the school as a strongpoint began firing at the panzers and the panzers in return fired at the school. Around 1630 hours, the PzKpfw IIIs withdrew back to the area on Nieuwe Kade along the river. The houses in the area were then set on fire by German incendiary parties and not long after that the area was ablaze.
In the evening, two Tiger Is from schwere Panzer-Ersatz-und Ausbildungs-Abteilung 500 arrived at the bridge from Paderborn and immediately went into action. Around 2000 hours, the two Tigers supported by SS-Panzergrenaddiere, advanced along the main road that led to the bridge ramp. While advancing, the Tigers fired shells into the buildings along the west side of the bridge ramp. The British return fire with PIATs and an 6 pounder AT gun. One Tiger took direct hits on the turret and main gun wounding two crewmen. Both Tigers quickly withdrew from the bridge ramp and while departing they fired point blank at the northwest corner of the school.
During the rest of the night, a number of German patrols were sent out and some minor skirmishes took place. The PzKpfw IIIs returned from the river and started shelling all the buildings which the British still held. The last building the British occupied along the east side of the bridge ramp was the school and the Germans concentrated on eliminating the stronghold. The grenadiers cleared out the buildings searching for British Tommies holding out in cellars and attics. The grenadiers lost a lot of men clearing the buildings around the bridge.
The PzKpfw IV Ausf H was knocked out by a British 6 pounder AT gun when it was under the pipe bridge of the Camiz Dairy on Westervoorsedijk. The 6 pounder scored 2 or 3 hits on panzer’s the front armor. The pipe bridge collapsed at a later time.

On the afternoon of September 18, Wing Commander ‘Sandy’ Webb of No. 16 Squadron flying a Spitfire PR Mk XI flew over the bridge north ramp and took these aerial photos the day before Panzer-Kompanie Mielke arrived in Arnhem.
This aerial photo is the view of the east side of the bridge. On the bottom edge of the photo can be seen the Camiz Dairy pipe bridge. The building on the left edge of the photo is the Van Limburg Stirum School.

This aerial photo is the view of the west side of the bridge. On the top edge can be seen the Camiz Dairy pipe bridge on Westervoorsedijk. The 6 pounder AT gun was probably positioned somewhere along Westervoorsedijk on the west side of the bridge ramp(bottom center of photo) and fired through the bridge ramp underpass hitting the PzKpfw IV Ausf H.

More photos of the knocked out PzKpfw IV Ausf H taken in 1945 after the collapsed pipe bridge was removed.

This is my close up of the front hull showing the hits.
The PzKpfw IV Ausf G located in front of the Tram depot on Westervoorsedijk was probably knocke out by a PIAT . It appears to be at an angle in the street with the rear facing the Arnhem bridge where the British positions were and was probably attempting to turn around to withdraw when it was hit.

This 1939 aerial photo shows the Camiz Dairy with the pipe bridge on Westervoorsedijk and the Tram depot further down the street on the north side of the street. The red dot is the approximate location of the knocked out PzKpfw IV Ausf G.
In April 1945, Arnhem was liberated by the 49th (West Riding) “Polar Bears” Infantry Division. The stripped knocked out PzKpfw IV Ausf G is being examined by a group of soldiers. In the background down the street the collapsed pipe bridge can be seen and behind it is the Arnhem Bridge north ramp. To the right would be the Tram depot.

Crewman Karl-Heinz Kracht took the following photos of the PzKpfw IIIs on Nieuwe Kade along the river with his Agfa Karat II camera.
PzKpfw IIIs on Nieuwe Kade with the Arnhem bridge in the background. Kracht took this photo from the turret of his panzer which implies there were at least three panzers in the area. The PzKpfw III Ausf M on the right was parked in the driveway of Jos Pe printing firm.
My close up of the PzKpfw III Ausf M parked in the driveway and another PzKpfw III on the street heading towards the bridge. Note the color of the panzer as it is probably overall dark yellow.

The rear of the PzKpfw III Ausf M in the driveway with crewman Kracht eating a meal. Note the Stadtgas bottle connection mount on the left hull corner above the muffler.

Compare this photo with the Stadtgas bottle mounted on a PzKpfw III Ausf M at Senne.

Crewman Mauel wearing denium tank overalls standing behind the Kracht’s PzKpfw III Ausf M in the driveway of Jos Pe printing firm on Nieuwe Kade.

This 1939 aerial photo shows the Arnhem bridge and Nieuwe Kade along the river. Note the location of the printing firm Jos Pe’s driveway.

View of the Arnhem bridge (renamed the John Frostbrug Bridge on 17 December 1977) along Nieuwe Kade today. The buildings along Nieuwe Kade had been torn down.

20 September 1944
In the morning, several German infantry attacks on the school were repelled by the British defenders. The school looked like a sieve with holes in almost every part of the building. At 1500 hours, a Tiger appeared at the crossroads where it fired at close range at the south side of the school. The school caught fire in several places and was slowly collapsing. The British paratroopers evacuated the school and started moving north and then turned east passing through burning and destroyed buildings. As they crossed a street, a panzer came up from the south and fired at them but they managed to cross unscathed. They pressed on, fearing of pursuit, and burst out from the next row of houses into the street beyond. They came face to face with about 50 Germans standing beside two yellow PzKpfw IIIs. Both groups were startled and British reacting first fired their MGs from the hip. After a few seconds, their ammunition ran out and they retreated out of sight in the nearby gardens. Eventually, all the surviving British tommies were rounded up and became POWs.
Two PzKpfw IIIs parked at the crossroads of Westervoorsedijk and Nieuwe Kade.

My close ups of the two PzKpfw IIIs. The PzKpfw III on the right is an Ausf F and the one on the left is probably an Ausf H (seen above). Some sources state the PzKpfw III on the left is an Ausf L but barely visible it has towing eyes below the headlights which were omitted earlier in production on the Ausf Js.
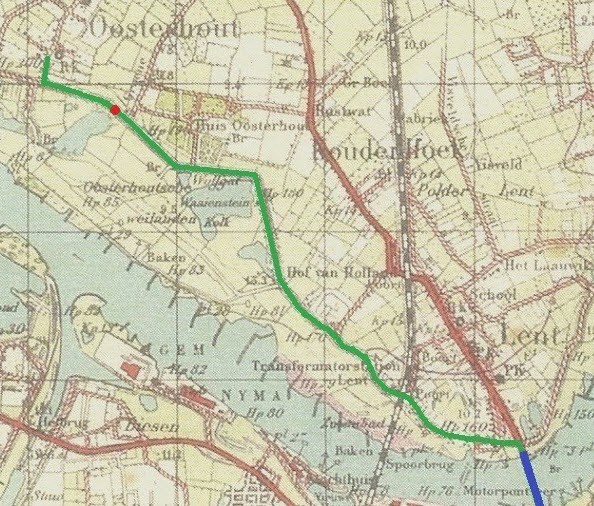
This high overhead view of Arnhem is marked with the locations of Panzer-Kompanie Mielke panzers. The two red squares are the locations of the knocked PzKpfw IV Ausf H (left) and PzKpfw IV Ausf G (right). The three green dots along the river are the approximate locations of where the three PzKpfw IIIs were parked on Nieuwe Kade. The two green dots in the lower right corner are the two PzKpfw IIIs parked at the crossroads and the yellow dot in the upper left corner is the approximate area of where the 6 pounder AT gun was located.

21 September 1944
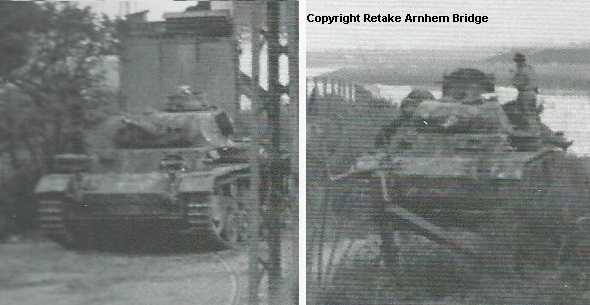
During the early hours, the fight for the bridge was coming to an end and a number of small pockets of resistance continued to hold out but the main body of remaining British paratroopers had withdrawn west to Oosterbeek. The Germans finally regain control of the bridge and cleared the wreckage. The PzKpfw IIIs of Kampfgruppe Knaust crossed the bridge to join a new defensive line forming south of Arnhem.
Top photo is a Panzer-Kompanie Mielke PzKpfw III approaching the Arnhem bridge on the north ramp. Bottom photo is the PzKpfw III after crossing the bridge and entered the “Betuwe” (Dutch) which is 10 miles of flat boggy polder land between the Rhine River at Arnhem and the Waal River at Nijmegen. It was known as the “Island” to the Allies.

Elements of the SS 9th and 10th Panzer-Divisions ferried across the Rhine River and Kampfgruppe Knaust reinforced with eight Panthers and Stugs including Tigers moved south towards Nijmegen to form a defensive line around Ressen (south of Elst) to counter the Allied units advancing north. Panzer-Kompanie Mielke passed through Elst then split from the main force and veered west toward the hamlet of Oosterhout. Five PzKpfw IIIs of Panzer-Kompanie Mielke with one half-track and approximately 100 infantry probed Oosterhout and reached the Waal river.
Around 1100-1200 hours, C Company, 1st Battalion, 504th Parachute Infantry Regiment(504th PIR), 82nd Airborne Division was in defensive positions southeast of Oosterhout in the northwest sector of the Nijmegen bridgehead when the Germans launched an attack. The attacking force consisted of infantry supported by a half-track and two panzers surged forward in attempt to recapture the Nijmegen Bridge. Along the Waaldijk road, bazooka man Private John Roderick Towle left his foxhole and ran 200 yards forward to a position on an exposed dike roadbed. He then fired his bazooka twice and hit both panzers. His bazooka rockets failed to penetrate the armor of both panzers and then both withdrew slightly damaged. Towle then engaged a nearby house which nine Germans were using as a strongpoint and with one rocket took out all of them. After replenishing his supply of rockets, Towle then ran approximately 125 yards through enemy fire to an exposed position where he could engage the half-track. While preparing to fire on the half-track, Towle was mortally wounded by a mortar shell. After this action, the US paratroopers dug in and waited for the next German attack. On March 15, 1945, Towle was posthumously awarded the Medal of Honor.
The senior regiments of the Guards Armoured Division after crossing the Nijmegen bridge (captured the day before) advanced up the Nijmegen-Arnhem highway encountered the new German defensive line where several Shermans were knocked out causing the advance to stall and traffic to backup. The Cromwell tanks of No. 1 Squadron (A) of the 2nd Welsh Guards spent most of the afternoon stuck in backed up traffic on the Nijmegen bridge. The Cromwells were exposed to sniper/mortar fire and German air attacks. It was not until 1700 hours, the Cromwells were able cross the bridge.
A Cromwell of A Squadron, 2nd Welsh Guards crossing the Nijmegen bridge.

Another Cromwell with crudely painted stars on rear hull and turret crossing the bridge. Note the aerial recognition panel on the engine deck.

This is my close up of the A Squadron Cromwell showing a tactical triangle painted on hull storage bin. Note the turret is draped with camouflage netting.

While the Shermans of the Irish Guards were on the Arnhem-Nijmegen highway trying to advance toward Arnhem, the Welsh Guards covering their left flank advanced along the Waaldijk road heading toward Oosterhout. The infantry of the Welsh 1st Battalion were mounted on the 2nd Battalion’s Cromwells, with only the first three tanks of A Squadron not being loaded with Infantry. The column after passing fort Hof van Holland soon encountered German AT guns which delayed their progress but they arrived in time to reinforce the 504th PIR before the Germans launched another attack.
Map of the north end of the Nijmegen bridge and Oosterhout. The red dot was the approximate area where the 504th PIR engaged the German panzers earlier that day.
The 2nd Welsh Guard cromwells advanced along the Waaldijk road and entered Oosterhout when they encountered the PzKpfw IIIs of Panzer-Kompanie Mielke. Someone shouted in German “Nicht schiessen, wir sind Deutschen!” (Don’t shoot, we are Germans). Immediately, the leading Cromwells open fired with their 75mm guns and knocked out three PzKpfw IIIs and killed a number of the accompanied infantry.
Due to the German heavy defenses north of the Nijmegen bridge and the wet marshy Betuwe being unsuitable for an armoured spearhead, the high command ordered the Guards Armoured Division to withdraw and allow the 43rd Wessex Infantry Division to take the lead. As it was getting dark, the Welsh Guards returned to the Nijmegen bridgehead in Lent and prepared for a limited attack to the east for the next morning.
22 September 1944
Shortly after dawn, armoured cars of the C Squadron, 2nd Household Cavalry Regiment(2 HCR) travelled the same route ahead of the 214 Brigade, 43rd Wessex Infantry division and the CO of the leading troop was Captain Wrottesley. Early autumn fog made visibility about 50 feet at best. Trooper John Knight driving the second armoured car while passing by Oosterhout briefly spotted the three PzKpfw IIIs through the fog. He thought they did not see them or they were gone before the Germans could react. After passing Oosterhout, the lead troop of 2 HCR armoured cars veered north and linked up with elements of the Polish Airborne near Driel south of the Rijn river.
The 7th Somerset Light Infantry, 214 Brigade supported by A squadron, 4th/7th Dragoon Guards, 8th Armoured Brigade started their final assault on Oosterhout at 1400 hours preceded by a heavy barrage from the divisional artillery. At the entrance of the village, they fired at two of the already knocked out PzKpfw IIIs. As they pushed further into Oosterhout, two more German panzers suddenly appeared. A Sherman Firefly fired a 17 pounder round at one of the panzers but the shell ricocheted off the side of the turret. However its crew quickly bailed out and surrendered leaving the engine running and the panzer in perfect order. The second panzer managed to escape to the north. By 1700 hours, Oosterhout was cleared of Germans and by the end of the day the Somersets had taken 131 POWs and captured an 88mm gun and a PzKpfw III intact. Not able to find information on what happened to the captured intact PzKpfw III and 88mm gun.
23 September 1944
Karl-Heinz Kracht beside his surviving PzKpfw III in one of the orchards around Elden. (southwest of Arnhem). He has caught a rabbit and is preparing Hasenpfeffer for his next meal.

24 September 1944
Sergeant Carpenter, No. 5 Army Film & Photographic Unit (AFPU) took the following photos of two knocked out PzKpfw IIIs in Oosterhout and the photos are currently part of the Imperial War Museum collection.
This is my close up of IWM B 10375
The rear of a knocked out PzKpfw III Ausf M on Dorpsstraat with the Waaldijk road in the background. Note the number “29” on the turret storage bin.

This is my close up of IWM B 10376
This is a knocked out updated PzKpfw III Ausf F with a vorpanzer (spaced armor) plate on the front of the hull superstructure and is missing its armoured air intake covers on the front hull. It was located behind the PzKpfw III Ausf M on Dorpsstraat. The soldier from the 43rd Wessex Infantry Division was posed for the photograph. By that date, the 214 Brigade was further north advancing toward Elst.

This is the corner of Dorpsstraat and De Breeacker in Oosterhout today. The knocked out PzKpfw III would be about where the lone tree is next to the street sign.

Of the eight panzers of Panzer-Kompanie Mielke that were at Arnhem and Nijmegen, five were knocked out, one captured intact, and one survived but there is no information of what happened to the eighth panzer. Due to Mielke’s achievement of getting the panzers combat ready at short notice and his actions at Arnhem and Nijmegen, Major Knaust recommended Oberleutnant Wilhelm Mielke to be awarded the Eiserne Kreuz 1. Klasse (Iron Cross). Mielke’s personnel file ends in October 1944 and there is no information as to what happened to him after the battle of Arnhem.
Special thanks to the authors of “Retake Arnhem Bridge” for allowing me to use content and photos from their book.

Hi
In the PzKp Mielke article one of the Pz3 Ausf G mentioned is actually an Ausf F. The photo is the last but one in the article showing the knocked out Pz3 The ID point is the hull front armour over the drivers section.
Not trying to not pick just thought you may like to know. It’s say to miss these little things when doing such in depth articles
Thanks for the great article.
Andrew
LikeLike
Andrew –
At first I also thought that it was an Ausf F but then I noticed that it had a ventilator fan on the turret roof which was introduced on the Ausf G.
Ausf Gs were also updated with the vorpanzer (spaced armor) plate on the front of the hull superstructure.
I also thought at first the Ausf H on the training grounds was an Ausf G but then I noticed in the side view that the first return roller was positioned closer over the first road wheel and it had the later sprocket introduced on the Ausf H.
LikeLike
Andrew –
Thank you for the clarification information. I have updated the blog.
LikeLike
I found your web site from Google as well as I need to say
it was a fantastic locate. Many thanks!
LikeLike
Merely a smiling visitor here to share the love (:, btw great style.
LikeLike
Sweet website , super design, real clean and use pleasant.
LikeLike
Great content! Thanks.
Just a minor comment: if you look at the original picture IWM B 10375 of the PzKpfw III Ausf M at Oosterhout, you can see on the left the Peperstraat, the house on the right is Dijkstraat 1, the building was demolished in 1999 to reinforce the dyke. So the position of this tank is Dijkstraat close to number 2, and not Dorpstraat.
LikeLike
I found another photo of a third PzKpfw III ausf ?, also taken in the Dijkstraat, you can see the house at number 3.
View Photo
This is the same spot at Google Maps, the house is now painted, but notice the dyke in the back and the little shed left of the house.
In Oosterhout there is an information sign on the dike that mentions two tanks in the Dijkstraat, however they are called Mark IV tanks, but that is obviously not correct.
And check this footage! IWM A70 169-3
First shot with the Shermans was taken at the Dijkstraat where picture IWM B 10375 and the other photo were taken. Funny that none of the PzKpfw IIIs was filmed.
There are also nice shots from the PzKpfw III Ausf M of IWM B 10376 at the Dorpstraat (?). The text with the footage mentions PzKpfw III Ausf J….
LikeLike
M.Wiltink
Thanks for finding that film footage on the IWM website. The text with the footage is incorrect. It is not a PzKpfw III Ausf J in the background.
It is the same knocked out PzKpfw III Ausf F with the vorpanzer (spaced armor) plate on the front of the hull superstructure as seen in IWM B 10376. The same destroyed car around the corner of the building can be seen behind it.
IWM B 10375 is the rear of the knocked out PzKpfw III Ausf M with the Sherman passing it.
LikeLike
Thanks, for your reply.
are you sure the picture taken at the Dijkstraat 3 is the same PzKpfw III Ausf M? I think the other tank (Ausf M) is 50 meters closer to the Dyke. Also, locals refer to two tanks in the Dijkstraat.
LikeLike
Hi there! This article couldn’t be written much better! Looking at this article reminds me of my previous roommate! He always kept talking about this. I will send this article to him. Fairly certain he will have a very good read. Thanks for sharing!
LikeLike
Great article Mike…keep up the great work!
LikeLike
The number of Pz III and IV tanks in the Kompanie were the other way around – the source (reproduced on p.125 of Retake Arnhem Bridge) is from a Wehrkreis VI report on units sent to Arnhem – the unit listed 8 Pz IV, 7 Pz III, and 1 Pz II. Half the Kompanie were attached to Kampfgruppe Knaust with 2 Pz IV and 6 Pz III, and used to attack Frost’s force at Arnhem bridge.
The others I believe were probably attached to SS-Pz.Rgt.10 and sent to Nijmegen, but the Mark IV tanks were too heavy for the Pannerden ferry and probably held back with the 16 Pz IV tanks belonging to Pz.Rgt.10, but I assume the single Pz III got across, and the Pz II (Ausf.b) wreck is an well-published photo in Nijmegen, but often incorrectly captioned as belonging to the Luftwaffe’s ‘Hermann Goring’ Training Regiment. The ‘HG’ Rgt never claimed to own a Pz II.
LikeLike