Mandalay, the second largest city in Burma (today Myanmar) is located on the east bank of the Irrawaddy River. In May 1942, Japanese forces seized Mandalay against little or no resistance. In March 1945, the Allies retaking Mandalay was the largest battle fought during the 1942–1945 Burma campaign in WWII involving tanks, artillery and aircraft.

Artist: David Pentland
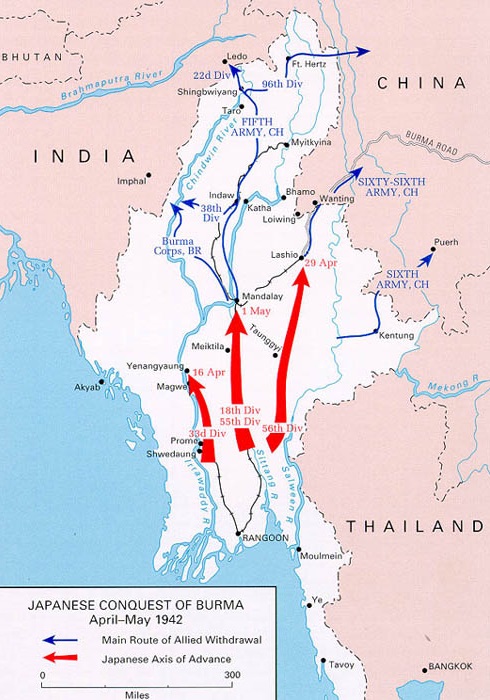
From April thru May 1942, the remaining British forces retreated north toward Mandalay, slowing down the advancing Japanese forces where they could. Supplies became a critical issue after the fall of Rangoon and losing its port facilities. An additional regiment was assigned as reinforcements to the Japanese 33rd Division bringing it up to full strength. Soon after, two additional infantry divisions, the 18th and 56th, arrived in theater, further bolstering Japanese strength. The Japanese reinforcements arriving in the area were undetected by Allied intelligence. The Japanese troops advanced north in three separate columns, one through the Irrawaddy Valley, another along the Rangoon-Mandalay Road in the Sittang Valley in the center, and the third from Taunggyi in the east towards Lashio. Chinese troops attempted to delay Japanese advances but failed; most of them fell back across the Chinese border almost immediately.
On 1 May 1942, Japanese forces seized the city of Mandalay, and many facilities including hospitals, schools, markets, residential wards, pagodas and temples, railway stations and power plants were reduced to ash. Japanese forces then marched into towns in northern Burma. The Japanese occupied Mandalay from May 1942 to March 1945.
Film: Japanese troops and tanks advance to Mandalay, Burma, WWII
On 26 May 1942, the British forces successfully retreated across the Indian border. Along the way, they destroyed precious oil fields so that they could not be used by the Japanese. As the British crossed into India, Japanese forces captured the entire country of Burma, including the vital airfields in Myitkyina near the Chinese border.
1945
The 19th Indian Infantry Division was assigned the task of attacking the city of Mandalay from the north. Supported by the tanks, the division advanced from the Indian border to the Irrawaddy River, arriving at the river to the north of Mandalay in early January 1945. The division had slipped units across narrow stretches of the Irrawaddy at Thabeikkyin on January 14th and at Kyaukmyaung 20 miles (32 km) south and 40 miles (64 km) north of Mandalay the next day. They endured heavy fighting for several weeks against attempts of the reinforced Japanese 15th Infantry Division to counterattack their bridgeheads. The crossings downstream, where the river was much wider, required more preparation. The assault boats, ferries and other equipment for the task were in short supply in British 14th Army, and much of its equipment was worn out, having already seen service in other theaters. Having been caught off balance, the Japanese quickly recovered and attempted to eliminate the initial foothold. Heavy fighting took place along the east bank of the river to the end of February.

19th Indian Infantry Division “Dagger Division”
(Order of Battle 1 March 1945)

62nd Indian Infantry Brigade:
- 2nd Battalion, Welch Regiment
- 3rd Battalion, 6th Rajputana Rifles
- 4th Battalion, 6th Gurkha Rifles
64th Indian Infantry Brigade:
- 2nd Battalion, Worcestershire Regiment
- 5th Battalion, 10th Baluch Regiment
- 1st Battalion, 6th Gurkha Rifles
98th Indian Infantry Brigade:
- 2nd Battalion, Royal Berkshire Regiment
- 8th Battalion, 12th Frontier Force Regiment (F.F.R.)
- 4th Battalion, 4th Gurkha Rifles
Divisional Troops:
- 7th Indian Light Cavalry (attached) M3 Stuart Light Tanks
- 1st Battalion, Assam Regiment (attached)
- 1st Battalion, 15th Punjab Regiment (Divisional reconnaissance regiment)
- MG Battalion, 11th Sikh Regiment (Divisional Machine Gun Battalion)
- 134th Medium Regiment (East Anglian), Royal Artillery
- 4th Field Regiment, Royal Indian Artillery
- 5th Field Regiment, Indian Artillery
- 115th (North Midland) Field Regiment, Royal Artillery
- 20th Mountain Regiment, Indian Artillery
- 33rd Anti-tank Regiment, Royal Artillery (mixed AT and light AAA batteries)
- Queen Victoria’s Own Madras Sappers & Miners, Indian Engineers
- 64th Field Company, Indian Engineers
- 65th Field Company, Indian Engineers
- 327th Field Park Company, Indian Engineers
- Royal Bombay Sappers and Miners, Indian Engineers
- 29th Field Company, Indian Engineers
- 9th Bridging Platoon, Indian Engineers
150th Regiment
The 150th Regiment began as the 10th Battalion, The York and Lancaster Regiment, which began forming at Pontefract on 23 June 1940. In July 1941, the infantry battalions of the brigade were informed that they were to convert to a new role, as tank regiments of the Royal Armoured Corps (R.A.C.). The 10th Battalion and the two other battalions moved to Cheltenham in August where the 10th Battalion became the 150th Regiment, R.A.C. As the establishment of a tank battalion was much smaller than that of an infantry battalion, some 300 officers and men were transferred to other units. On 26 August 1941, the Regiment, together with the 146th and 149th Regiments, R.A.C., embarked at Liverpool for India. After a voyage lasting more than three months, the men disembarked at Bombay in early December. The 150th Regiment went to Dhond (Daund), near Poona (Pune) where it formed part of the new 50th Indian Tank Brigade. It was expected that this formation would be trained in mobile, desert warfare for service in the Middle East or North Africa. There was little equipment and few vehicles available. The regiment received only a handful of British Valentine tanks. It seemed that it would be a long time before the regiment would see any combat.
The outbreak of the war with Japan put to rest all notions of combat in the desert. The 50th Indian Tank Brigade moved to Ranchi in July 1942 but the 150th Regiment instead joined the 19th Indian Infantry Division in the Madras area where it remained for nine months. During the winter of 1943-1944, the Valentine tanks which had equipped the regiment began to be replaced by US M3 Lee medium tanks, but the new tanks arrived at a slow pace. The arrival of the Lee tanks forced a reorganization due to the difference in tank crew size between the Valentine (4) and the Lee (7). It became necessary to augment the crews with men from other units: R.E.M.E. artificers, gunners and signalers from the British 2nd Infantry Division. During this time, the regiment carried out intensive jungle training with the 2nd Infantry Division.
When the Japanese offensive began in March 1944, the 150th Regiment was still in the midst of reorganization. Only C Squadron had been completely equipped with Lee tanks and was undergoing jungle training 170 miles (273.6 km) away near Belgaum, India. The squadron was called upon for an urgent dispatch to Dimapur, India (north of Imphal) to support British and Indian troops fighting to oppose a Japanese offensive and later was involved in the fighting at Imphal.
By the end of September 1944, the 150th Regiment had been completely equipped with Lee tanks and was then ordered to Burma. It arrived at Imphal at around 15 October 1944 and joined the 254th Indian Tank Brigade. This brigade was assigned to the 33rd Indian Corps for the advance into Burma but did not at first join the Corps in its drive to the Irrawaddy River. The 150th Regiment moved in stages beginning shortly after Christmas Day 1944. It caught up with the 19th Indian Infantry Division towards the end of January 1945.
Markings and Colors
Markings were minimal, and limited to a couple of roughly painted white stars, tactical markings on the turret, and a tank name. In 1943, British tanks used in Burma were painted Middle Bronze Green (a.k.a. “Khaki Green No.3”). The 150th RAC used the letters X, Y and Z to identify its squadrons, rather than the usual A, B and C. Period photos of the British tanks in Burma are often very indistinct where the tanks themselves were coated in dust, mud and stowage, often made it difficult to make out the Allied Stars and formation/tactical signs.
Arm of Service (AOS) and Tactical Markings

M3 Lee Tank
Although considered obsolete in 1945, the M3 Lee tanks were effective with the Commonwealth forces fighting in Burma. Extra armored plates, sand bags and track links were mounted on the hull to protect against Japanese lunge mines and anti-tank guns. During the fighting in Mandalay, one Lee tank was hit no fewer than 13 times from a Japanese 37mm anti-tank gun and it still remained in action. Note that most of the Lees in Burma had the long barrel 75mm M3 cannon. Most of them were modified by the removal of the .30 cal commander’s cupola which were replaced by the same split hatch that was used on the Grant tank. British style smoke grenade launchers were mounted on the turret. Screens or sandbags were added over the engine deck to protect it against Japanese anti-tank mines. Unhitching logs and other exterior stowage was also common.
This is most of the crew of a Lee tank in Ywathitgyi (west of Mandalay on the north bank of the Irrawaddy River) in February 1945. This photo shows the details of the smoke grenade launchers mounted on the side of the turret.

Soldiers of the 6th Gurkha Rifles are ready to go into action at Singu in the Irrawaddy bridgehead with a M3A1 Stuart tank of the 7th Light Cavalry in support, February 1945. The number 37 within the circle tactical sign is probably the vehicle’s number in the regiment.

M3 Lee tanks carrying infantry advancing along a dusty road towards a village near Madaya, 12 miles (19.3 km) north of Mandalay. Lengths of tank tracks are draped on the front hull for additional armor protection. Note the shovel laying across the tracks on the front hull.

This is my close up of IWM HU 87180.
Entering Mandalay
The Japanese plan of defense was for the 15th Infantry Division to hold the city. The main defense line was the double canal line north of Mandalay Hill stretching from the river on the west to the Mandalay Canal in the east, fields north of the canal were flooded to form a tank obstacle. Defense in depth was provided by Mandalay Hill, the Pagoda fields and Fort Dufferin, all of which were considered tank proof. Strong defended areas in buildings were formed to cover the gates of the fort.
On March 5th, the 19th Indian Infantry Division gave orders for the formation of a mobile detachment to be known as ‘Stiletto’ Column or ‘Stiletto’ Force. A Stiletto is a knife or dagger with a long slender blade and needle-like point, primarily intended as a stabbing weapon. The column’s mission was to make a lightning fast thrust to the south, along the mud flats of the Irrawaddy River, to the west of the dusty main route which followed the axis of the railway line leading to Mandalay, by passing or rolling over the Japanese defenders before they could organize a proper defense.
The Stiletto column was composed as follows:
- 1st Battalion, 15th Punjab Regiment, mounted in lorries.
- C Squadron, 7th Light Cavalry, minus one troop, with M3 Stuart tanks.
- No. 3 Troop, C Squadron, 150th Regiment, R.A.C., with M3 Lee tanks.
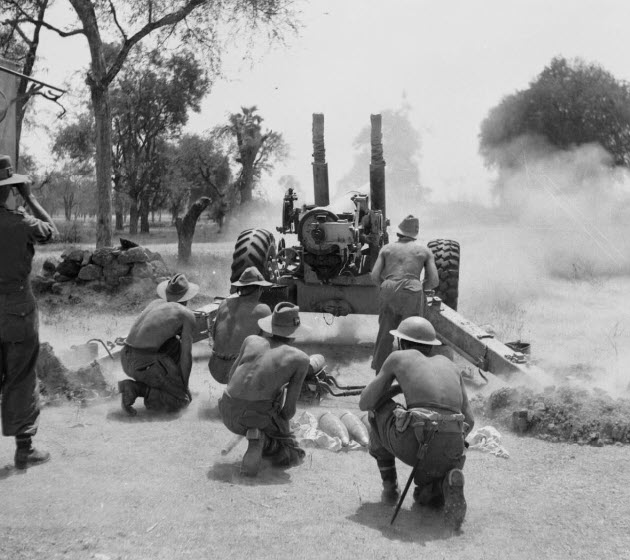
- 240th Field Battery, 115th (North Midland) Field Regiment, R.A., with 25-pounder field guns.
- G Troop, 275th Battery, 33rd Anti-Tank Regiment, R.A., with 6-pounder AT guns and 3-inch mortars.
- D Company, Machine Gun Battalion, 11th Sikh Regiment.
- Two sections, 64th Field Company, Indian Engineers.
At 06:15 on March 8th, A Company, 1st Battalion, 15th Punjab Regiment, accompanied by tanks, entered the northern outskirts of the city at Obo village, the first Allied troops to enter Mandalay since it fell to the Japanese in 1942.
Mandalay Hill
Mandalay Hill is 934 feet (300 m) high which is located northeast of the city center of Mandalay. The city took its name from the hill. The hill is known for its abundance of pagodas and monasteries, and has been a major pilgrimage site for Burmese Buddhists for nearly two centuries. At the summit of the hill is the Sutaungpyei or Su Taung Pyai (literally wish-fulfilling) Pagoda. The Sutaungpyei Pagoda has a panoramic view of the Mandalay plain which stretches far to the horizon. Since 1942, well supplied Japanese troops garrisoned the hill which was honeycombed with machine guns, anti-tank guns and field guns. The Allies regarded the hill as a shrine and instructions were given not to use artillery unless absolutely necessary.
It was thought that Stiletto Force would accomplish it objectives as it was reported that Mandalay was defended by maybe as few as 200 Japanese without artillery but that expectation was soon proven incorrect. The Japanese were taken completely by surprise at first and small parties of the enemy were seen moving around in all directions. The infantry and the tanks attacked, inflicting many enemy casualties, and later 23 Japanese bodies were counted. A Company and the tanks then continued probing eastwards towards the north end of Mandalay Hill. B Company was then pushed forward to Obo Railway Station, followed by the remainder of the column. As elements of the column continued to seek out the Japanese defenses, two of the Lee tanks were damaged by enemy gun fire. Although disabled, the tanks returned fire and claimed to have knocked out three enemy guns, including a 105mm gun which was subsequently captured. Some groups of Japanese then attempted to move in from the east but were dealt with by the infantry and the supporting tanks.
Troops of the 19th Indian Division advance east towards Japanese positions on Mandalay Hill overlooking the city.

On the morning of 9th March, the 4th Battalion, 4th Gurkha Rifles seized the northern and the higher of the two peaks on Mandalay Hill. By that time the Japanese had recovered from their shock and were ready to counter attack. The Gurkhas on Mandalay Hill were supported by M3 Lee tanks of the 150th Regiment, R.A.C., firing from the road along the foot of the hill, fought off two counter attacks during the day. They encountered fierce resistance as they mopped up snipers hiding among the trees, rocks, deep caves and bunkers on the hillsides.
It was then decided to occupy a small hill feature, referred to as the “Pimple”, on the north west end of Mandalay Hill. A platoon from C Company, 1st Battalion, 15th Punjab Regiment, set off at 1415 hours with support from the medium machine guns of the 11th Sikhs, two M3 Stuart tanks of the 7th Light Cavalry and a Lee medium tank which had just arrived. The Punjabis occupied the feature by 1530 hours, against little opposition and with no casualties. The enemy were found to be dug in on the reverse slope of the feature and were dealt with by grenades, later 12 enemy dead were counted. B Company then came up to relieve the platoon and was established by 1600 hours, despite coming under fire from the higher slopes of Mandalay Hill. From this, it became obvious that the Japanese occupied the hill in force. During the afternoon, the area occupied by the Tactical Headquarters of Stiletto Force to the west of Obo came under heavy Japanese shelling and one of Lee tanks damaged earlier and evacuated for repairs, was hit again and burnt out.
Lee tanks of No. 4 Troop was supporting the Indian infantry unit who mounted an attack in the Shwegyin area (immediate north of Mandalay Hill) with two infantry companies. During the attack, one of the Lees, commanded by Sergeant Shaw, was hit by a Japanese 47mm AT gun but it did not received any serious damage. Sergeant Shaw spotted the enemy gun flash and quickly put it out of action with high explosive shells from his 37mm gun. The enemy gun was found abandoned the next day.
The 4/4 Gurkhas had taken the summit of Mandalay Hill, but in the subterranean chambers bored in the hill Japanese defenders survived and came out to snipe at the attackers who were waiting for them to emerge, thumbs ready to press the triggers of their machine guns. It was the combat engineers who solved the problem, and in a gruesome matter. Under the surface of the hill, with its temples dedicated to an ideal of tranquility and non-violence, they burst open the concrete casings with explosives, poured petrol through the gaps and then fired flare guns into them. Anti-tank weapons were used to blow down steel doors, through which petrol drums were rolled and exploded with grenades. This ghastly inferno was the key to victory and Mandalay Hill was cleared by March 12th.
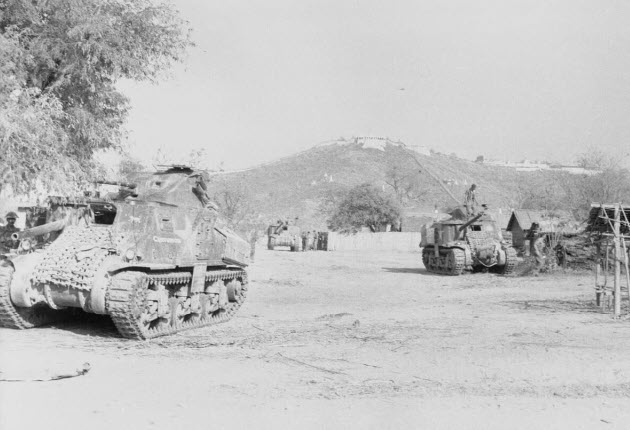
M3 Lee tanks taking a rest break before advancing forward in Mandalay, March 9-10. In the background is Mandalay Hill.
Troops, probably from the 8th Battalion, 12th Frontier Force Regiment, supported by an M3 Lee of C Squadron, 150th Regiment, R.A.C., advance cautiously into the outskirts of Mandalay, March 9-10.

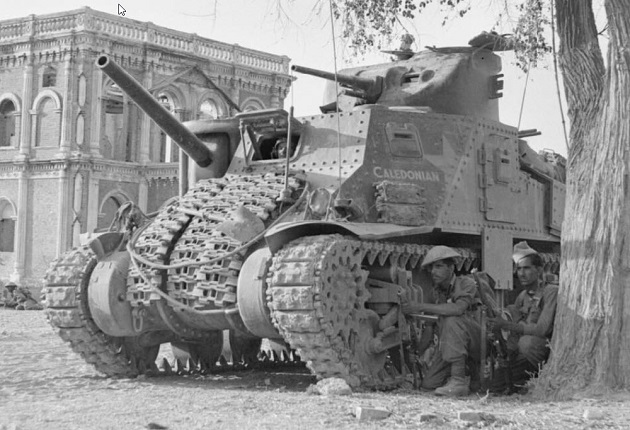
A M3 Lee tank named “Caledonian” of C Squadron, 150th Regiment, R.A.C., supporting infantry of the 19th Indian Division in Mandalay, March 9-10. This tank is equipped with British WE210 rubber double-I tracks, the same used on the British M3 Grant tanks. The lengths of tracks draped on the front hull appear to be British Valentine tank tracks. Note the shovel laying across the tracks.
A M3 Lee tank named “Cossack” of C Squadron, 150th Regiment R.A.C., leading a column of tanks and troops of the 19th Indian Division advancing towards Fort Dufferin on March 10th.

This M3 Lee provides a good view of the additional armor on the rear side hull. The armor appears to be the engine deck from a M3 Stuart light tank. The armored plate mounted below the hull side hatch probably prevents exiting crewmen becoming entangled in the track while the tank is moving. On the rear of the turret, the circle tactical sign can be seen.

This is the right side of a M3 Lee with a lot of stowage on the engine deck. It appears that the smoke grenade launchers are only mounted on left side of the turret.
Fort Dufferin
The Mandalay Palace was constructed as part of King Mindon’s founding of Mandalay in February 1857. Large parts of the palace were reconstructed from the palace at Amarapura, which was relocated to Mandalay. The plan called for a 144-square block grid patterned city, anchored by a 16 square block royal palace compound at the center by Mandalay Hill. The 413-hectare (1020.5 Acres) royal palace compound was surrounded by four long thick walls and a moat 64 m (210 ft) wide, 4.5 m (15 ft) deep. Along the wall were bastions with gold-tipped spires at intervals of 169 m (555 ft). The walls had three gates on each side, twelve in total, each presenting a zodiac sign. The citadel had five bridges which cross the moat.
In June 1857, the construction of the palace began. After the disastrous Second Anglo-Burmese War of 1852, the shrunken Burmese kingdom had few resources to build a new palace. The former royal palace of Amarapura was dismantled and moved by elephants to the new location at the foot of Mandalay Hill. The construction of the palace compound was officially completed on 23 May 1859. During the Third Anglo-Burmese War (7–29 November 1885), the British captured and occupied the palace, ransacking it before burning down the royal library. The British renamed the palace compound Fort Dufferin and it was used to billet troops. It was named after Lord Dufferin (21 June 1826 to 12 February 1902) who was at the time the Governor-General and Viceroy of India. The Royal Mint, located a few hundred meters to the northeast of the mausoleums, was where the first Burmese coin was minted in 1865. After the British annexation, the British used the mint as a bakery, still making “dough”.
During the Japanese occupation (1942-45), the Japanese used the palace citadel as a supply depot.
The blue lines mark the moat around Fort Dufferin. To the west of the city is the Irrawaddy River.

While the fighting for Mandalay Hill was taking place, the 8th/12th Frontier Force Regiment advanced southwards until it reached the northern wall of Fort Dufferin. It had been hoped to catch the Japanese by surprise and take one of the entrances of the fort before a defense could been organized. However, as the 8th/12th F.F.R. approached the north wall, it found the moat full of water, the two bridges wired but not mined and the immensely thick walls of the fort were undamaged by the bombing. All attempts to approach the moat in daylight was met by hail of enemy small arms fire. It was decided to wait for more forces to arrive before making any more attempts.
On March 10th, the 8th/12th F.F.R. had made a plan to attack the fort across the bridge at the North Gate. The assault would begin with a bombardment by 5.5-inch medium guns, firing at the walls of the fort. The intention was to create four breaches on the west side of the gate and to its right from the viewpoint of the attacking troops. Following the breaching of the wall, there would be an artillery barrage on the area just inside the fort wall. Smoke would also be laid down to conceal the attacking troops as they approached, crossed the bridge and entered the fort through the breaches. A second company was then to pass through the first company and secure a firm box inside the fort. If the plan succeeded, the remaining two companies would follow through. D and C Companies were selected to lead the attack. The tank support was provided by the M3 Lees of No.1 Troop from C Squadron, 150th Regiment, R.A.C., under the command of Lieutenant Sharp, and a half squadron from C Squadron, 7th Light Cavalry, consisting of Numbers 1 and 3 Troops under the command of Captain Moody. Timed to coincide with this attack so as to minimize enemy interference on the left flank, to the east, other units of the 98th Indian Infantry Brigade were to attack Mandalay Hill and down to the cemetery area to the west of the hill.
At 1345 hours, the attack began with an intense artillery concentration laid down all around the fort gate and mortars began to lay smoke on the flanks as planned. Three minutes before the assault, D Company moved up to begin the attack. C Company then moved up on their left (to the east). Two troops of tanks had been allocated to give covering fire and these also moved up. As the attack moved in, tank 1A of No. 1 Troop, 150th Regiment, R.A.C. was pushed out to the right, along the east-west road running to the north of the moat, with the intention of obtaining an angle from which it could fire into the gate and along the walls from that flank. At that time the ‘pya-that’ above the North Gate was on fire. The Stuarts of No. 1 Troop, 7th Light Cavalry moved forward to protect the left flank. The Japanese now opened up with machine gun fire from the area of the bridge and from the fort walls. D and C Companies were pinned down by this fire, but some of D Company managed to get onto the bridge and started to remove the wire. Some of the enemy fire appeared to be coming from positions previously unidentified. The Lee tanks fired at the fort walls with their 75mm guns and machine guns in an attempt to suppress the Japanese fire to no avail.
A British 5.5-inch (139.7 mm) medium gun of the 498th Battery, 134th Medium Regiment, firing over open sights at point blank range against the north wall of Fort Dufferin on March 10th.
The wooden structure or ‘pyathat’ above the North Gate of Fort Dufferin is on fire. Pyathat is the name of a multi-staged roof, with an odd number of tiers (from three to seven) which is common incorporated into Burmese Buddhist and royal architecture. The fort’s wall can be seen on the right side of the photo.

All efforts were directed at breaking into Fort Dufferin and eliminating every Japanese soldier within. The fort was defended by the Japanese 60th Regiment of the 15th Infantry Division. Heavy artillery and aerial bombardment had surprisingly little effect on the walls. The Allied Air Forces also made attempts to skip bomb 2000 lb (907 kg) bombs across the moat onto the fort walls. Although the 23 foot (7.0 m) high fort wall was breached on March 9th, the Japanese defenders repulsed the first infantry assault, as were the repeated assaults over successive days, despite further bombardment by artillery and aircraft.
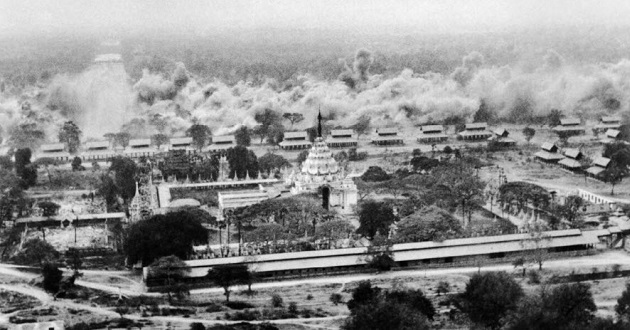
An aerial view of Fort Dufferin under an Allied aerial bombing attack in March 1945.
Aerial reconnaissance photo taken of Fort Dufferin on March 15th. Note the strip of ground between the moat and the walls of the fort. It is suggested that some Japanese troops occupied positions along this strip of land as well as behind the battlements up on the walls. Note also the earth rampart behind the walls inside the fort. The rampart would had strengthened the walls, making them more resistant to artillery fire and skip bombing.

On March 18th, unknown to the Allies, the commander of Japanese 15th Infantry Division received orders to abandon the city of Mandalay as all his escape routes were rapidly closing. The British and Indian divisions had crossed the Irrawaddy River further south and had captured Meiktila, severing communications and supply lines between Rangoon and Mandalay. During the night of March 19/20, the Japanese withdrew from the fort through the sewers almost unscathed, except for the loss of a lot of transport which was intercepted by 4th Brigade of the British 2nd Infantry Division. Two days later, the bulk of the garrison was caught and roughly handled, 400 KIA, 10 guns and over 30 trucks carrying stores were captured.
Most of the structures in Fort Dufferin were destroyed by allied shelling and aerial bombing, only the royal mint and the watch tower survived.
Once Mandalay was secured, the 19th Indian Infantry Division was released to reinforce the British forces fighting around Meiktila, south of Mandalay. Rangoon (today Yangon), 392 miles (631 km) south of Mandalay, was the next and the last objective in Burma.
Film: Mandalay Liberated – 1945
Troops hitch a ride on an M3 Lee tank as it drives into the recently liberated Fort Dufferin. The two holes in the front hull are for mounting two US .30-06 Browning M1919A4 machine guns, fixed in traverse but adjustable in elevation, they were controlled by the driver. The guns were removed to provide more interior space and the holes were either plated over or covered by stowage.

Reuben Saidman/Popperfoto via Getty Images
A M3A1 Stuart tank of the 7th Light Cavalry passes a destroyed jeep on the outskirts of Mandalay shortly after the fall of Fort Dufferin on March 19th. Note that two crewmen are wearing turbans.

This my close up of IWM SE 3453.
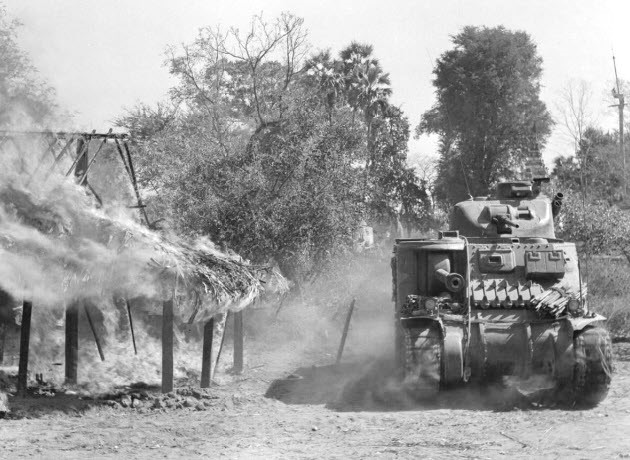
A Lee tank supporting infantry during the advance south from Mandalay on March 20th. The tank is about to demolish the abandoned hut.

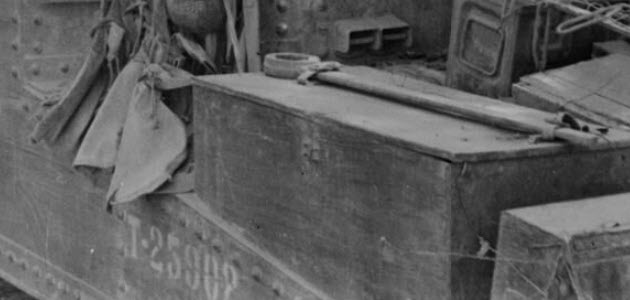
This is my close up of the rear of the Lee tank above. The census number “T25602” is clearly visible on the rear hull. Note the ammo can mounted on the rear of the turret.
This is another rear view of Lee tank “T25602” with infantry advancing beside it on March 20th.

This is my close up of the rear of Lee tank “T25602”. This shows the side details of the ammo can on the turret rear. There is also a telephone box mounted on the rear hull plate which allows the infantry to communicate with the tank crew. The rear engine deck appears to be covered with barb wire where the intention was to make it more difficult for Japanese infantry to climb on board.

This is a front view of the Lee tank “T25602” advancing south from Mandalay on March 20th. It has the short barrel 75mm M2 cannon with a counterweight at the end of the barrel to balance the gun for operation with the gyro-stabilizer. In the background is a burning building. Note the tree behind the rear hull of the tank.

This is the front view of Lee tank “T25602” passing a burning building in a Burmese village south of Mandalay on March 20th. The right side of the turret does not have the smoke grenade launchers mounted. Note behind the tank is the same tree in the above photo.
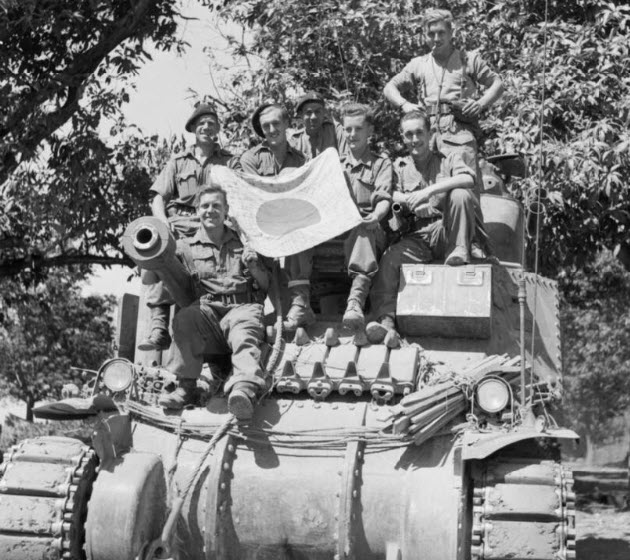
The whole crew (7) of Lee tank “T25602” pose with a captured Japanese flag south of Mandalay on March 20th.
Two Lee tanks during the advance south from Mandalay on March 20th. The Lee tank in the background turning to the right is Lee tank “T25602” with the ammo box on the rear of the turret and the telephone box on the rear hull. In the foreground is a M3A4 or M3A5 late production Lee which has the hull side hatches eliminated. The number 14 on the turret is probably the vehicle number. Note the cable draped around the turret.

This is my close up of the rear hull side of the M3A4/M3A5 Lee in the above photo. The census number appears to be “T-25902”.
Film: British Advance On Mandalay (1945)
Film: Burma / Myanmar Mandalay Captured Fort Dufferin Siege and Fall March 1945
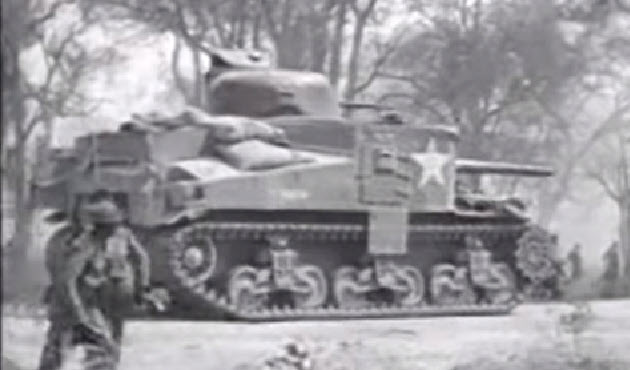
Film: MANDALAY – NO SOUND (Note the M3 Lees in the background.)
Post War
One of the halls of the original palace was dismantled during the rein of King Thibaw (1 October 1878 to 30 November 1885) and rebuilt as the Shwenandaw Monastery located near Mandalay Hill. It is the single remaining major structure built from the original palace which survived WWII intact and is still standing today.
When the British ransacked the Mandalay palace in 1885, the royal regalia of Burma were removed as spoils of war and displayed in the South Kensington Museum (today the Victoria And Albert Museum in London). In 1964, they were returned as a gesture of goodwill to the Burma government which at the time was a military dictatorship under the Burma Socialist Programme Party (BSPP).
Reconstruction of the palace began in 1989. While the overall design was faithful, the reconstruction process incorporated both traditional and modern building techniques. Corrugated sheet metal was used for the roofing of most buildings, while concrete was extensively used as a building material. The original palace was built using only teak.
Today
Today, the current Mandalay Palace is a primary symbol of Mandalay and a major tourist destination. Except its very core center, Fort Dufferin still serves as a camp for the current military and living quarters of their families. The old British barracks are still in use.
This is a view at the southeast corner of the fortress facing west. On the left under the large trees, is a section of the moat. In the center is a path that runs between the moat around the massive fort walls. There are two men walking along the path and beside the wall to the right of them is a modern day pole with lights. The two men and the pole provides us the scale of the fort walls.

There are a couple of rusting relics still standing in a War memorial today, just north of the current palace in Fort Dufferin.
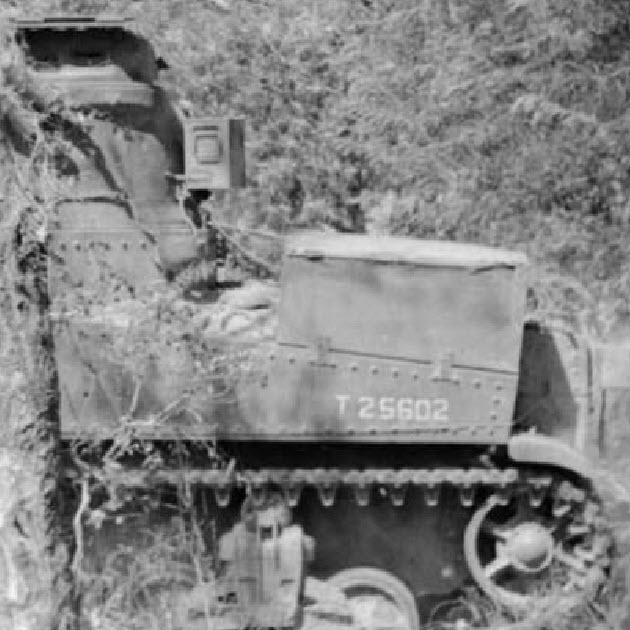
This is a T-16 Universal Carrier parked on a stand to the left of a gun pit. From 25 March 1943 until 1945, the Ford Motor Company (FMC) Sommerville plant near Boston, Massachusetts, produced a total of 13,893 T-16s. Sunlight appears to be hitting the side armor of the carrier and trees are casting shadows on it.
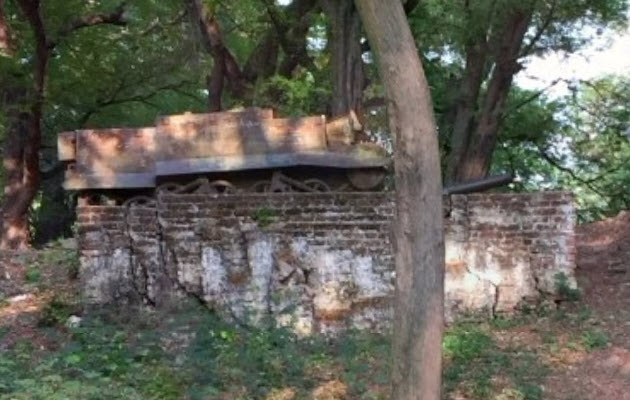
This is the rear of the carrier pictured above. The T-16 had a controlled differential steering system, a Ford Mercury engine, a different bogie system (4 road wheels where the British carriers had 3), a longer, redesigned and simplified welded hull structure, and refinement of the tracks and suspension. They were supplied thru Lend Lease to the British and other commonwealth countries. To the right of it is the gun pit with an old cannon.

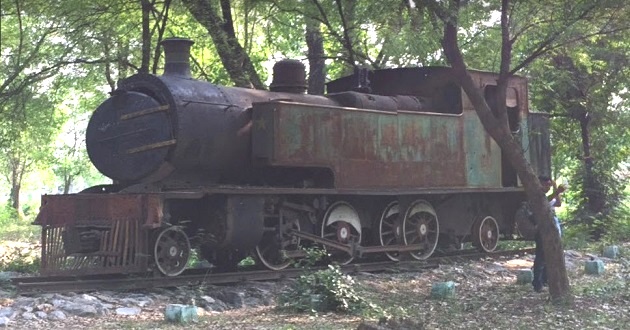
There is also this rusting old steam locomotive. It might have been damaged during the Allied shelling/bombing in 1945. Sometime since the war, the railroad tracks were removed leaving only just the rails beneath this locomotive sitting isolated among the trees. I am not a train guy and cannot identify the year, make or model of this locomotive.
Model Kits and Decals
1/35:
Academy 13206 US Medium Tank M3 Lee – 2006
Tamiya 35039 U.S. Medium Tank M3 Lee Mk I – 2013
Takom 2085 US Medium Tank M3 Lee – 2017
Takom 2089 Mid M3 Lee US Medium Tank – 2018
MiniArt 35206 M3 Lee Early Production (Interior Kit) – 2019
MasterClub MTL35078 Tracks for Valentine/Bishop Detail Set – 2016
MR Modellbau MR-35595 Burma Lee Detail set – 2017
Chino Model CM-056 WE210 Workable Track Link Detail Set – 2022
Star Decals 35-C1120 Lee in Burma Decalset – 2017
Echelon Fine Details ALT352006 Lee/Grant in Burma/North Africa WWII
1/48:
Kengi Models M3 Lee resin conversion set (Require Tamiya M4 Sherman kit)
1/72:
Hasegawa 31104 Medium Tank M3 Lee Mk.I U.S.Army – 1991
Mirage Hobby 728002 “Lee” MK I Medium Tank – 2010
Master GM-72-014 M3 Lee – 75mm M3 L/40 and 37mm M6 gun barrels

