
The Battle of Kasserine Pass was a series of battles that took place in February 1943 around and in Kasserine Pass, a 2 mile (3.2 km) wide gap in the Grand Dorsal chain of the Atlas Mountains in west central Tunisia. The inexperienced US forces took heavy losses which made these engagements the last Axis victories in the North African campaign. As a result of the battles, the US Army instituted changes in unit organizations and replaced commanders and some types of equipment.

Artist: Michael Welply, 6 Avenue Nationale, 18340 Levet, France
Osprey Publishing Limited
The US forces in Tunisia at the time was the US II Corps commanded by Major General Lloyd Ralston Fredendall.
US II Corps:
1st Infantry Division (16th, 18th, 26th Infantry Regiments)
34th Infantry Division (133rd, 135th, 168th Infantry Regiments)
701st Tank Destroyer Battalion
805th Tank Destroyer Battalion
894th Tank Destroyer Battalion
1st Armored Division (Major General Orlando Ward)
1st Armored Regiment (3 Battalions)
13th Armored Regiment (3 Battalions)
US 1st Armored Division Company Markings
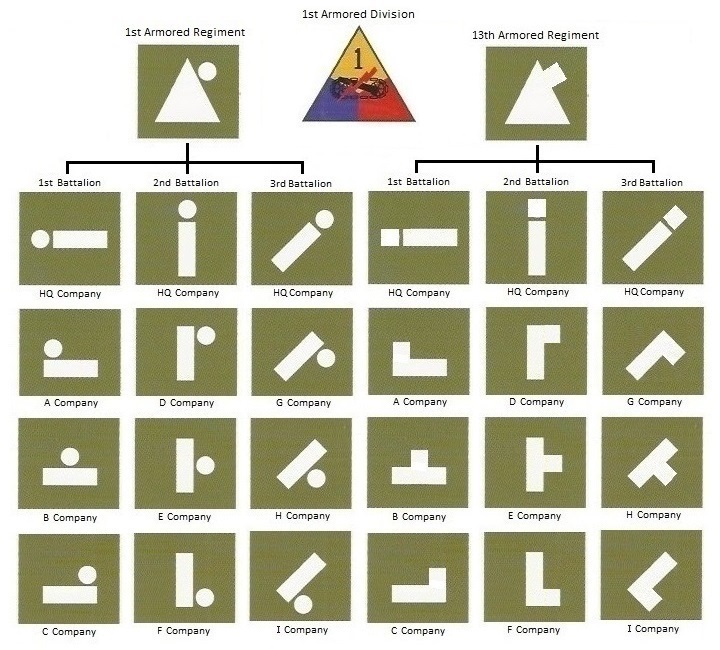
Battalions:
1st: Light tank battalions (M3 Stuart tanks)
2nd and 3rd: Medium tank battalions (M4 Sherman or M3 Lee tanks)
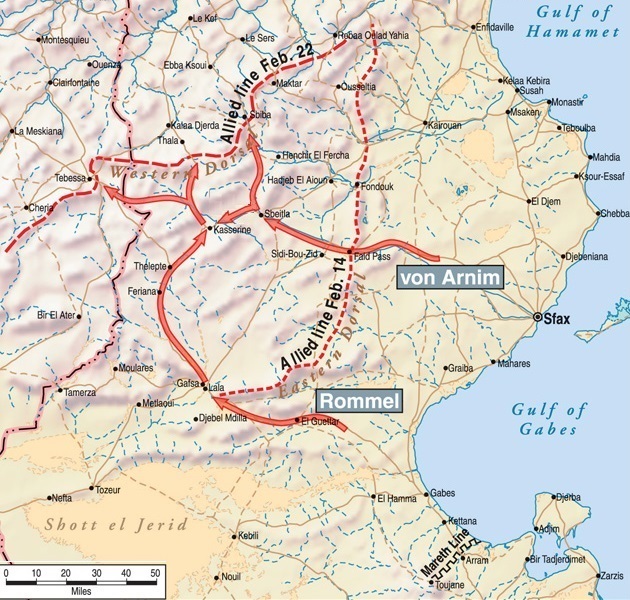
Southern Tunisia
In early 1943, the Tunisian front was divided into three areas: the rugged north was manned by British forces with some US Infantry units; the hilly center with the French 19e Corps supported by US troops; and the more open south where the US 1st Armored Division held the line and ultimately would use their positions to attack due east when fair weather was expected to set in. South of Gabès was the Mareth Line, 80 miles (130 km) inside Tunisia and south of it Montgomery’s Eighth Army was preparing for their spring offensive.
Just before dawn on January 30, French units guarding the mountain passes near Faïd came under attack by a combined Italian-German force based around elements of the veteran 21. Panzer-Division. Although the French were able to inflict significant casualities among the Axis infantry, they were severely pressured by German armor since they only had a single platoon of WWI era Renault FT-17 light tanks. For about a week, the French commander had been requesting reinforcements from the US II Corps commander, General Fredendall and finally appealed in person to Colonel Raymond McQuillian, the 1st Armored Division’s Combat Command A (CCA) commander whose HQ was located at Sidi Bou Zid. Colonel McQuillian turned to II Corps for instructions who then passed the French request onto the British 1st Army HQ and it was not until 0900 hours that an order was received to provide armor support to the French. The complex Allied chain of command proved disastrous later on against an enemy that reacts as conditions dictated and expects local commanders to act on their own imitative. By 1200 hours, the reconnaissance elements of CCA reported that the Germans were indeed attacking in strength and two armor forces were formed around the 3rd Battalion, 1st Armored Regiment, 701st Tank Destroyer Battalion and the 26th Infantry Regiment and were sent to the passes at Faïd and Rebaou. Both counter-attacks were unsuccessful and another attempt on February 1 was also a failure. While these actions were taking place, CCC (Combat Command C) had seen some action in a limited operation to capture the town of Sened in preparation for a major operation aimed at Maknassy. The results of these early small scale engagements convinced the Axis High Command that the inexperienced US forces would be ineffective in any future fighting. This gave the Axis the opportunity of attacking the weaker US forces in the south to counter the real threat posed by the British units in the north around Tunis.
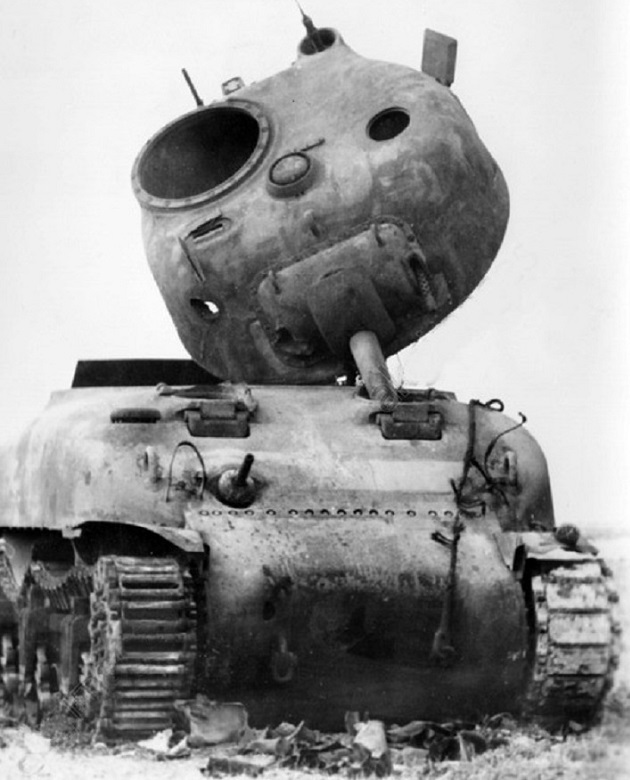
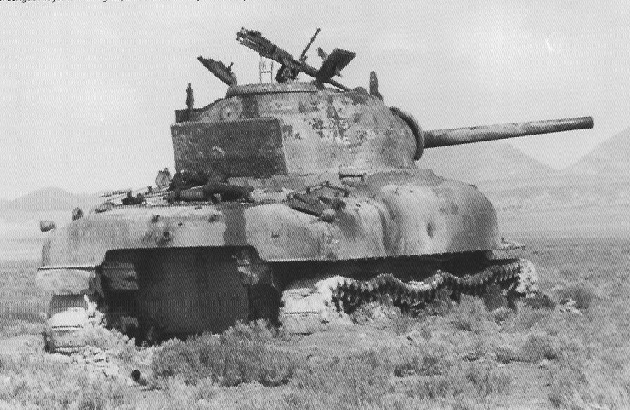
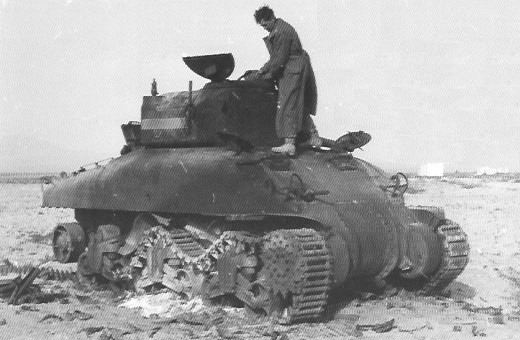
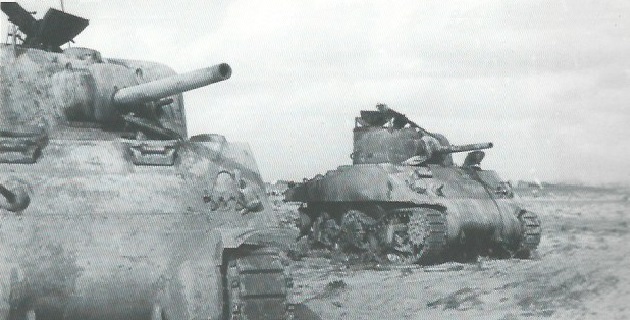
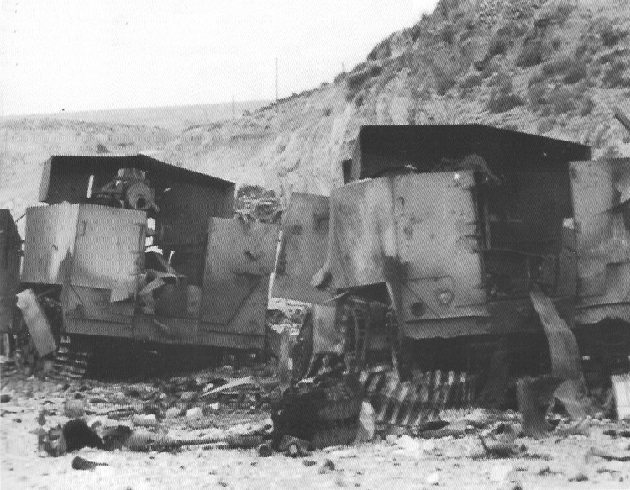
On January 31, the inexperienced Companies G and H of 3rd battalion, 1st Armored regiment suffered a number of losses during one of the counter-attacks. The US attacking force advanced into a concealed enemy anti-tank trap and 8 M4/M4A1 Shermans were destroyed. This Pressed Steel Car July 1942 production M4A1 of Company H, 3rd Battalion, 1st Armored Regiment with registration number 3014998 and named “HONKY TONK” was one of the tanks lost on January 31.
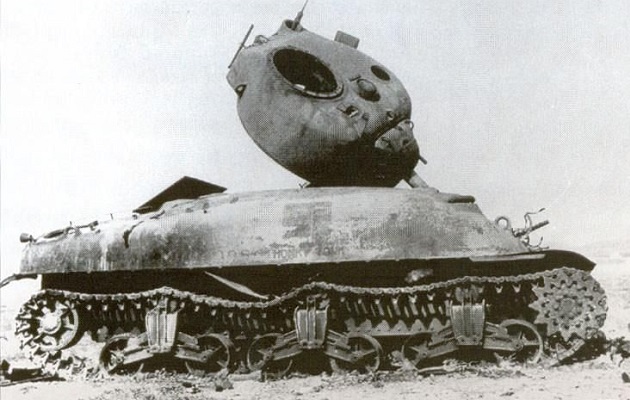
The force of the explosion blew the turret straight up into the air and it came straight down thrusting the gun barrel through the driver’s hatch resulting in the turret being precariously perched in mid-air. Note the direct vision ports and the M3 style bogies however this M4A1 had the later one-piece cast transmission housing.
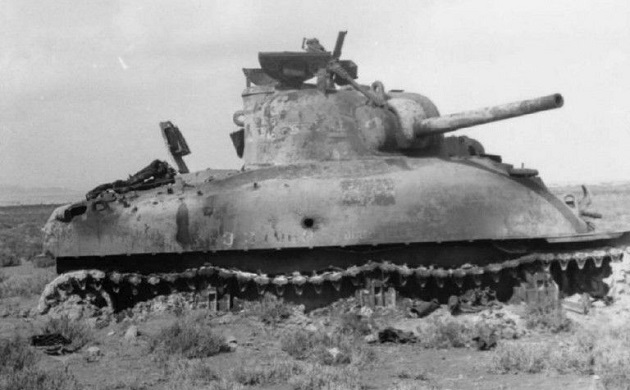
This M4A1 with registration number 3014969, named “DIXIE BELLE” belonging to Company H was also one of the tanks lost on January 31. It is seen here sunk up to its belly while maneuvering in wet marshy terrain where it was knocked out.
This side view of “DIXIE BELLE” shows the German shell penetration on the side hull. The small tabs under the sponson are an early version of the sand shield fittings. On later Sherman models, a simple metal strip was used instead.
This is the front view of “DIXIE BELLE.”

Sidi Bou Zid
Two fortified positions, Djebel Lesssouda to the north and Djebel Ksaira to the southeast, were supposed to protect Sidi Bou Zid from attack. The CCA defenses on Djebel Lesssouda was under the command of General Patton’s son-in-law Lieutenant Colonel John Waters which consisted of the 2/168th Infantry Regiment, US 34th Infantry Division supported by Company G, 3/1st Armored Regiment and a platoon of 701st tank destroyers. On Djebel Ksaira, there was a similar force consisting of the 3/168th Infantry Regiment commanded by Colonel Thomas Drake. The two hills were too far apart to provide mutual support and they were no match for the overwhelming enemy force bearing down on them. In Sidi bou Zid, Lieutenant Colonel Louis I. Hightower had Companies H and I, 1st Armored Regiment and a number of vehicles from the 701st Tank Destroryer Battalion ready for action. It was expected that the two hilltop garrisons would been able hold off any attack long enough for Hightower’s tanks to launch a counter-attack.
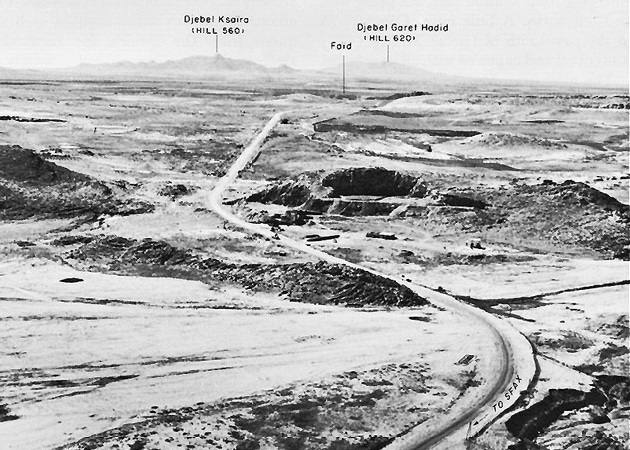
This is the German view looking southwest from Faïd Pass. In the background, the village of Faïd, Djebel Ksaira and Djebel Garet Hadid can be seen. Djebel in Arabic-speaking countries refers to a mountain: often used as part of a place name to indicate that the place is situated on or near a mountain.
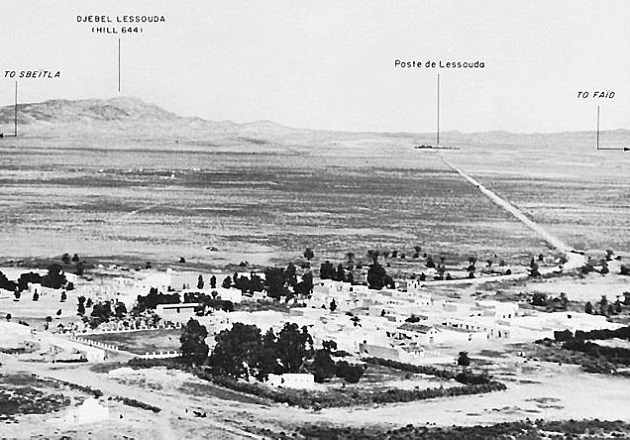
In this view, Sidi bou Zid is in the foreground and behind it is the road heading northeast to Poste de Lessouda on Highway 13.
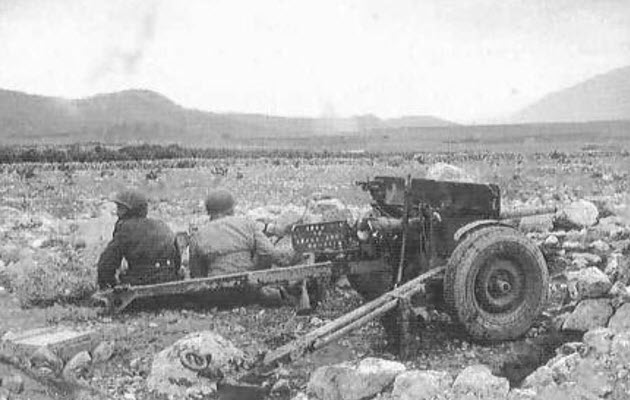
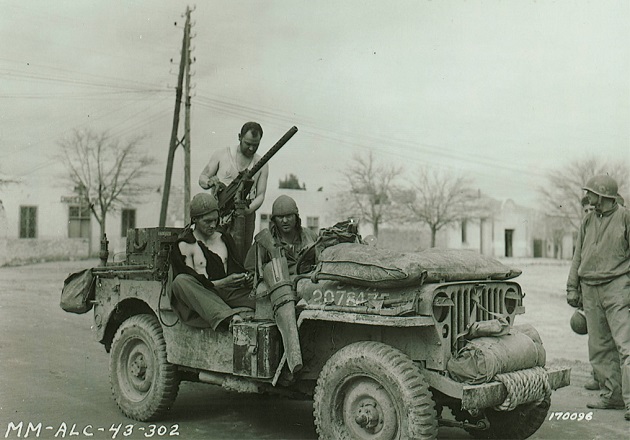
A US infantry anti-tank squad sitting by their M3 37mm anti-tank gun.
General Hans-Jürgen von Arnim launched Operation Frühlingswind (Spring Wind) in the early morning hours of February 14. The assault consisted of a two-pronged enveloping attack on Sidi bou Zid. Cloaked by a blinding sandstorm, the 10. Panzer-Division debouched from Faïd Pass, about 10 miles (16 km) east of Sidi bou Zid and swung around Djebel Lesssouda to the northwest before veering south towards Sidi bou Zid. Meanwhile, the 21. Panzer-Division emerged from the south through the Maizila Pass.
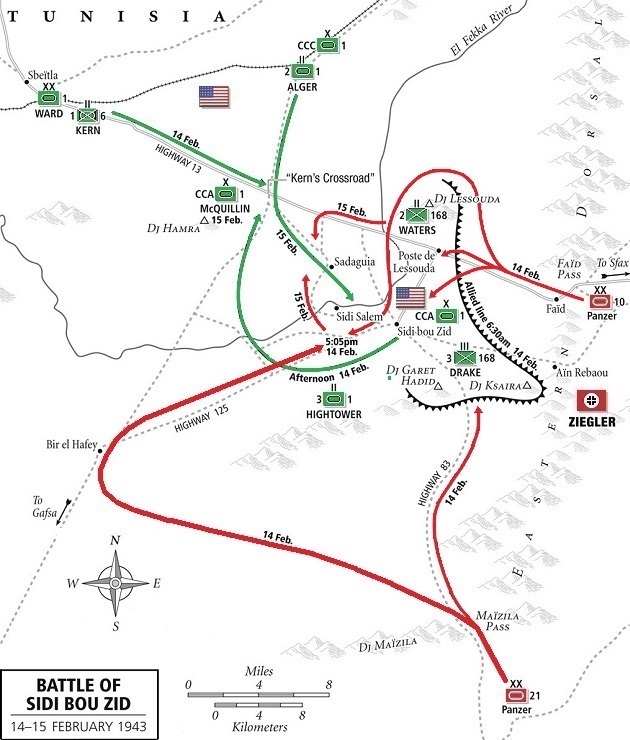
By dawn it was clear to the US forces that a major attack was underway and shortly afterwards the Luftwaffe mounted a devastating air attack on Sidi bou Zid. Roughly about the same time, HighTower’s force moved out of Sidi bou Zid and almost immediately came under accurate fire from German 88mm anti-tank guns positioned along the south base of Djebel Lesssouda and from Tiger Is advancing behind the main German units. The US armor attempted an orderly withdraw but were constantly harrassed by German panzers and anti-tank guns. The remaining troops atop of Djebel Lesssouda including Company G, 3/1st Armored Regiment were totally cut off and were unable to affect the course of the battle. They were utterly ignored by the 10. Panzer-Division panzers milling about below them. The garrison on Djebel Lesssouda was only spared due to the sandstorm had been more intense in their area.
By midday, German panzers were threatening CCA’s HQ in Sidi bou Zid, firing directly into the town. Shortly after 1200 hours, the command post was evacuated with Colonel McQuillian being one of the last to leave. Meanwhile Hightower’s group was reduced to a handful of Shermans and by the end of the day had lost 37 of the 44 tanks which left Sidi bou Zid early that morning. Hightower’s own tank was destroyed but he and his crew survived. They walked from the battlefield to the division HQ at Sbeitla. The two German attack forces made contact at 1705 hours west of Sidi bou Zid and were able to consolidate their positions. Rommel insisted that they press on through the night but General von Arnim and the local commanders refused. Despite Rommel’s frustration, the operation had so far been executed as the Axis High Command had expected. The German had wasted no time in preparing for a possible US counter-attack and the best part of two panzer divisions were dug in around Sidi bou Zid by nightfall.
Although the US units substained heavy losses during the day, the British 1st Army HQ and the US 1st Armored Division commanders believed that this was only a diversionary attack and that McQuillian and Hightower had vastly overestimated the German’s strength. Major General Ward did request that CCC (Combat Command C) under Colonel Paul Robinett to be returned to his division. But to his dismay, only Lieutenant Colonel James D. Alger’s 2nd Battalion, 1st Armored Regiment was released and arrived at 1st Armored Division HQ at Sbeitla late on February 14.
This M4A1 of 3/1st Armored Regiment was disabled on February 14. The heavy overcoats worn by the two Germans indicate that the North African nights were fairly cold compared to the hot days.

The fact that this M4A1 is still burning together with the jubilant expression displayed by the German tanker on the far left would indicate that this photograph was taken shortly after the engagement had ended.
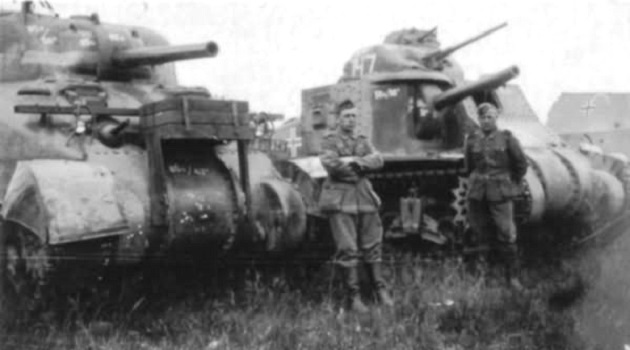
This Pressed Steel Car built M4A1 of Company I, 3/1st Armored Regiment is being inspected by curious German soldiers. Note the absence of the tail light bush guards and the rails on the rear engine deck which seem to have been common features of the regiment’s Shermans at the time. The name “JOYCE” is clearly visible on the barrel of the 75mm gun and the name “HANG ON II” was on the hull side.

This platoon of M4A1 tanks of Hightower’s 3/1st Armored Regiment were knocked out on the road to Djebel Lessouda by the 10. Panzer-Division. Sidi Bou Zid and Djebel Ksaira can be seen in the background.
This surviving M4A1 tank from Company G, 3/1st Armored Regiment is towing a disabled M2 half-track car after an ill-fated attempt to prevent the encirclement of the 3/168th Infantry Regiment on Djebel Lessouda which is in the background. All sources incorrectly state the half-track in this photo is a M3 but the mine rack on the side only runs half the length of the hull at the rear. Between the driver’s door and the mine rack is the exterior hatch for the storage compartment directly behind the driver’s seat.
Believing that the German armor numbered not more than 60 panzers between Djebel Lesssouda and Djebel Ksaira, Major General Ward ordered an attack for the next morning to be made by a hastily assembled force which would be led by Alger’s 2/1st Armored Regiment followed by two batteries of self-propelled guns (SPs) and the 1/6th Armored Infantry Regiment. A company of M3 75mm GMC (Gun Motor Carriage) half-tracks from the 701st Tank Destroyer Battalion would protect the flanks. Sometime after midnight on February 15, Colonel Robert I. Stack arrived from Division HQ to take command of what was then referred to as CCC (Combat Command C) and the attack was scheduled to begin at 1200 hours.
Reconnaissance units were sent out but they were only able to report on details of the fighting around Djebel Lesssouda and neither Stack nor Alger had any idea of the German’s strength or disposition. No one in CCC had been able to study a terrain map of the area although Colonel Peter C. Hains, CO of the 1st Armored Regiment, was able to brief Alger and his officers on the nature of the ground they were expected to advance across. Alger, Stack and Hains were able to view the area from a hilltop 13 miles (20.9 km) west of Sidi Bou Zid. They noted the locations of deep gullies and ravines which they supposed would be ideal positions for their anti-tank guns but unknown to them the Germans had already emplaced their guns covering that whole area.
At noon as the lead tanks began to move out, their assembly area came under attack by Stukas dive-bombers which did almost no damage but were able to report CCC’s exact strength and position to General Heinz Ziegler, acting commander of the 5th Panzer Army. A truck radio near Hains’ command post blared out “The Stars and Stripes Forever” as the tanks, half-tracks, and self-propelled artillery headed towards Sidi Bou Zid.
Alger’s 2/1st Armored Regiment tank attack towards Sidi Bou Zid was a case study of a military failure. Alger’s Battalion simply headed forward blindly in a cavalry charge intending to engage the Germans somewhere near Sidi Bou Zid. The 2/1st Armored Regiment had never seen combat and like the rest of the 1st Armored Division had not received tank-vs-tank tactical training at the Desert Training Center in the Mojave Desert due to the rush to deploy to North Africa. The German tactic was to make slow panzer movements in the desert to minimize the amount of dust and sand kicked up but Alger’s battalion charged towards the German positions at moderate speed. The only thing missing was a bugle call for the charge. The large clouds of dust and sand kicked up made the US tanks clearly visible to the German anti-tank gunners while at the same time blinded the US tankers from seeing enemy threats around them. The US tanks attacked in a “V” formation in alphabetical order: Company D on the left, Company E in the center, and Company F on the right. The Germans moved two panzer abteilungs (battalions) against both sides of Alger’s charging battalion and the trapped US tanks were blasted from three sides. The outlying US tanks companies did spot the German outflanking maneuvers but by the time they recognized the threats, the lead tanks were already in range of the concealed German anti-tank guns. Alger’s battalion claimed to have knocked out 19 panzers. Only 4 of the US tanks survived, they were the lucky ones that were able to retreat back to Kern’s Crossroads with the survivors of 1/6th Armored Infantry Regiment.
After the battle, the Germans were elated as they searched the wadis and villages for survivors. Experienced panzer crews who had fought in Russia and the Western Desert were heard to exclaim that they had seen nothing like it before. After the war, Alger compared the action that day to the ill-advised Charge of the Light Brigade at Balaclava on 25 October 1854 but a more appropriate comparison would have been General Custer’s Last Stand at the battle of Little Bighorn, 25–26 June 1876.
An interesting side note, Colonel Hains stated that after Sidi Bou Zid a total of 36 British M4A2 Sherman III tanks were acquired from the British to replace their losses. The colonel was just as impressed with the diesel engine shermans as the British were. Sergeant Lasley of Company G commented that the M4A2 was “a swell tank.”
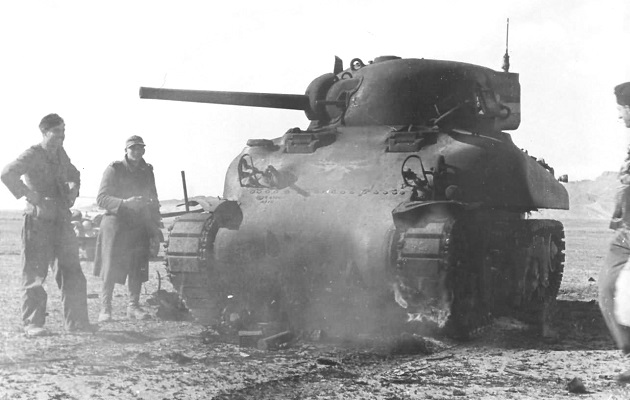
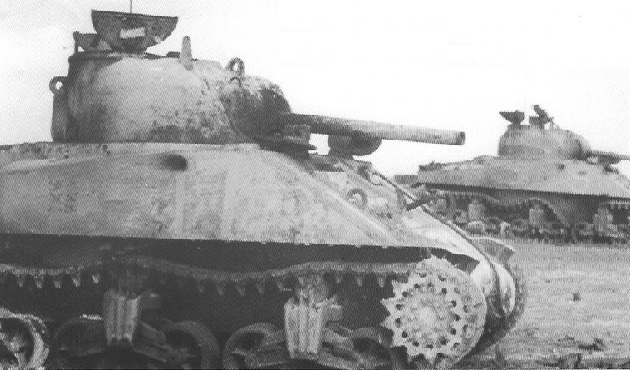
All M4 tanks fighting in Tunisia in February 1943 were built by the Pressed Steel Car Company. Production of the welded M4 hull by other manufacturers did not began until early 1943 too late for any of their tanks to arrive in time to participate in the battles. This early M4 tank with direct vision ports and early M3 bogies had a large yellow number 3 painted on the hull sides. A small black number 3 is also painted on the turret star.

This is the front view of M4 tank number 3. The tactical marking on the turret denotes that this tank belonged to Company F, 2nd Battalion, 1st Armored regiment. The 709 foundry mark on the turret star indicates that it is the 709th turret cast by the manufacturer. Note the enemy shell gouge on the turret side.

This August 1942 production Pressed Steel Car M4 with registration number 3015037 and named “BIGGIN” is probably the most spectacular wreck photographed. It was almost certainly destroyed by demolition charges set by the crew to prevent it from being captured and used by the Germans. With the hull sides blown out like that, the Sherman appeared to had wings.
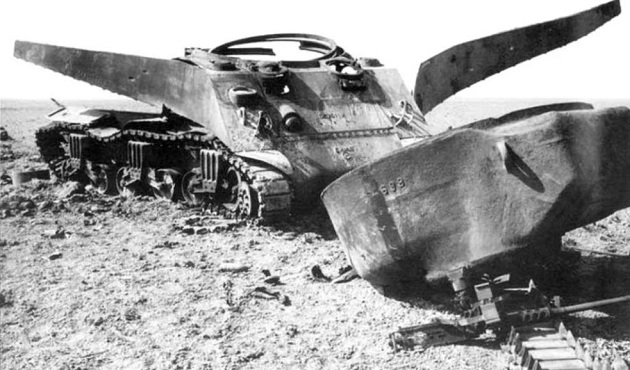
This is another view of “BIGGIN” from a different angle. The casting markings on the glacis and transmission housing can clearly be seen. This photo also has a clear view of the inner face of the tracks and the track teeth.

This Lima built M4A1 had a welded lower hull and also fitted with tail light bush guards and the rounded, fabricated grouser box vent covers. It has received many hits from German anti-tank guns and quite a few failed to penetrate the turret and the hull.

This is a close up of the M4A1 above. A small black number 2 is painted within the turret yellow star and what may have been a name has been painted over on the hull side. Two or three shell penetrations had caused the vertical rip in the hull side.
These are two M4 Shermans from Company F, 2nd Battalion, 1st Armored Regiment were knocked out on February 15. The M4 on the left is tank number 4 and named “HANG ON”. This should not be confused with M4A1 “HANG ON II” above and some sources identifies “HANG ON” as being a M4A1 due to the poor quality of the photograph. The tank to the right of “HANG ON” is M4 number 7 named “DOUBLE TROUBLE”. Both these tanks were knocked out by German 50mm anti-tank guns.
These two M4 Shermans of 2nd Battalion, 1st Armored Regiment most likely belonged to Company F and are marked with large yellow numbers on the hull sides. The closest M4 is number 17 while the M4 in the background is number 9.
This is a close up M4 number 9 in the photo above. The cover of the cast antenna base on the glacis (used on command tanks with additional radios) has been lifted by the force of an internal explosion. The US Army initially preferred hull mounted command radios but later adopted the British practice of installing them in the turret.
M4 number 16 of the 2nd battalion, 1st Armored Regiment was knocked out on February 15. Note the large shell blast pattern covering part of the large tank number on the forward side hull.

M4A1 number 3 of the 2nd battalion, 1st Armored Regiment was also knocked out on February 15. An enemy round had totally ripped off the left headlight and brush guard below the driver’s hatch. The tank has complete sand shield on the left side and the right is at least missing the front fender. Note that it has the earlier three piece transmission housing cover.

One of the few surviving tanks of 2nd battalion, 1st Armored Regiment was this M4A1, number 9 of Company E seen here after the Kasserine fighting.
Film: After the Battle of Kasserine Pass, Tunisia (1943)
This jeep reconnaissance patrol returned to the US lines on February 17 after being trapped behind German positions for three days in the Djebel Lessouda area.
Retreat to Sbeitia
During the evening of February 16, the survivors of CCA had setup defensive positions in olive groves north of Sbeitia while the newly arrived and more experienced CCB held the southern perimeter of Sbeitia. Advanced elements of Ziegler’s command probed the outer defenses with sporadic MG and artillery fire. When the CCA HQ in the olive groves came under MG fire, McQuillian ordered his staff to move to the west side of Sbeitia out of harm’s way without consideration of neighboring units. After witnessing two battalions left to their fate on Djebel Lesssouda and Djebel Ksaira and both tank counter-attacked pulverized, the remaining units of CCA were demoralized. While engineers demolished an ammunition dumps and several buildings, some units near the withdrawing CCA HQ assumed a retreat was under way and began retreating out of Sbeitia without orders. Wild rumors spread and retreating, panicked troops informed other fearful troops to follow. Fortunately, Robinett’s battle-hardened CCB and a few CCA units held their positions and kept the Germans at bay for the remainder of the night. At dawn, road bocks were setup and numerous deserters were collected on the outskirts of the town.
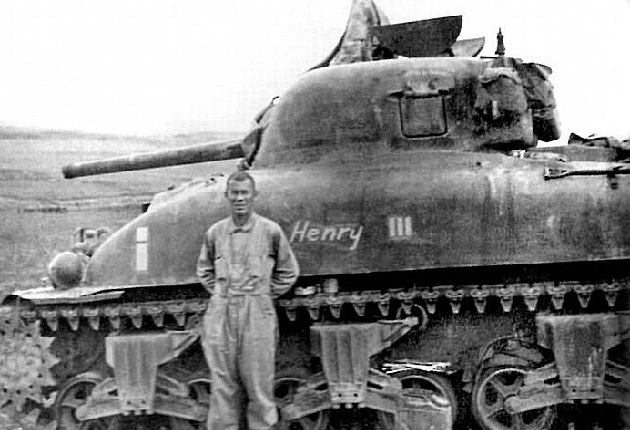
The German probes into Sbeitia began on the afternoon of February 17. Without realizing the CCA’s weak defenses, the main German push took place south of the town against the more solid defenses of Robinett’s CCB. Lieutenant Colonel Henry E. Gardiner, commander of 2/13th Armored Regiment, although at less than half strength due to continual combat since December 1942 met the initial German panzer assault with a carefully laid ambush. Gardiner’s tanks claimed 15 panzers destroyed but the Germans reported only 5 were lost. While CCB held off the German attack, CCA suffered another wave of panic and more of it units withdrew without any contact with the Germans. Robinett’s CCB remained in position until late afternoon and began withdrawing in good order before 1700 hours. CCB reached Kasserine Pass to the west shortly after nightfall.
Lieutenant Colonel Gardiner standing next to his M4A1 named “Henry III” (“Henry” was a M3 Lee which was destroyed on 2 December 1942, “Henry II” was destroyed on 17 February 1943, and “Henry III” was destroyed on 6 May 1943.) Note the marking of the HQ company, 2/13th Armored Regiment on the front hull and the later bogies.
US forces captured this Schwerer Panzerspahwagen Sd.Kfz. 233 8 Rad armed with a 75mm KwK 37 L/24 howitzer abandoned somewhere near Sbeitia. Sd.Kfz. 233s provided mobile fire support for German Reconnaissance Battalions (Aufklaerungs Abteilung or A-A) of a panzer division.

Kasserine Pass
The Allied defenses in the Western Dorsals were uneven with the strongest forces to the north near Sbiba. The US 34th Infantry Division had arrived to reinforce the French 19e Corps and the British 6th Armoured Division was moved into the area, with the 26th Armoured Brigade commanded by Brigadier Charlies Dunphie defending the key road junction at Thala.
26th Armoured Brigade, British 6th Armoured Division:
16th/5th Queen’s Royal Lancers
17th/21st Lancers
2nd Lothians and Border Horse
2nd Battalion, Grenadier Guards
Squadrons consisted of:
3 2-pdr Valentine Troops
1 6-pdr Crusader Troop
1 SHQ Troop (2 Valentines and 2 3-inch howitzer CS Crusaders)
Access to the Allied supply center at Tebessa was through several possible routes, including the mountain passes at El Ma el Abiod, Bou Chebko and Kasserine. Tebessa was shielded by the remnants of the French Constantine Division along with CCB/1st Armored Division near Bou Chebko with CCA in transit into the area. The route to Sbiba and the southern passes towards Tebessa were the best defended while the Kasserine Pass was tenuously held by a weak force.
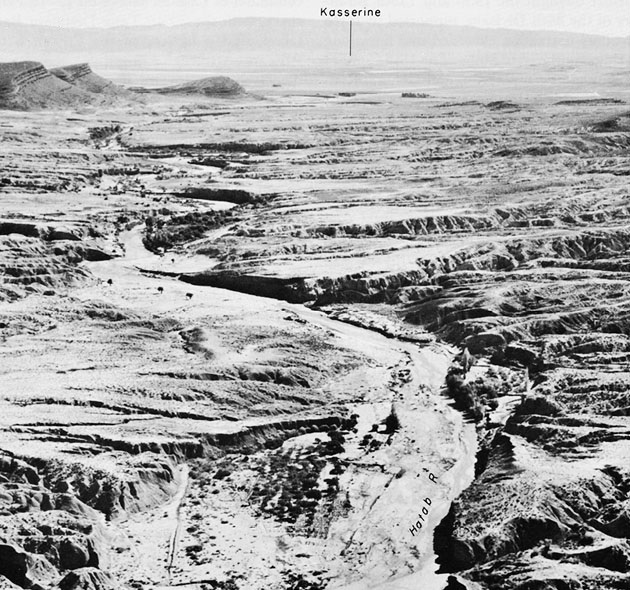
This is the view of the rugged terrain in Kasserine Pass looking southeast towards the narrowest part of the pass where the roads to Thala (to the left) and the road to Tebessa (to the right) diverge. In the foreground, the dried Hatab riverbed which snakes through the pass can be seen. At the time of the battle, the Hatab riverbed was engorged with water.
Kasserine Pass was initially defended by Colonel Anderson Moore’s US 19th Engineer Regiment. The engineers had some training as infantry but they were primarily a construction unit with no experienced infantry officers. A defensive line was setup across the narrowest part of the pass approximately 800 yards (731.52 meters) wide. It also covered the road through the pass before it splits in two, the northern spur going to Thala and the northwestern to Tebessa. The Hatab River, when in full flood, bisected the pass. The engineers received a large number of mines but they arrived so late that some of the minefields were very hasty setup with mines simply laid on the ground or lightly covered with soil with little attempt at concealment. Prior to the Axis attack, the engineers were reinforced by the US 1/26th Infantry Regiment which took over defense of the hilly northeast border of the pass on Djebel Semmama. There were three companies of engineers to the south of the river and one company to the north along with the infantry battalion in the hills. These units were supported by eight M4 Shermans of Company I, 13th Armored Regiment and M3 75mm GMCs of the 894th Tank Destroyer Battalion which were spread out in the center of the pass. Fire support came from two 105mm howitzer batteries of the US 33rd Field Artillery Battalion and a French horse-drawn 75mm battery. Due to the lack of infantry experience of the engineers, on the night of February 18, Colonel Alexander N. Stark of the 26th Infantry Regiment was placed in command of all the units and the command was named Task Force Stark.
Operation Sturmflut (storm tide)

Deutsches Afrika Korps (DAK) commanded by Oberst Karl Robert Max Bülowius
- Panzer-Division
Panzer-Regiment 8, I & II panzer abteilungs
PanzerGrenadier Regiment Afrika
Aufklärungsabteilung 33 (Reconnaissance Battalion)
- Divisione Corazzata “Centauro” (Armored Division)
31° Tank Regiment (Italian: 31° Reggimento Carri)
5° Bersaglieri Regiment
131° Artillery Regiment
132° Anti-Tank Regiment
“Lodi” Recce Battalion (AB41 Armored Cars)
Rommel decided to launch the attack with Kampfgruppe DAK since the 10. Panzer-Division was still en route. He hoped that the US defenses were so disorganized that it might be possible to overrun them. Aufklärungsabteilung 33 launched the attack around 0630 hours on February 19, attempting to move through the pass and seize the Chebko Pass outlets further down the valley. They discovered that the US defenses were already well emplaced and the concentration of US tanks, infantry and tank destroyers in the center of the pass opened fire forcing them to take cover in the foothills of Djebel Chambi on the southwest side of the pass. After the rebuff, Bülowius ordered PanzerGrenadier Regiment Afrika forward in its 40 trucks, and two abteilungs (battalions) started an attack on the opposite side of the pass against the 1/26th Infantry around 0930 hours. The US defenses were in the hills at the base of Djebel Semmama, and the German infantry was unable to seize the key US hilltop positions. Bülowius was forced to commit his main panzer support, Panzerabteilung Stotten (I. Abteilung, Panzer-Regtiment 8, 15. Panzer-Division), around 1200 hours. The DAK were unable to break through the pass on the first day of the attack, and throughout the night the fighting continued on both sides of the pass, with the Germans trying to infiltrate past the US defenses over the mountainous terrain.
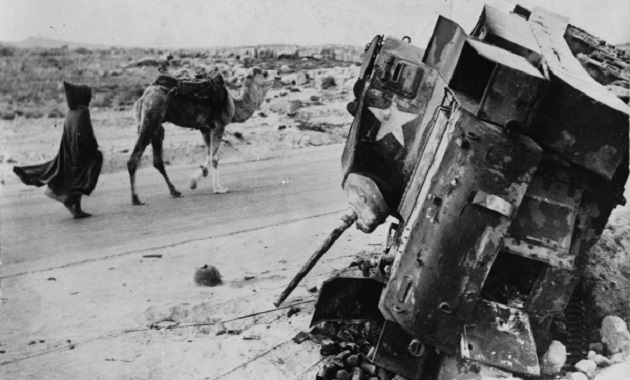
This knocked out M3A1 Stuart light tank either belonged to the divisional 81st Reconnaissance Battalion, US 1st Armored Division which had 17 or possibly one of the regimental reconnaissance companies which had 5 of them. One of the jettisonable fuel tanks is burning on the ground in the background. A grouser rack has been added to the glacis, perhaps as an attempt to increase armor protection.
This is the rear view of the same M3A1 Stuart above after the fighting ended. Note that the sand shields are still in place and the .30 Cal MG on top of the turret had been removed. On the road in the background is an Arab and a camel walking pass the tank.
The initial attack towards Sbiba by the 21. Panzer-Division had been sharply repelled suggesting that the Allied defenses along that route were already entrenched. The defensive positions of the US 18th Infantry Regiment were supported by tanks of the British 16th/5th Lancers. Attempts by Panzer-Regiment 5 to break through led to the loss of a dozen panzers, mainly due to accurate artillery fire. Rommel was unaware at the time that Allied forces around Sbiba were three times the size of the German attacking force. The 21. Panzer-Division made no significant success against Sbiba, so prospects along that route were not promising.
Brigadier Dunphie was given permission to place a blocking force along the road to Thala in case the defenses in the pass crumpled. Gore Force under Lieutenant Colonel A. Gore of the 10th Battalion, Royal Buffs consisted of 7 Valentines and 4 Crusaders tanks of C Squadron, 2nd Lothians, a company of motorized infantry and a battery of artillery. Lieutenant Colonel W. Well’s 3/6th Armored Infantry, 1st Armored Division arrived late on February 19 and Stark directed them into the hills to cover Gore Force. Throughout the day, other reinforcements trickled in to Stark including an infantry battalion from the 39th Infantry Regiment, US 9th Infantry Division and the 805th Tank Destroyer Battalion. The engineer defenses on the north side of the Hatab River had crumbled but the lines to the south of the river covering the Tebessa road continued to hold. The 894th Tank Destroyer Battalion had lost half of its M3 75mm GMCs during the day’s fighting in the pass and the two US artillery batteries pulled back without orders leaving only the French 75mm battery. Fredendell alerted Robinett’s CCB to be ready to move to block the pass behind the engineers.
The morning of February 20 was rainy and cold, and the pass was slippery with mud. Rommel visited the pass and was displeased that Bülowius had still not broken through the Allied defenses in the pass. In the early morning, the attacks resumed with heavy artillery, including the new 21cm Nebelwerfer 42 (21cm NbW 42) multiple rocket launchers which US troops nicknamed “Screaming Meemies” due to their terrifying sound. A battalion of the 5° Bersaglieri Regiment was sent to reinforce the PanzerGrenadier Regiment Afrika fighting against the 1/26th Infantry Regiment on Djebel Semmama. The 5° Bersaglieri Regiment fought valiantly but suffered heavy losses.
Film: Battle of Kasserine Pass 5TH & 7TH BERSAGLIERI REGIMENTS DEFEAT US 2ND CORPS
Rommel changed the dispositions of his attack. Due to the poor results of the 21. Panzer-Division at Sbiba, he decided to direct the 10. Panzer-Division which was still en route, through the Kasserine Pass and up the road towards Thala. The 10. Panzer-Division was not at full strength and General von Arnim refused to release its Tiger abteilung. By mid afternoon, the advance elements of the 10. Panzer-Division had arrived at Kasserine Pass, including the division’s motorcycle and PanzerGrenadier abteilungs. At 1630 hours, German artillery opened fire and a coordinated attack was launched down the middle of the pass, with infantry fighting in the hills above. The US engineer company near the road collapsed allowing the 10. Panzer-Division kampfgruppe to begin moving up the Thala road. Gore’s blocking force managed to temporarily stall the German attack, so at dusk 1./Panzer-Regiment 8 was thrown into the attack. The panzers finally overwhelmed the British tanks as well as five M3 75mm GMCs from the 805th Tank Destroyer Battalion which were reinforcing the roadblocks, and pushed a short distance up the Thala road before dark fall.
The US defenses were shattered by the late afternoon attack and Company I, 13th Armored Regiment had lost all its tanks during the fighting. The last Allied unit in the Axis path along the road to Tebessa was the French 75mm battery, and when their ammunition was depleted, the gun crews spiked their guns and retreated. Rommel exploited the weakened Allied defenses and sent a battalion from the Italian Centauro Division down the Tebessa road which reached about 5 miles (8 km) into the pass, nearing the Bou Chebko Pass exits by nightfall. The US units, Wells’ 3/6th Armored Infantry and the survivors of the 1/26th Infantry were encircled on Djebel Semmama. The 3/6th Armored Infantry had left their half-tracks at the base of the Djebel when they deployed to the heights. The Germans captured most of them intact and since the Germans were short of mechanized transport for their troops and supplies, they immediately pressed them into German service.
This captured US M3 half-track being used by the Germans still has its US registration number. The Germans probably mounted the tire on the hull side since they would not have a supply of spare US tires and they probably applied dabs of local mud to break up the solid US Olive Drab paint. Parked next to the half-track in the background is an 1941 or early 1942 Dodge WC-3 or WC-4, 1/2 ton, 4×4, open cab pickup truck. The bumper markings on the Dodge truck are not clear.
This captured US M3 half-track has the name “COMMANDO YANK” just forward the driver’s door with a hooded cartoon character below it with a star on his chest. Commando Yank was a popular cartoon hero in the 1940’s (Wow Comics #6-35.) On the bottom of the door is the name “GRENADIER”. The yellow star on the hull side has been covered with local mud. Note the Browning M1917A1 water cooled .30 Cal MG mounted on the half-track and the half-track behind it also has one mounted.
On the morning of February 20, General Robinett began to move CCB/1st Armored Division into the northern entrance of Kasserine Pass along the Tebessa road and the units began to arrive by the early afternoon. Fredendall ordered Robinett to clear the pass south of the Hatab River while Dunphie and the 26th Armoured Brigade to clear the pass north of the river. To make the situation more confusing, General Kenneth A. N. Anderson, commander of the British 1st Army, sent Brigadier General Cameron Nicholson, assistant commander of the British 6th Armoured Division, to Thala to command all US, British and French troops in the sector under his improvised “Nickforce” command.
Rommel consolidated his gains in Kasserine Pass and made certain that his units were ready for any Allied counter-attack. The Hatab River was engorged with the winter rains and US engineers had blown up the main bridge over the river. As a result, the pass was completely divided and the two kampfgruppes were separated by the river. Rommel accepted the situation and sent Bülowius’ Kampfgruppe DAK down the road to Tebessa while the 10. Panzer-Division continued along the northern route towards Thala.
The DAK advance guard, a Centauro armored battalion and Aufklärungsabteilung 33, encountered the outer defenses of CCB, Reconnaissance Company, 13th Armored Regiment on the night of February 20-21, which held them up until daylight. At 1145 hours, Rommel ordered the whole kampfgruppe into Kasserine Pass to break through the Djebel El Hamra passes to Tebessa. Robinett’s CCB deployed into the valley on the morning of February 21 with 2/13th Armored, 2/6th Armored Infantry two self-propelled artillery battalions and elements of two tank destroyer battalions. Around 1630 hours, PanzerGrenadier Regiment Afrika supported by Panzerabteilung Stotten ran into dug-in tanks of Gardiner’s 2/13th Armored Regiment and was repulsed by tank gun fire and accurate artillery concentrations.
This M4A1 of the HQ Company, 2nd Battalion, 13th Armored Regiment was commanded by Major James Simmerman, the battalion’s executive officer. The camouflage scheme may have been applied using local mud which dried to a lighter color and the contrast does not show well in this B/W photograph. The second antenna mounted on the front hull indicating a command tank. Note the company marking on the front side hull and the name “Major Jim .”

The 10. Panzer-Division attack against Dunphie’s British forces holding the outer defenses of Thala was both concentrated and successful. On February 21, about 30 panzers and 25 other armored vehicles including captured US half-tracks and scout cars began probing the outer defenses around 1200 hours, gradually overrunning an outer outpost line.
A group of knocked out M3 75mm GMC (Gun Motor Carriage) half-tracks of the 894th Tank Destroyer Battalion were photographed on the Thala road on February 21. Some sources state these vehicles were destroyed by enemy fire but unfortunately they veered off the road into an Allied minefield while withdrawing north during the previous night.
This is the rear view of the same knocked out M3 GMCs above.
Rommel and his staff officers inspecting the M3 GMCs.

The 10. Panzer-Division main attack was launched around 1500 hours. The lightly armored British Crusader and Valentine tanks were outgunned and out ranged by the German panzers and by mid-afternoon about 15 had been knocked out. By late afternoon, with the defenses on the verge of collapse, Dunphie requested a smoke barrage and began to withdraw his forces to the ridge line just south of Thala.
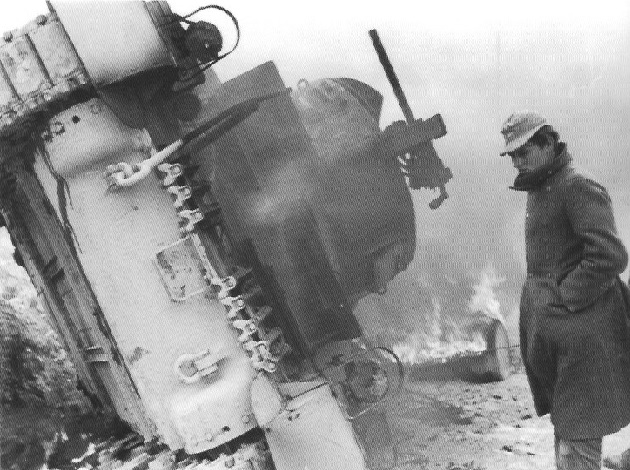
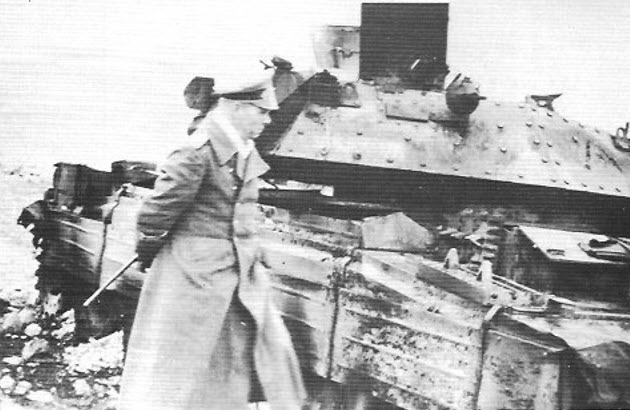
Rommel strolls pass a knocked out Crusader Mk. II CS (Close Support) on the Thala road. The Mk. II CS mounted a 3-inch (76.2 mm) howitzer in the turret.
As the British withdrew towards Thala, the Germans followed behind. Around 1900 hours, a German panzer column led by a captured Valentine tank tried to break into the 17th/21st Lancer’s leaguer area. A confused close-range melee ensued and the 10. Panzer-Division overcame the British defenders south of Thala. Dunphie’s brigade lost 38 tanks and 28 guns while the Germans took 571 prisoners. But the British had knocked out 7 panzers and their stubborn defense made the Germans wary of any attempts to push into Thala after dark.
This is the scene south of Thala after the close range night action on February 21-22.
This destroyed British Valentine V tank displays the runes of the 10. Panzer-Divison to the right of the driver’s vision port and has the buffalo emblem of Panzer-Regiment 7 stencilled on the rear of the turret. This tank may have been the “Trojan Horse” which led the night assault into the 17th/21st Lancer’s leaguer area with the turret crew sitting smoking on the outside obscuring the German markings. The Valentine V tank was the same as the Valentine III tank but had a GMC 6004 diesel engine and a US-built transmission.

Film: The 1943 Battle of Thala, Tunisia
The British delaying action allowed critical reinforcements to trickle in from all over the Tunisian front, an infantry company of the 2nd Hampshires, the 16th/5th Lancers with some new Sherman tanks and the divisional artillery of the US 9th Infantry Division which arrived after a hard 800 mile (1287 km) road march. The US artillery included two 105mm howitzer battalions, a 155mm howitzer battalion, and two cannon companies with 75mm pack howitzers which was a substantial addition to the existing 22 British 25pdr guns already defending Thala. At 0700 hours on February 22, remnants of the 2nd Lothians launched a suicidal attack against the German position south of Thala supported by the 10 remaining tanks. In bad mechanical condition, only 5 of the tanks reached the German lines around dawn and were quickly knocked out. The 10. Panzer-Division planned to launch an attack at 0700 hours, but the Lothians sacrificial attack and an artillery barrage by the reinforced Thala defenses derailed their plan. By the end of the day, the 10. Panzer-Division advance towards Thala was stalled. For the first time in days, Allied air power was able to fly over the battlefield. A newly constructed runway allowed 117 sorties to be flown, mainly by P-38 fighters which strafed exposed Axis troops.
At 1415 hours on February 22, the Axis withdraw order was issued and by the next day, most of the German and Italian units had withdrawn from the Kasserine Pass area. The Allied actions on February 23 were wary and anticipating more counter-attacks, not realizing that the Axis units had withdrawn.
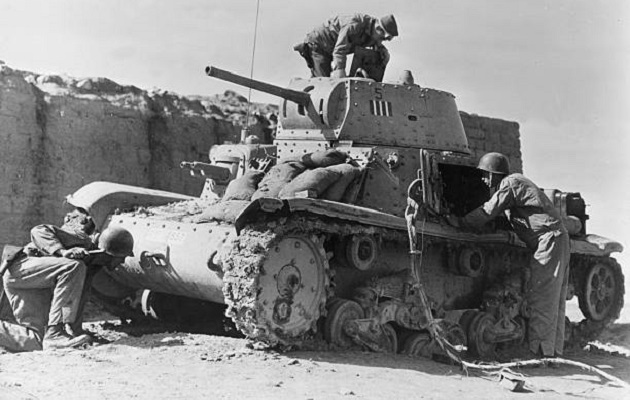
US troops examining an abandoned Fiat-Ansaldo Carro Armato M14/41 medium tank armed with a 47mm cannone da 47/32 AT gun (87 rounds). Crew: 4 (commander/gunner, radio operator/machine gunner, loader, and driver)
Italian Tactical Markings:
Rectangle background color: Red (1st Company), Sky Blue (2nd Company), Yellow (3rd Company)
Tank number: 5 in Company Color
Platoon number: 3 (3 white bars)
One of the few survivors of the destruction of Hightower’s 3/1st Armored Regiment at Sidi bou Zid is this M4A1 commanded by Captain G. W. Meade. the CO of Company I, seen here in Kasserine Pass on February 24.
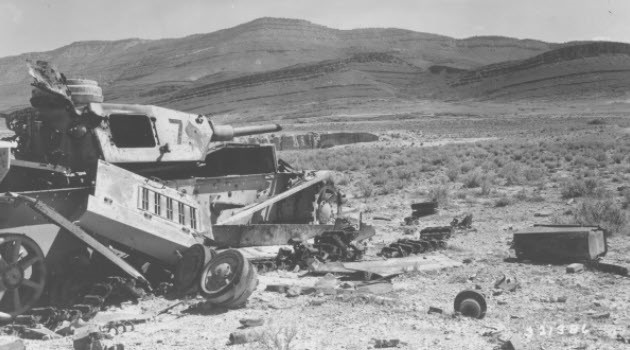
This Pz.Kpfw. IV Ausf. F2 of Panzerabteilung Stotten abandoned in Kasserine Pass was photographed on February 26. The muzzle break had been removed and the barrel appears to be jammed in full recoil. Note that a couple of road wheel assemblies are on the front hull.
This is another view of the same Pz.Kpfw. IV Ausf. F2 above. Note the same damaged road wheel and the same Jerry can is sitting on ground just to the left of the sprocket.

This is probably the same Pz.Kpfw. IV Ausf. F2 after US engineers had blown it up with demolition charges. Note the gun barrel and the number 7 with spade marking visible on the turret.
The Allied high command realized that many inexperienced officers were in command. Major General Fredendall was very inept at modern mobile warfare and his command style was that of WWI trench warfare. Instead of paying attention to what was happening on his front, Fredendall spent more time focusing on the construction of his HQ located at least 70 miles (112.7 km) from the front. Some accounts state it was 100 miles (160.9 km). A battalion of engineers blasted a series of tunnels deep in the rock face of a ravine to construct his bombproof HQ and it was ringed with anti-aircraft guns. It was named “Speedy Valley” but troops also referred to it as “Lloyd’s very last resort” or “Shangri-la, a million miles from nowhere.” Fredendall never visited the front or communicated with his subordinates, was contented on directing deployments based on his maps. He issued his orders over the radio which were a combination of slang and obscure phrases designed to baffle enemy monitors. Unfortunately, most of his subordinates were equally baffled. Fredendall was a compulsive micromanager who bypassed his unit commanders which created confusion among his front line troops. He also blamed others for his failures.
On February 20, Eisenhower ordered Major General Ernest Harmon, commander of US 2nd Armored Division, to be Fredendall’s deputy corps commander. When Harmon arrived at Speedy Valley, Fredendall handed Harmon a note authorizing him to take charge. Then he went to bed. Harmon stabilized the front, a situation aided by the fact the Axis forces were retreating which he did not know at the time. Upon returning to Eisenhower’s HQ, he informed Eisenhower that Fredendall was not a good commander and that he should be relieved. After Harmon rejected the offer of taking command, Eisenhower gave command of the demoralized US II Corps to Major General George S. Patton, Jr.
To keep the home front morale high, Fredendall returned to the USA to a hero’s welcome and was promoted to lieutenant general. He spent the rest of the war in various stateside training assignments and he retired in 1946.
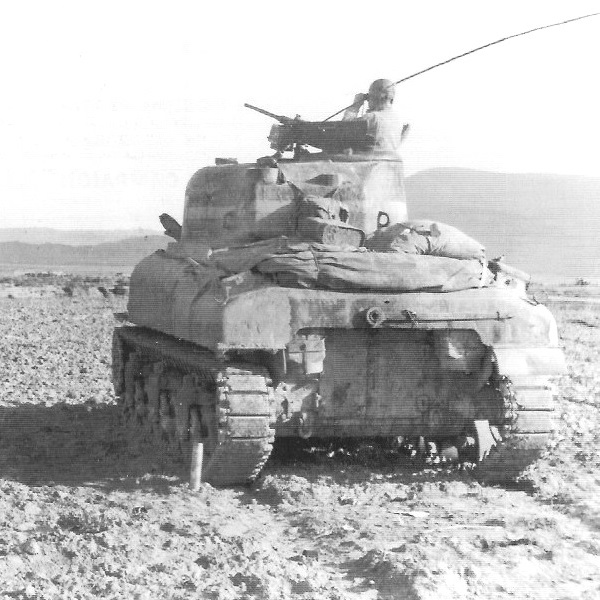
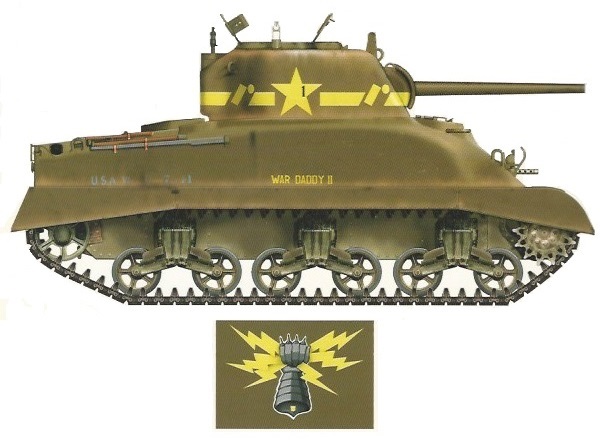
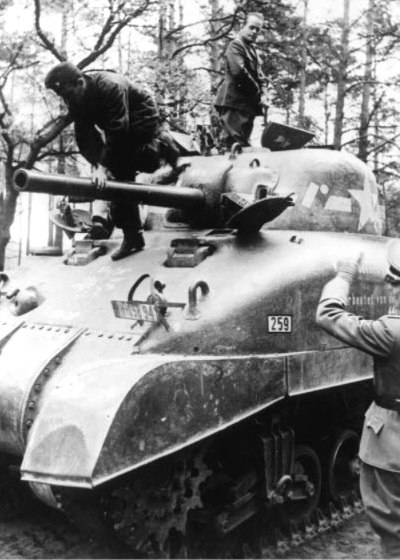
WAR DADDY II
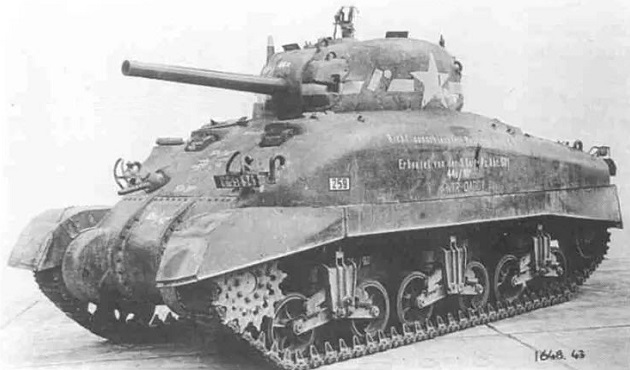
On the 22 Febuary 1943, M4A1 “War Daddy II” belonging to Company G, 3rd Battalion, 1st Armored Regiment was captured by a Spähtrupp (recon troop) of schwere Panzer-Abteilung 501 near Sbeitla. Its registration “USA 3067641” indicates its one of 134 M4A1 Shermans built by Lima Locomotive Works in July 1942.


The colorful unit insignia, a mailed fist clutching three lightning bolts, was generally thought to have been used throughout the 1st Regiment. From all the available photos, it would suggest it was used only by the 3rd Battalion. The unit insignia was painted in the center of the front hull.
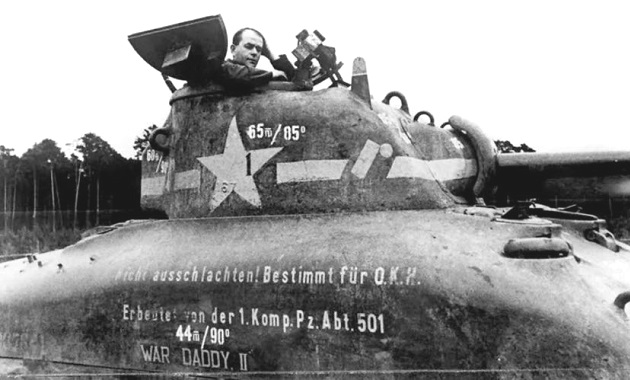
Being the first of its type to fall into Germans hands intact and operational, it was earmarked for evaluation in the Reich. The following inscription was painted on hull side of “War Daddy II”:
“Nicht ausschlachten! Bestimmt für O.K.H.
Erbeutet von der 1.Komp.Pz.Abt 501“
“Don’t disassemble! Intended for O.K.H.
Captured by the 1st Company, Pz.Abt 501”
(The Oberkommando des Heeres (OKH) was the German High Command.)
According to an article which appeared in propaganda magazine Die Wehrmacht, the tank was manned by personnel of the Spähtrupp and was driven 350 km (217.48 miles) to the port of Sfax which was a four and a half days march. From there it was shipped to the state proving ground at Kummersdorf to undergo in-depth examination. At Kummersdorf, the tank received Versuchsfahrzeug No. 259 as well as the obligatory license plate WH-05894117. The vehicle was annotated with armour thickness and the corresponding angle on all surfaces. In general, Die Wehrmacht painted a favorable picture of the new US tank and concluded: “The preliminary investigation on Tunisian soil already showed that this rolling steel mine is not in itself a bad creation.”
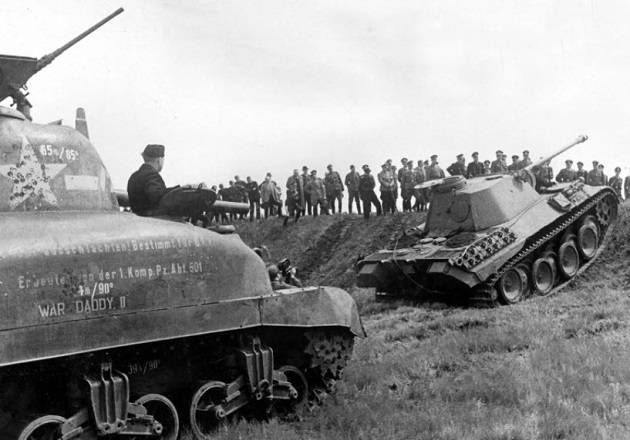
A relatively unknown armaments conference was held at the Hillersleben artillery range on 6-7 June 1943. This Rüstungstagung was presided by Reichsminister Albert Speer and attended by leaders from the armaments industry, high-ranking Nazi officials as well as senior officers. Unlike during the regular Vorführungen neuer Waffen, Hitler was not present. The programme consisted of meetings and demonstrations of the latest and greatest German as well as captured Allied equipment.
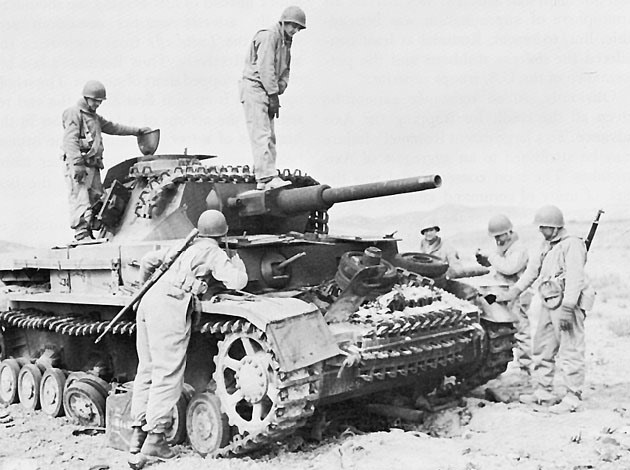
Albert Speer inspects and riding in captured M4A1 “War Daddy II” at Hillersleben.
A demonstration at Hillersleben featured “War Daddy II” driving up a slope which it was unable to climb while a very early Panther Ausf. D was able to make it. Some of the photos showing the Sherman and Panther climbing the hill were used in propaganda campaigns, praising the superiority of German tank designs. Note the bullet impacts on the turret star of “War Daddy II” which were not present earlier during Speer’s inspection of the tank.
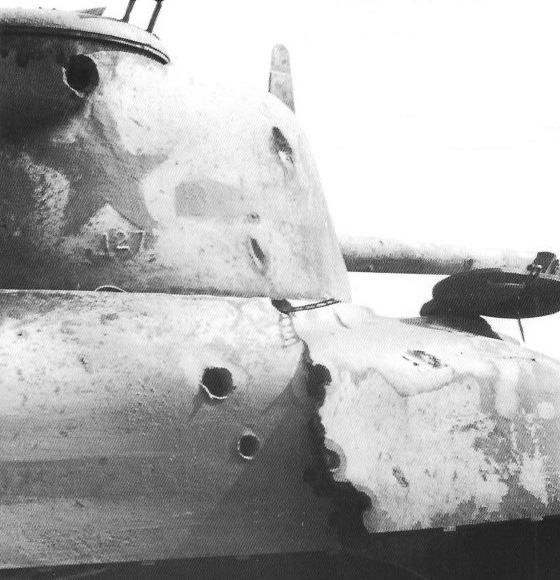
This is the front view of “War Daddy II” climbing the hill. Note the unit insignia on the center of the front hull. In the background, is a M3 Lee tank number 147 which was captured and used somewhere on the Russian front. German balkenkreuz (crosses) are painted on the front and hull side and part of number 7 can be seen on the turret side.

A large propaganda campaign was launched in late June during which the abilities of Feindpanzer (enemy tanks) were compared with those of the latest German designs. An article published in the weekly-newspaper Das Reich on 27 June 1943 was similarly positive about the Sherman. The author described it as “one of the special accomplishments of the North American laboratories” and furthermore regarded it as “quite a praiseworthy product of the North American steel industry.”
Kummersdorf is the name of an estate near Luckenwalde, around 25 km (15.5 miles) south of Berlin, in the Brandenburg region of Germany. Until 1945, Kummersdorf hosted the weapon office of the German Army which ran a development center for future weapons as well as an artillery range. It was also the location for the analyses, studies and testing of various German-captured Allied tanks and armored fighting vehicles (AFVs).
M4A1 “War Daddy II” and M3 Lee number 147 were tested by the Germans at kummersdorf. The purpose of the box mounted on the front of “War Daddy II” is unknown.
Not able to find any information indicating if M4A1 “War Daddy II” had survived the war or what happened to it. Although, some information suggests that several US built tanks were sent to Panzer Brigade 150 commanded by Otto Skorzeny and were to be used in Operation Greif during the Battle of the Bulge.
MODEL KITS AND DECALS
1/35:
ASUKA Model 35-025 US M4A1 Sherman Direct Vision Type – 2015
Tasca 35-025 U.S. Medium Tank M4A1 Sherman (Direct Vision Type) – 2011
Dragon 6329 M2A1 Half-Track (2 in 1) – 2006
Dragon 6360 Pz.Kpfw.IV Ausf.F2(G) – 2007
Dragon 6467 M3 75mm Gun Motor Carriage – 2008
Border Model BT-004 Pz.Kpfw. IV Ausf. F2 & G – 2019
Italeri 6543 Carro Armato M14/41 I Serie with Italian Infantry – 2017
Bison Decals 35217 US Armor in North Africa – part 3. M5A1 Stuart & Halftracks = 201?
Archer AR35225Y M2/M3 Halftrack yellow stars Decals – 2006
1/48:
Tamiya 32523 U.S. Medium Tank M4A1 Sherman – 2006
Wee Friends WVC48006 M4A1 Direct Vision Upper Hull
MR Models MR-48025 Sherman M4A1 early Production Conversion Kit
ToRo Models 40026 M4 SHERMAN EARLY VVSS M3 TYPE BOGIES
KENGI UNIBLOCK TRACK AND M3 BOGIES (Resin)
KENGI M3 HALF TRACK 75MM SPG (Resin Kit)
Gaso.line GAS48093K Sherman T51 Tracks Chenilles
1/72:
Extratech EXM 72035 Sherman M4 (75mm Early) U.S. Medium Tank – 2004
Wee Friends WVC72017 M4A1 Sherman Direct Vision Upper Hull – 200?
OKB Grigorov S72126 1/72 Tracks for M4 family, T51
Mirage Hobby 728002 “Lee” MK I Medium Tank (For M3 Bogies) – 2010
Italeri 7510 M3 75mm Gun Motor Carriage – 2015
Hasegawa 30046 Pz.Kpfw IV ausf.F2 & 8t Half Track & 88mm Gun FLAK 18 – 2017
Dragon 7359 Pz.Kpfw. IV Ausf. F2 (G) – 2010
Criel Model 720 Carro Armato M14/41
Peddinghaus-Decals 2998 US Panzer in Tunisien und Italien
1/87:
Peddinghaus-Decals 2999 US Panzer in Tunisien und Italien


Greetings, Mike
I just came upon your blog posts today – very well done, indeed! Of particular interest to me was the Kasserine Pass article, as a few years ago I’d put together a wargame scenario around the post-Kasserine fighting in the Bahiret Foussana valley/Djebal al Hamra. This is where, you’ll recall – while the Brits were defending Thala – a nearly division-size force under BG Robinett stopped the Axis advance on Tebessa. I’ve always regretted that this battle never received the attention it deserved. Historians ever since have been focused on the debacle at Sidi Bou Zid and Kasserine itself, quite overlooking the fact that Rommel’s thrust was stopped by hard fighting short of his objectives, and forced to withdraw. Below is the scenario blurb that was used when the game was played three or four years ago. I’ve also got rather painfully assembled orders of battle for the battle, should you be interested. Looking forward to reading more of your postings!
Bruce Weigle (brucew@1870.net)
Djebel al Hamra, 21-22 February 1943
The series of encounters collectively known as the “Battle of Kasserine Pass” has been mythologized for decades, often luridly as “Rommel’s Last Victory”, “First Blood” “Epic Battle Where Patton Met Rommel”; “Disaster at Kasserine”, ”The Battlefield Slaughter of American Troops by Rommel’s Afrika Corps”. It was none of these things. Rommel’s sole achievement was to oversee the capture of the pass itself, a short, sharp engagement a week after General von Arnim’s forces practically annihilated four American battalions at the beginning of the offensive.
Rommel’s leadership was sadly lacking, leading to his eventual defeat and withdrawal on three axes. Patton was nowhere near the fighting. Casualties among the American – and British, and German and Italian – forces were heavy, but hardly mortal. They would all continue to fight energetically for another three months.
Nor was it the US Army’s first blooding against the Wehrmacht. As we have seen, that occurred nearly three months earlier at Tebourba, during the first race to Tunis. Kasserine was an acute embarrassment for the American army, however. Leadership at all levels was deficient (as, arguably, was that of the First Army command). In several units, tactics, doctrine, weapons and morale were all found wanting, and remedial measures – including changes in tactics and commanders – were undertaken soon afterwards. But was it a “defeat” as is often claimed?
Initially, yes. Men were lost unnecessarily and US allies and enemies both were left with a low opinion of the US Army’s fighting qualities. It took months for the Army to fully recover its confidence and reputation. But Kasserine was no more a “defeat” than was the much larger Battle of the Bulge, despite some uncomfortable similarities. Benefiting from superior leadership, excellent weapons, and tactical experience, German and Italian veterans in the Kasserine fighting drove back the Allies for seven days (14-20 February). Then, poor command decisions, fatigue, and high casualties – and the Allies’ defensive victories at Thala, Sbeïtla, and Djebel al Hamra – stopped the offensive. Rommel recognized that his drive had reached its culmination point on 22 February and ordered his troops to retreat; he needed them to deal with the slowly-arriving 8th Army back at the Mareth Line. That ended the battle, and the Axis’s last opportunity for victory in Tunisia; the Americans, British, and French all remained intact and unbroken between them and their objectives …and although they had taken losses in the battle’s early phase, the Allies had won. This scenario will give the Axis player another chance to break through one of the last Allied defensive lines to the green fields beyond …and the American player another opportunity to stop them cold.
LikeLike
Thank you very much for this detailed and great article. I was very pleased to be able to read more about the first captured Sherman. Because this story is one that my grandfather often told me as a curious child. My grandfather was a gunner in the “Schwere Panzerabteilung 501” in Tunisia and had the pleasure of driving “War Daddy II” from the battlefield to the Mediterranean over four days with another comrade (driver). As he became an American prisoner of war after the surrender in May 1943, he never knew that Albert Speer drove “his” Sherman in June of the same year. Even I was not aware of this until recently! Many thanks for that!
My question is where the photo showing the “conquerors” of War Daddy II comes from, as the quality is very poor I cannot clearly identify my grandfather. Is there perhaps a reference to the original or a better resolution?
LikeLike