The Battle of Tarawa (20-23 November 1943) was the first US large-scale amphibious assault on a heavily fortified Japanese island during WWII. This battle is the first time the US Marine Corps deployed the Sherman tank in combat and the Marines first tank-vs-tank engagement with a Japanese tank. On Tarawa, LVTs (amtracs) were used for the first time as assault vehicles.

The Tarawa Atoll is part of the northern Gilbert Islands about halfway between New Guinea and US Hawaii. As part of their empire expansion on 9 December 1941, Japanese forces land on Betio Island located on the southwest corner of the atoll. On 15 September 1942, Japanese forces occupied Tarawa and began fortifying the atoll, mainly on Betio where they built an airfield. The island also has its own natural defense, an underwater barrier reef surrounding the island.
Coastal Defense and Heavy Artillery:
- 8-inch (203mm) Vickers Naval Guns: Four of these, two located at the southwest corner and two at the southeast coast in reinforced concrete bunkers.
- 140mm (5.5-inch) Coastal Guns: Four of these were emplaced around the island, including at the northwest and east points, to guard lagoon and ocean approaches.
- 127mm (5-inch) Twin-Mount Dual-Purpose Guns: Four of these were used for both coastal defense and anti-aircraft fire.
- 80mm Anti-boat Guns: Six of these were organized into two batteries of three, located on the west and south shores to fire on reef approaches.
Note: The Japanese purchased the Vickers Naval Guns from the British in 1904-05.
Light Artillery and Anti-Aircraft Weapons:
- 75mm Type 88 Anti-Aircraft Guns: Eight of these were sited in batteries to defend against air attacks and could also provide low-angle anti-boat fire.
- 75mm Type 41 Mountain Guns: These field guns were used as mobile support and for beach defense.
- 70mm Type 92 Battalion Guns: Often referred to as “infantry guns,” these were used in firing pits.
- 37mm Type 94 Rapid-Fire Guns: Light anti-tank/anti-boat guns specifically used to target incoming LVTs and landing craft.
On 17 March 1943, a force of 1,497 soldiers from the 7th Sasebo Special Naval Landing Force (Sasebo 7th SNLF) under the command of Commander Takeo Sugai arrived on Betio with a platoon of 14 Type 95 Ha-Go light tanks (37mm gun) under the command of Ensign Ohtani.
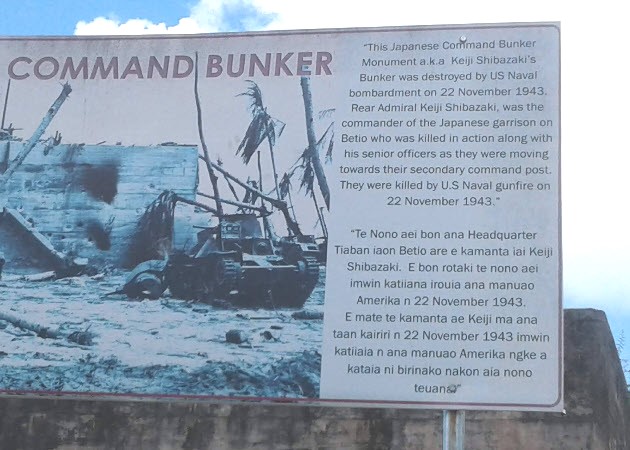
The commander of the Japanese garrison on Betio was Rear Admiral Keiji Shibasaki.
“It would take one million men, one hundred years.”
— Keiji Shibazaki
US Invasion
Allied Command planned on spreading their naval and air reach by first setting up air bases in the Gilbert Islands in the Central Pacific, that would eventually support a naval and air campaign to take over the Mariana Islands. Only one obstacle stood in the way, and that was the well-fortified Japanese base with an airstrip on Betio, the largest island of the Tarawa Atoll. Betio was the most eastern Japanese occupied island and the closest to the Equator.
The US 2nd Marine Division “The Silent Second” was ordered to make the assault.
- 2nd Marine Regiment
- 6th Marine Regiment
- 8th Marine Regiment
- 10th Marine Regiment
- 18th Marine Regiment
- 2nd Amphibian Tractor Battalion (LVTs)
- 2nd Marine Tank Battalion (Light tanks)
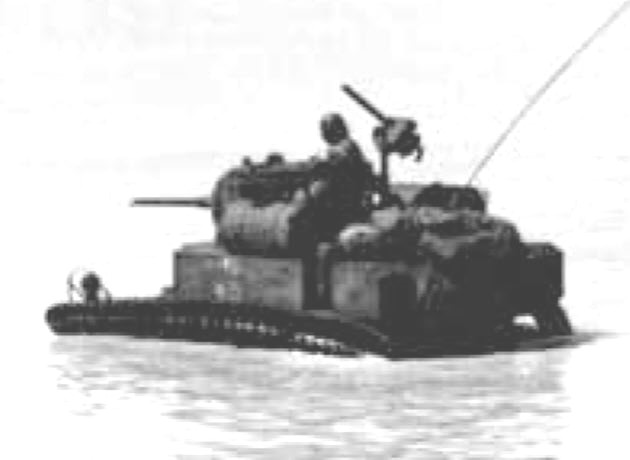
Companies A and B of the 2nd Marine Tank Battalion had 63 M3A1 Stuart light tanks that were the primary tank components to land in the first waves.
The 2nd Marine Division had not yet used medium tanks in action. For this invasion, Company C of the 1st Corps Medium Tank Battalion (Medium) equipped with 14 new diesel-powered M4A2 Sherman tanks was attached to the 2nd Marine Tank Battalion.
The 14 Sherman tanks of Company C were divided into a HQ Section and three Platoons. As was tradition, all the tanks were given names that began with the letter “C”.
| HQ Section | 1st Platoon | 2nd Platoon | 3rd Platoon |
|---|---|---|---|
| 1. CECILIA (1) 2. COMMANDO (2) | 1. CHICAGO (3) 2. CHINA GAL 3. COUNT 4. CHERRY | 1. COBRA (3) 2. CLIPPER 3. CUDDLES 4. CONGA | 1. CANNONBALL (3) 2. CONDOR 3. CHARLIE 4. COLORADO |
(1) Company Commander’s tank
(2) Executive Officer’s tank
(3) Platoon Leader’s tank
The name CHEROKEE was often mentioned by veterans but no photo, report, or testimony from a crew member exist to verify the existence of the name in the company. It might have been the name of a M31 Tank Recovery Vehicle (TRV) which was left in New Caledonia.
New US Ship Class
For the Tarawa invasion, the M3A1 Stuart light tanks of the 2nd Tank Battalion were transported in Attack Cargo Ships (hull designation AKA). These ships carried the landing craft (LCMs) and tanks in the ship’s holds. While offshore, the LCMs (Landing Craft, Medium) were lowered by the ship’s boom cranes into the water beside the ship and then a tank was lowered into each LCM. It typically took several hours to a full day to disembark all the LCMs each carrying a tank.
The US Navy developed a new ship classification, the Landing Ship, Dock (LSD). It was designed to solve the problem of the long disembarkation time during amphibious operations. These ships featured a flood-able well deck that allowed smaller landing craft like LCMs to float out through a stern gate.
The huge well deck of the LSD was an opening 44 feet (13.4 meters) wide and 396 feet (120.7 meters) long which ran from the stern to clear up under the bridge ending near the bow. The well deck was 61 feet (18.6 meters) short of the ship’s 457 foot (139.3 meters) overall length. The well deck capacity (varies with mission) was 14 LCMs (Mk III) each with 1 medium tank or 47 DUKWs or 41 LVTs.
USS Ashland (LSD-1) was the US Navy’s first LSD, commissioned on 5 June 1943. She was the first US Navy ship to be named Ashland, the estate home of the famous statesman Henry Clay (12 April 1777 to 29 June 1852), in Lexington, Kentucky.
USS Ashland with empty LCMs loaded in her well deck.
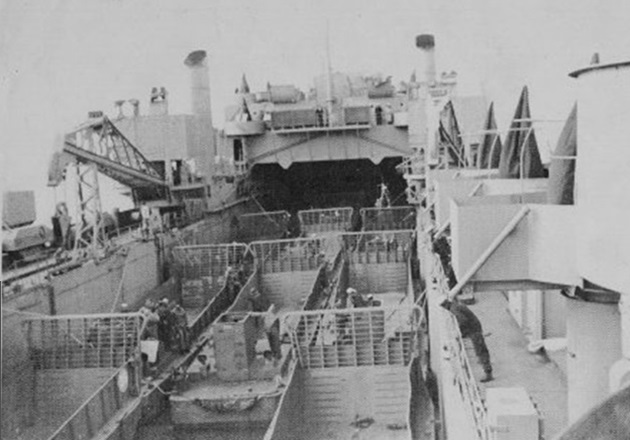
To launch the landing crafts, the LSD takes on sea water into ballast tanks, increasing its draft and causing the stern to sink. Then the LSD’s stern gate is lowered to provide access to the ocean. As the stern of the LSD lowers, water flows into the well deck until it reaches a depth where the LCMs become buoyant. Once the landing craft in the well deck are floating and the “Green Well” signal is given, the LCMs start their engines and navigate out of the ship under their own power. The reverse of this process would load LCMs into the LSD’s well deck.
At the start of the war, the US Marine Corps tank doctrine was underdeveloped. The Marine tank training was US Army influenced and lacked amphibious integration. The Marine Infantry and the Marine tank crews had no infantry-tank co-operation training. The troops of the 2nd Marine Division conducted detailed invasion rehearsals on the island of Efate (northeast of New Caledonia, east of New Guinea, southeast of Solomon Islands, and west of Fiji) while the company of Sherman tanks held its rehearsals separate from the rest of the division at Nouméa, New Caledonia.
On 19 October 1943, USS Ashland sailed for New Caledonia. At Nouméa, 14 LCM Mk IIIs each with one Sherman tank were loaded. Then USS Ashland proceeded to Efate Island where she joined Task Force 53 (TF 53) to take part in the amphibious assault on Tarawa (Betio Island).
The M3A1 Stuart tanks of the 2nd Marine Tank Battalion were transported on the USS Bellatrix (AKA-3), USS Thuban (AKA-19), and USS Virgo (AKA-20). They were deployed via LCMs.
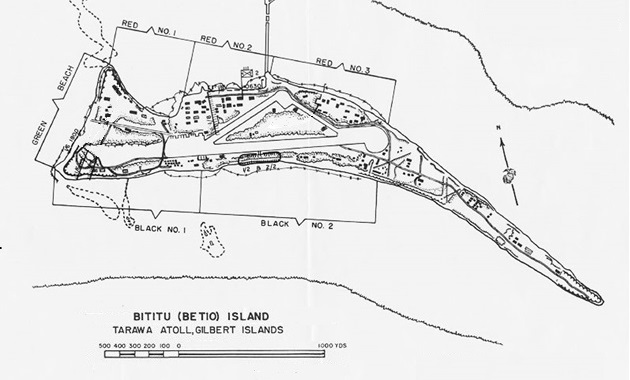
Betio Island
The tiny island is approximately 2 miles (3.2 km) long. It is narrow, being only 800 yards (730 meters) wide at its widest point.
There was no Japanese air support on Betio, as all the enemy planes were destroyed by the US preparatory naval bombardment or by US air attacks. Heavy seas and incorrect initial anchoring positions by the transports delayed the transfer of troops and tanks from the larger ships to the landing crafts.
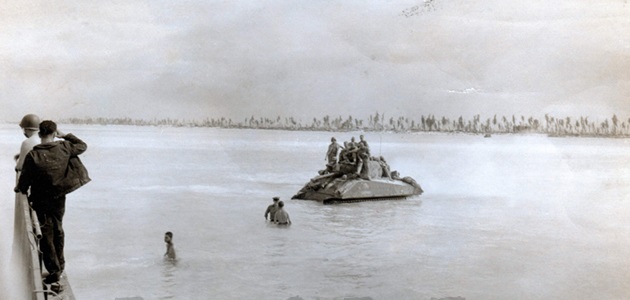
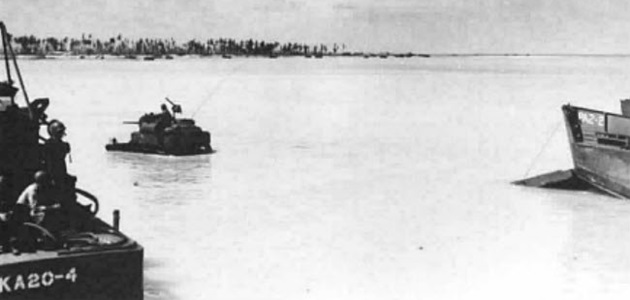
The LVTs struggled shore-ward in three long waves, each separated by a 300 yard (274.32 meters) interval: 42 LVT-1s of Wave One, followed by 24 LVT-2s of Wave Two, and 21 LVT-2s of Wave Three. Behind the tracked vehicles came Waves Four and Five of LCVPs. Each of the assault battalion commanders were in Wave Four. Further astern, the USS Ashland (LSD-1) launched 14 LCMs, each carrying a Sherman tank. Four other LCMs appeared each carrying one M3A1 Stuart light tank.
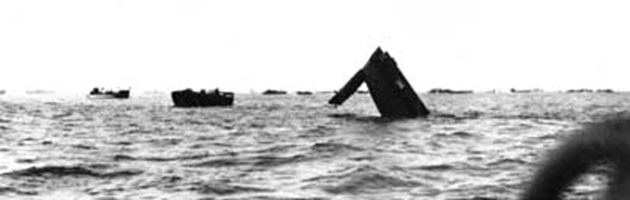
A US Navy LCM-3 sinks seaward of the reef after receiving a direct hit by Japanese gunners. This craft may have been one of the four LCMs carrying M3A1 tanks, all of which were sunk before reaching the reef.
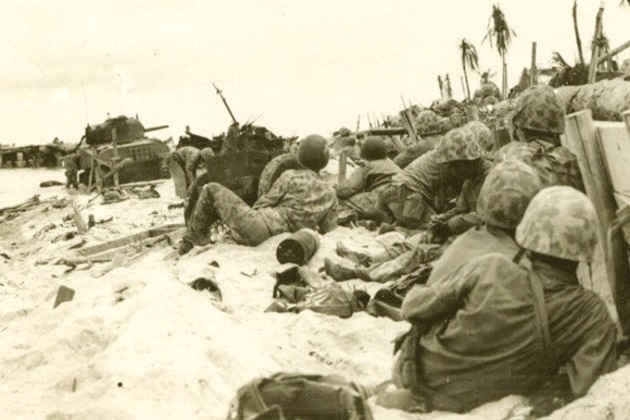
The LVTs of the first three waves had no problems driving over the reefs and reached the beaches while under heavy enemy fire. As many LVTs tried to climb the seawall at low spots, close-range enemy fire ripped through their exposed bellies. Some LVTs found breaches in the seawall and carried their marines inland as far as the edge of the airfield.
As soon as the Marines hit the beaches, they were met with intense Japanese fire and were pinned down.
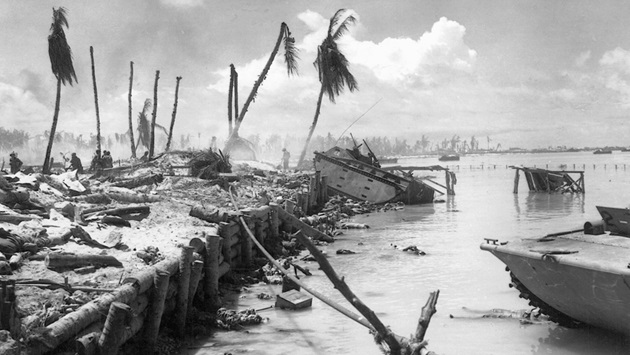
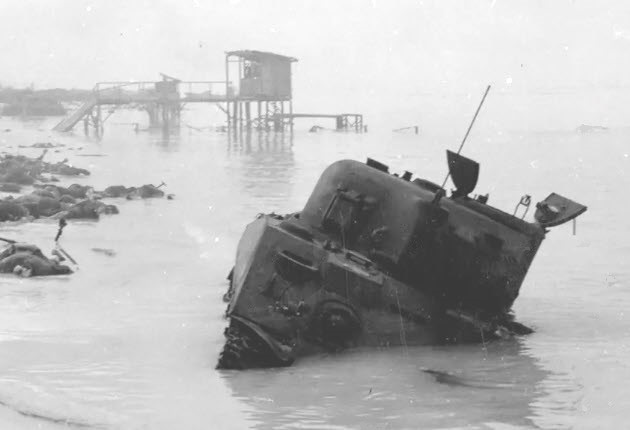
This is a section of the Seawall on Beach Red 2. In the background is a LVT-1 hung on the seawall. In the foreground on the right is the bow of a LVT-2.
The tide at Betio was predicted to reach a high point roughly 5 feet (1.524 meters) over the reef at approximately 1001 hours. However, actual conditions deviated significantly from predictions. Historical and scientific analysis of the battle highlights a “neap tide” period combined with a rare lunar apogee (when the moon is farthest from Earth), which resulted in an uncommonly low tidal range. Instead of rising, the water level hovered about 3.3 feet (1.0 meter) for nearly 13 hours, from 0900 hours to 2200 hours.
LCVPs carrying Marines got hung up on the outer edge of the reef forcing the Marines to disembark in waist deep water. While under heavy enemy fire, they had to wade to the beach which was roughly 800 to 1200 yards (730 to 1100 meters) away.
LCMs carrying tanks also got hung up on the reef and were forced to disembark the tanks and they had to wade ashore. The tanks were not properly waterproofed or equipped with deep-water fording kits.
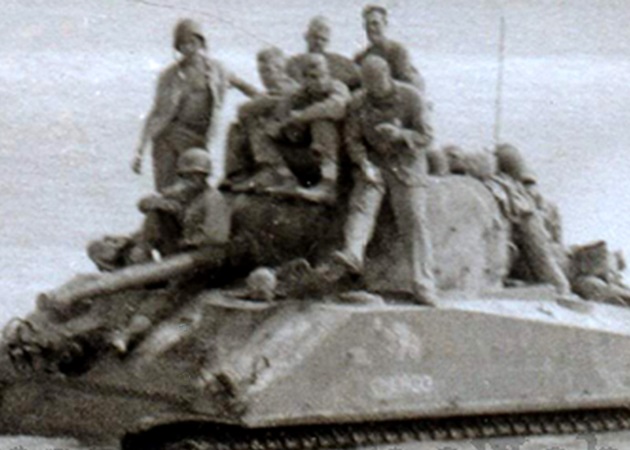
The next two days of combat on Betio consisted of ad hoc tactics. Because the Marine tanks did not have an infantry telephone, small groups of Marine infantry and tankers coordinated with unofficial methods of communication. They quickly established a series of hand and arm signals to correspond with their actions. When not possible, infantrymen would often ride on the turrets of the tanks to converse with the tank commander. This allowed the troops to communicate with the tank commanders, but it placed many lives at risk. Communicating with the infantry was critical for the tank commanders. It enabled them to support one another through maneuvers and firing at targets.
Recon Guides
Marines were designated as “Recon Guides” (often from the 2nd Marine Tank Battalion) and were tasked with ensuring the survival and mobility of the tanks in the chaotic, reef-choked environment. Their duties and risk included:
- Move on foot ahead of tanks to identify routes through deep water, hidden shell craters, and any obstacles that could swamp or disable a tank.
- Use signal flags and hand signals to direct tank drivers along secure paths and to specific targets, as the tankers had extremely limited visibility from inside their tank and radio communications often failed.
- While leading under fire they are completely exposed while walking in front of the tanks, making them a target for the enemy.
A number of brave Marines became Recon Guides on Betio.
Film: Marines Land & Fighting On Tarawa 11/25/1943 (full)
Film: The Capture of Tarawa from Japan – 1943
CECILIA
Sherman named CECILIA belonged to the company commander, First Lieutenant Edward Lewis Bale Jr. (19 March 1920 to 21 December 2017). The crew consisted of Sergeant Michael E. Shivetts (radio operator/loader), Private Charles E. Martin (gunner), Sergeant Robert M. Keller (assistant driver), and Corporal Alfonso A. Chavez (driver). The tank was named after Chavez’s newborn daughter, Cecilia Chavez, born on 23 March 1943.
On November 20th (first day), Sherman named CECILIA and COMMANDO of the HQ Section came ashore on west end of Beach Red 1. A seawall was along the beach which was not vertical but was deep. Bale dismounted from CECILIA and tried to find a way through the seawall. Unable to find a hole in the wall, Bale remounted CECILIA and decided to move west along the beach. The beach was covered with Marines so he instructed the other tanks to follow his tank in the water.
At about 1130 hours, CECILIA and COMMANDO moved around the small peninsula at the boundary of Beach Red 1 and Green Beach. About 50 yards (45.72 meters) down Green Beach, they found a low spot on the seawall and they were able to get through. Apparently, the Japanese used this spot to move trucks and equipment out onto the reef at low tide. They did not see any Marines. There were a lot of Japanese running and they started shooting at them with machine guns.
CECILIA forged well ahead of COMMANDO, moved south working its way through the rubble and fallen palms behind Green Beach. Eventually, COMMANDO came on up and the two tanks continued inland. Then CECILIA got hung up on some coconut logs. Suddenly, a Japanese tank turret popped up over a revetment. The Japanese Type 95 Ha-Go light tank nosed up over the sand and log wall with its 37mm gun pointed straight at CECILIA.
CECILIA’s gunner was excited and fired before the order was given, missed the Japanese tank. Before the loader could reload, the Japanese tank fired. The 37mm shell struck the muzzle of CECILIA’s main gun. The shell slid down the 75mm barrel, wrecking the barrel rifling and fragments ricocheted around the turret interior. The crew was shaken and had some minor wounds. COMMANDO quickly fired at the Japanese tank, ripping off the turret and ending the US Marines first tank-vs-tank engagement.
Diver Chavez got CECILIA off the coconut logs. Lieutenant Bale returned back to the beach with CECILIA and left COMMANDO to continue support of the badly exposed Marines. CECILIA spent the night on Beach Red 1. See more about COMMANDO below.
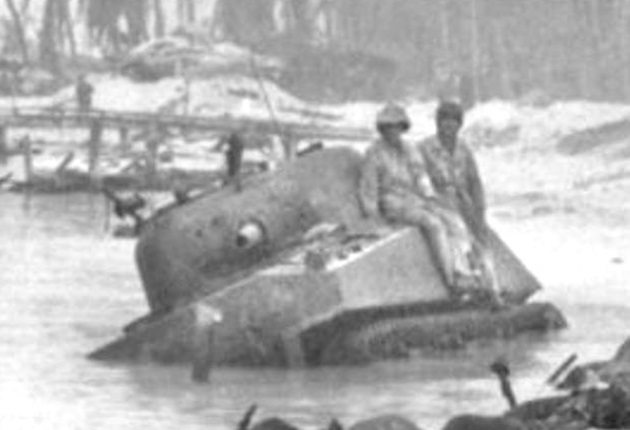
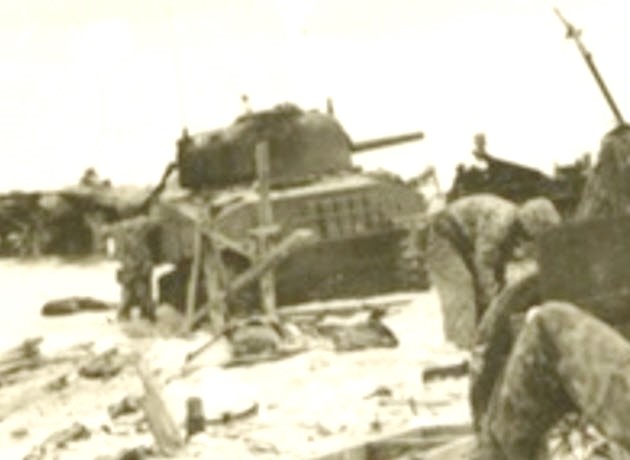
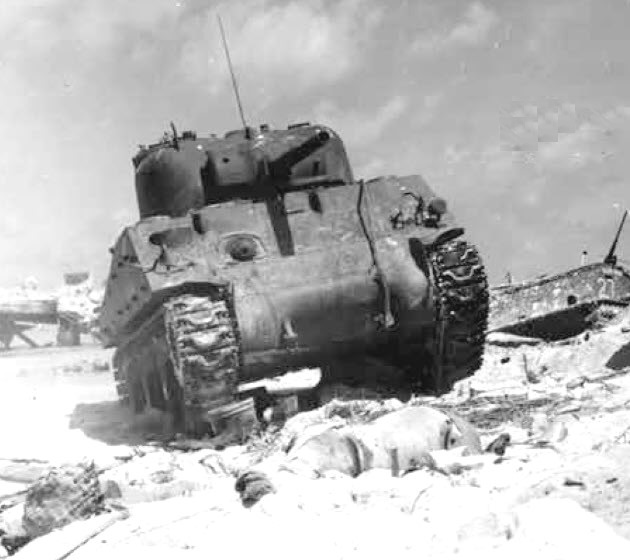
On the morning of the second day (the 21st), CECILIA with a bad gun tube moved up and down the beach and in the water fired its machine guns at Japanese machine gun positions. Near the junction of Beaches Red 1 and Red 2, CECILIA slid into a large, water-filled bomb crater that had been obscured by silt and tumbled sideways. The impact or water caused the tank’s electrical system to short out, and the turret could not be rotated manually due to the steep angle. The crew was forced to abandon the tank.
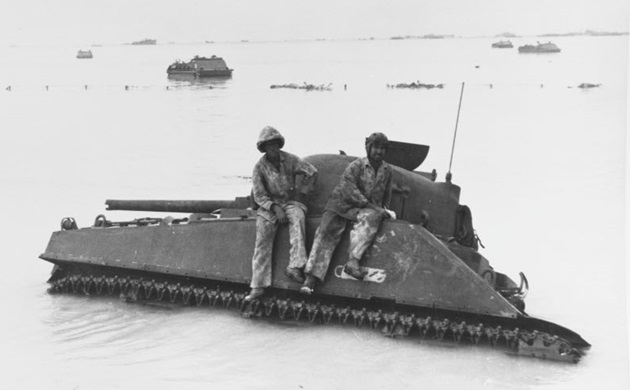
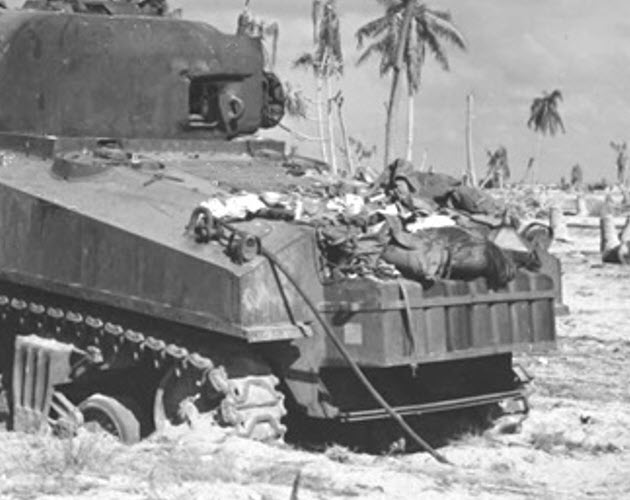
Two marines sitting on Sherman CECILIA stuck in the underwater bomb crater on Beach Red 1 on 22 November 1943. In the background is LVT-1 number 11. Note the hole on the end of the main gun where the Japanese 37mm shell hit it at an angle and slid down the barrel.
This is my close up of the tank’s name in the above photo. A censor has painted out most of the name for some unknown reason.
Rear view of Sherman CECILIA on Beach Red 1 surrounded by bodies of US Marines.
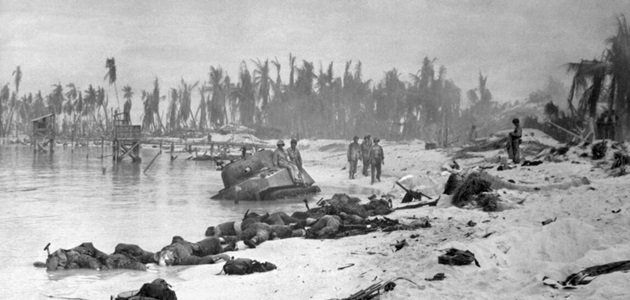
Film: 1940s: Shots Of Dead Marines On Beach. High Angle, Marines Carrying Body
This is my close up of Sherman CECILIA in the above photo.
Front view of Sherman CECILIA on Beach Red 1.
Film: 1944-Pacific War / Tarawa / 1944 Video
COMMANDO
Sherman named COMMANDO, part of the HQ Section, was commanded by Second Lieutenant Louis Robinson Largey. COMMANDO and CECILIA successfully navigated the treacherous reef and made it onto Beach Red 1. COMMANDO destroyed the Japanese tank which disabled CECILIA’s main gun. After CECILIA returned to the beach, COMMANDO pushed further inland than any other Sherman operating with US Marine infantry.
Infantry reports stated COMMANDO destroyed two five-inch (127mm) anti-boat guns and several (some reports stated five) enemy pillboxes and fighting positions. The two five-inch guns were Japanese Twin Type 89 (1929) 127mm Anti-Aircraft guns which the Japanese Imperial Navy used on their ships.
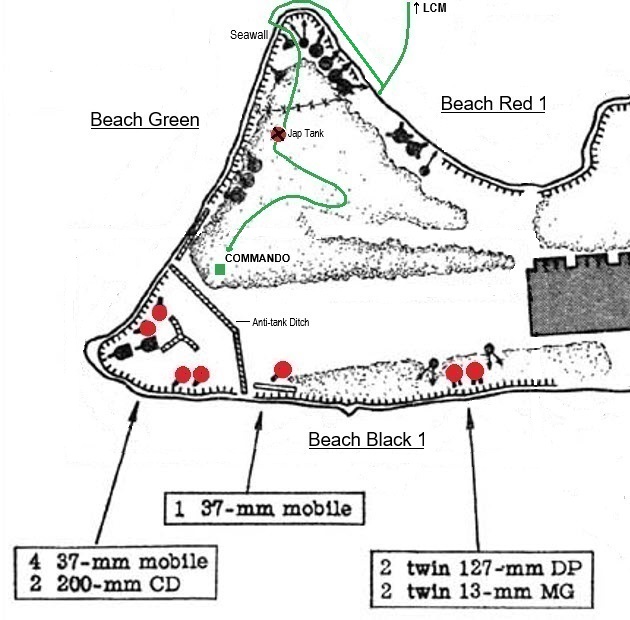
The Japanese gun positions are marked in red. DP is Dual Purpose and CD is Coastal Defense.
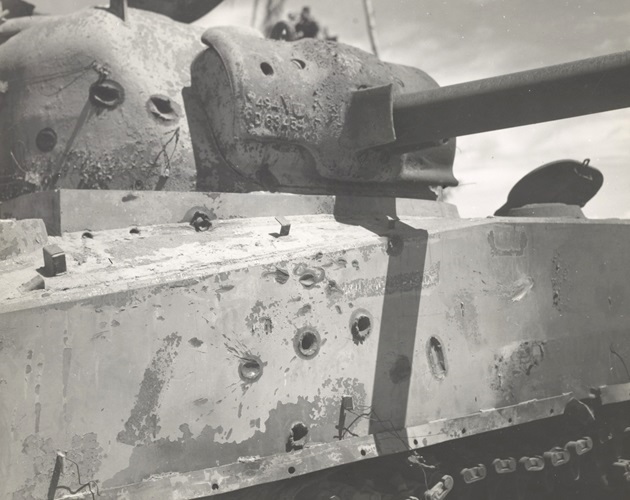
COMMANDO was eventually knocked out by armor-piercing rounds from Japanese anti-tank guns.
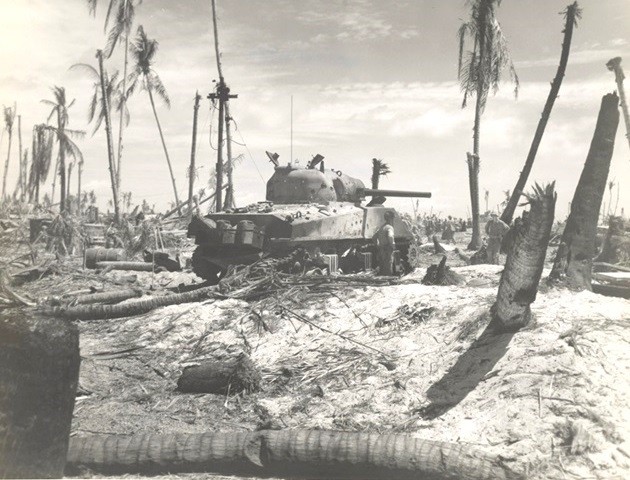
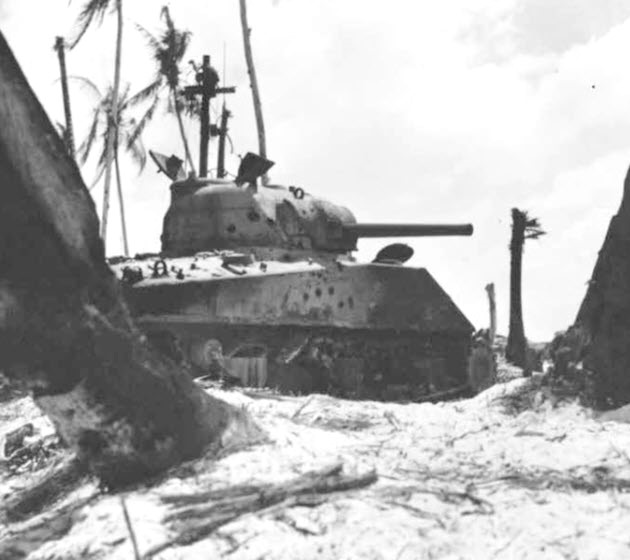
This is a close up of COMMANDO’s turret and hull side. The multiple penetrations are hits from five Japanese Type 94 (1934) 37mm anti-tank guns located on the southwest corner of the island (south end of Green Beach). There were no Japanese 47mm anti-tank guns on the island as some had expected.
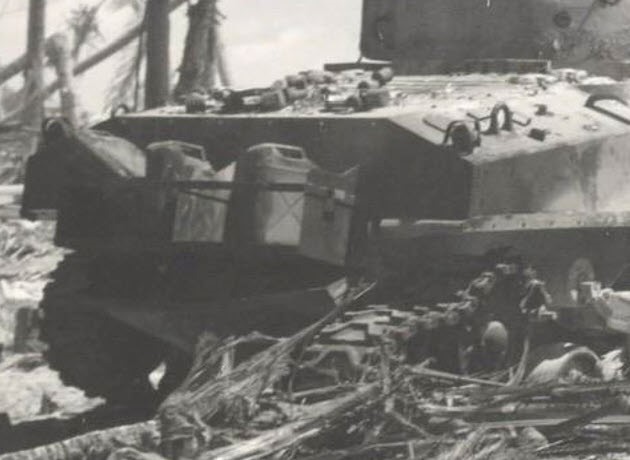
This is my close up of COMMANDO’s rear hull. Note the storage rack mounted on the rear hull holding Jerry cans of water.
CHICAGO
The Sherman tank was named after the US city in Illinois.
CHICAGO was the tank of the 1st Platoon leader, First Lieutenant William Inlow Sheedy, and was one of the tanks which attempted to land on Beach Red 1. Due to the low tide, CHICAGO disembarked from the LCM at edge of the reef and waded ashore. While maneuvering near the beach, CHICAGO drove into a deep underwater crater created by the preparatory naval bombardment. The water flooded CHICAGO causing the electrical system to short out and rendered it inoperable.
Lieutenant Sheedy ordered the crew to abandon the disabled tank. While wading ashore, Sheedy was mortally wounded by Japanese machine gun fire.
Film: 1943-Pacific War / Tarawa / Second World War / 1943 Video
On the last day (the 23rd), salvage crews recovered CHICAGO from the underwater crater and got it running again. Here, CHICAGO carrying US marines is wading to a waiting LCM (left) at the edge of the reef to be loaded and taken to LSD USS Ashland.
This is a close up of CHICAGO in the above photo.
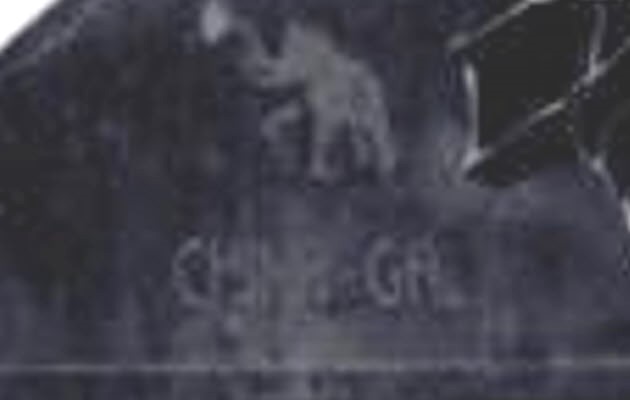
CHINA GAL
CHINA GAL was the stage name of a stripper in San Diego, California, and she was not Chinese.
On the first day, Sherman named CHINA GAL from 1st Platoon was one of the few tanks to successfully navigate the reef and reach Beach Red 1. CHINA GAL was instrumental in clearing the western shore by attacking Japanese pillboxes from the rear and flank, often at point-blank range. At that time, CHINA GAL’s tank commander was Private Edward L. Bajus.
CHINA GAL then became inoperable. The tank’s main 75mm gun was rendered useless when its breech block jammed. The next morning, Lieutenant Bale, personally cleared CHINA GAL’s jammed breech block and then afterwards he made CHINA GAL his command tank.
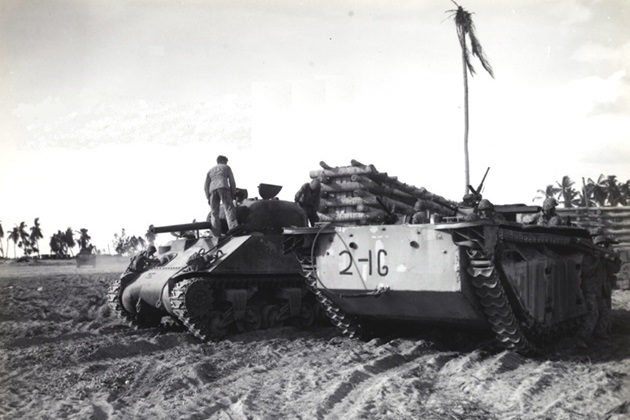
A LVT-2 with tactical number 2-16 is replenishing CHINA GAL with ammunition. The walls in the background are part of a Japanese aircraft revetment at the west end of the airstrip.
This is my close of the Sherman’s hull in the above photo.
By the last day (the 23rd), CHINA GAL and COLORADO were the only two operational Shermans leading the final assault on the eastern tip of the island. Sources differ on CHINA GAL’s final status during the battle. Some historical records state CHINA GAL was knocked out by a mine on the last day.
COUNT
The Sherman tank was probably named after the noble European title, the Count, which typically ranked below Dukes and Marquesses but above Viscounts and Barons.
COUNT belonging to 1st Platoon made it ashore on Beach Red 1. To rendezvous with Lieutenant Bale’s CECILLA, COUNT went back into the water instead of moving along the beach to avoid running over marines. When trying to drive around the drowned CHICAGO, COUNT fell into another underwater crater.
During the rush and confusion of abandoning the tank, one of the other crewmen inadvertently let go of the turret’s heavy hatch cover. It slammed down on gunner Private John E. Irvine’s hand, crushing some bones. Like most of the injured and wounded, Irvine had to endure a night on the beach before he was evacuated to the Attack Transport USS Harry Lee (APA-10) the next morning.
No photos of COUNT had been found.
US Navy Seabees
The 18th Naval Construction Battalion (NCB) served as the 3rd Battalion, 18th Marines. Approximately two-thirds of this unit participated in the actual assault on Betio. On the first day, they landed in early waves alongside the Marine infantry, performing engineering tasks and beach support while under enemy fire.
Film: 1943-Pacific War / Tarawa / Second World War / 1943 Video
Their primary mission was the rapid repair of the Japanese airfield on Betio. Despite sniper fire and equipment shortages, they had the runway ready for emergency landings within 24 hours of starting work.
On November 22nd while the battle for the island was in its final stages, the 18th NCB moved onto the airstrip with their heavy equipment began clearing debris and repairing bomb damage.
Film: 1943 – Us Marines Repair An Airfield On Tarawa, Which They Have Just Captured
CHERRY
Sherman named CHERRY was one of the tanks that failed to reach the beach. While attempting to navigate the reef toward the shore, CHERRY plunged into a large, submerged shell hole created by the preparatory naval bombardment. Because the tank was not waterproofed, CHERRY quickly flooded and sank.
Film: Tarawa – 1943 – Soldiers Sitting On Gun Turret Of An M4 Sherman Tank On The Video
The film above has “Tarawa 1943” in the title with no exact date or location noted. The trees in the background are not palm trees and there is no bomb damage. This film was more likely taken somewhere in Mele Bay on the southwest corner of Efate Island. On November 7th and the 9th, the Shermans of C Company took part in landing exercises at Mele Bay. During both rehearsals, the Shermans remained on the beaches and never moved inland. Shermans CHERRY, CHINA GAL and LVT-1 number 11 are visible in the film.
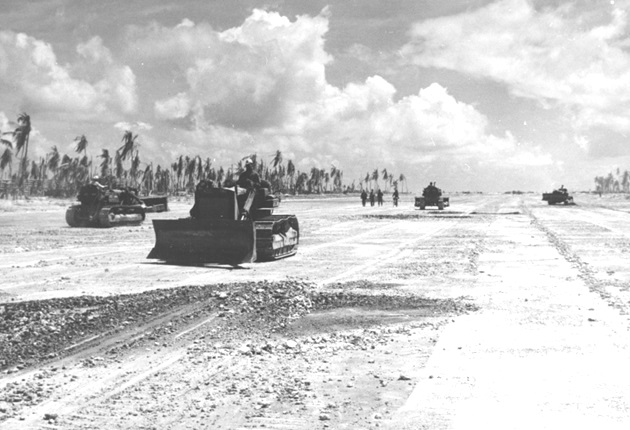
Tanks that were sunk or disabled head-on to the beach, the Seabees towed them ashore using tow cables. Then the tanks were towed or driven to the airfield.
A Seabee bulldozer driving pass a Sherman tank on the on the side of the airstrip. On the left in the background is the rear of an unidentified Sherman tank parked in an aircraft revetment.
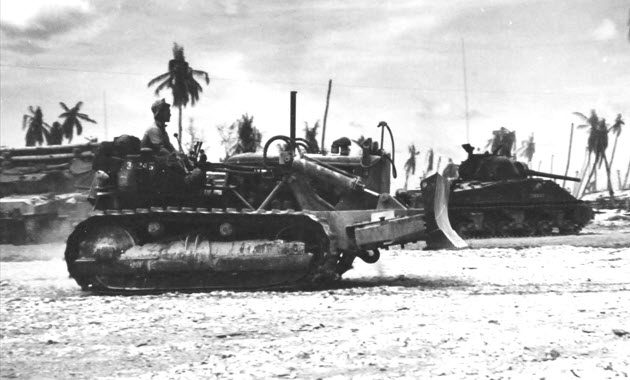
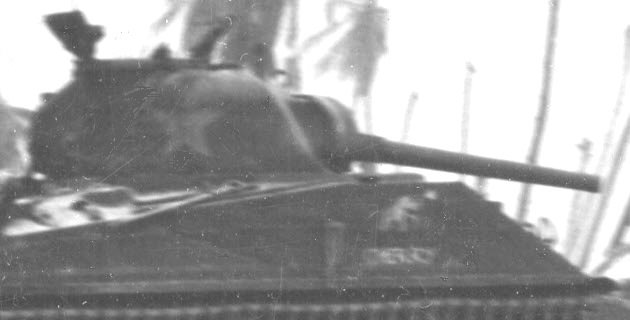
This is my close up of the Sherman on the right in the background of the above photo. It is the Sherman named CHERRY. Note the partially faded star on the turret which most likely was painted yellow.
COBRA
Sherman named COBRA was the first tank of 2nd Platoon. The crew consisted of Corporal William H. Eads (radioman), Corporal Hester S. “Buck” Webb (driver), PFC Hank G. Travernicht (gunner), and the tank commander First Lieutenant Richard O. Sloat. COBRA landed in the third wave on the first day somewhere on Beach Red 1 or possibly on Beach Red 2. During the first night, COBRA was positioned on the edge of the airfield taxiway and that was where Buck Webb was KIA. PFC Jack Trent (assistant driver) took over as the driver.
On the morning of the second day, COBRA returned to the east end of Beach Red 2 and unloaded Webb’s body. COBRA was ordered to move west along Beach Red 2, driving in shallow water parallel to the beach to avoid running over marines. While moving west the COBRA fired at enemy positions. At the west end of Beach Red 2, COBRA turned around and moved east to sweep the beach again. After moving a short distance, COBRA felled into a submerged shell hole and the crew abandoned the tank.
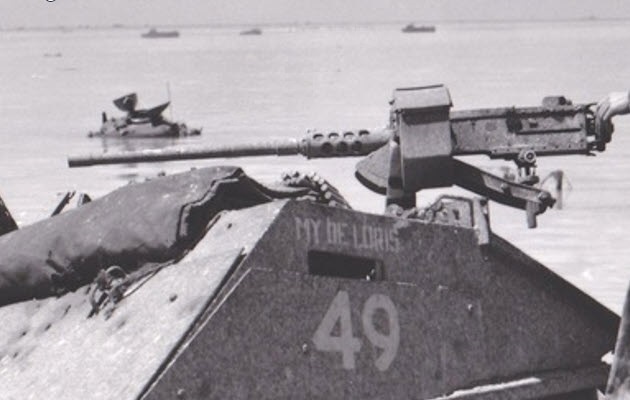
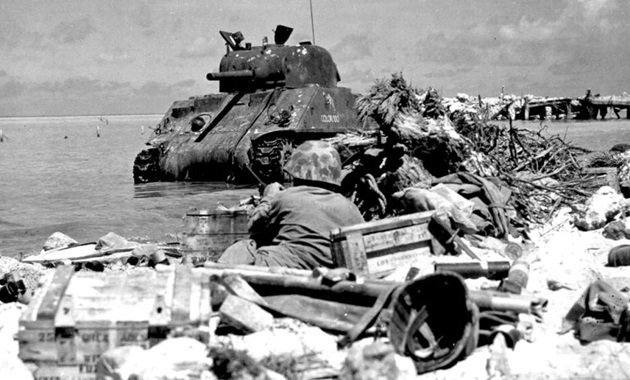
LVT-1 number 49, the first US vehicle to reach Betio’s shore, is hung on the seawall just east of the boundary between Beaches Red 1 and Red 2. This photo is taken facing northwest.
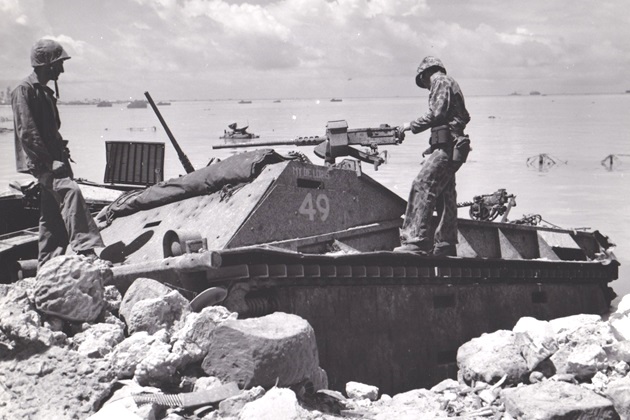
This is my close up of the above photo. The name on the LVT-1 49 is “MY DELORES”. In the background just above the .50 Caliber machine gun barrel, COBRA is submerged with only the top of the turret above water.
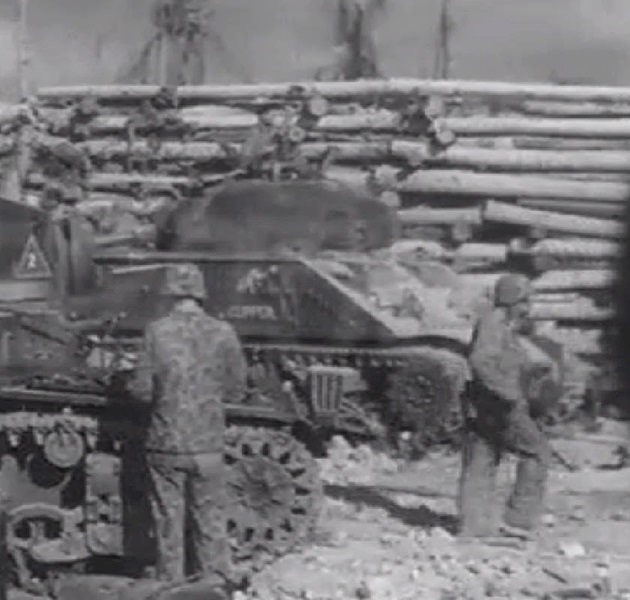
CLIPPER
Sherman named CLIPPER commanded by Sergeant Robert E. Baker was assigned to the 2nd Platoon. During the landing on Beach Red 3, CLIPPER was one of the few tanks that managed to navigate the treacherous coral reef and make it to the shore despite heavy Japanese fire.
On the first day, CLIPPER moved inland and supported marines attacking the airfield. During an attack, a Japanese Type 99 (Hako-Baku-Rai) magnetic mine damaged one of CLIPPER’s engines and CLIPPER managed to move to a revetment for cover. The M4A2 Sherman had two diesel engines joined together on a common crankcase. With only one engine running, the M4A2 was under-powered, very hard to drive, and hard to steer on rough terrain or in close spaces. CLIPPER was technically out of commission. Members of CLIPPER’s crew transferred to other tanks as replacements.
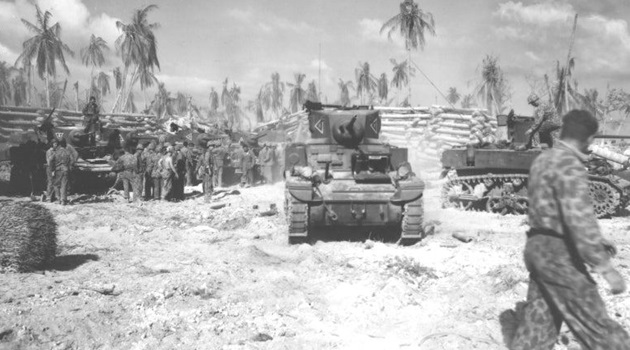
CLIPPER parked in a Japanese aircraft revetment with a group of M3A1 Stuart Light tanks of the 2nd Marine Light tank Battalion on November 22nd.
Film: 1944-Pacific War / Tarawa / 1944 Video
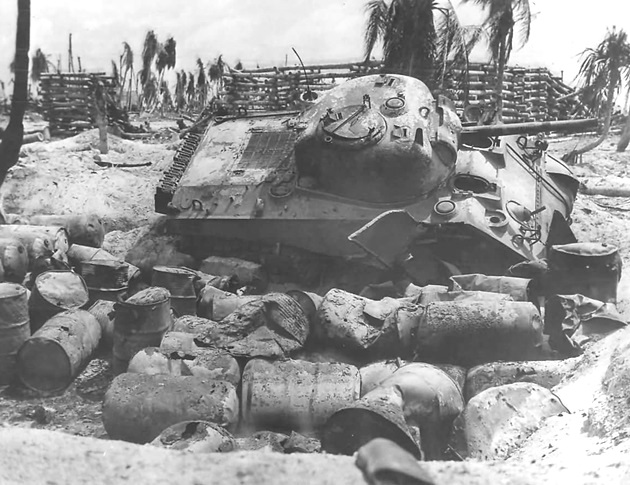
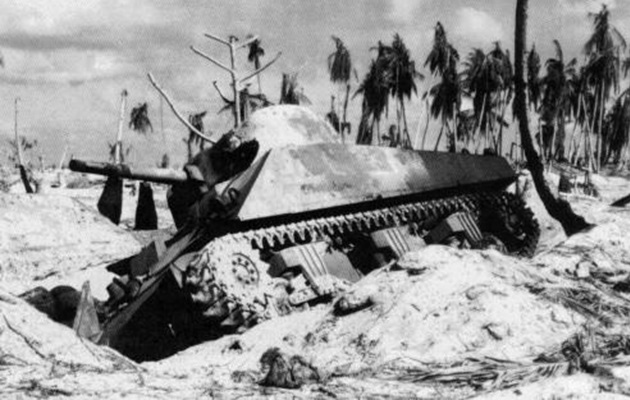
CUDDLES
The actions of the Sherman named CUDDLES of 2nd Platoon remains largely unknown because it was not mentioned in any official reports. During the landing, CUDDLES disembarked from the LCM onto the reef and started to wade ashore. About 100 yards (91.44 meters) from Beach Red 3, CUDDLES fell into a underwater crater.
CUDDLES partially submerged and abandoned off Beach Red 3. It appears CUDDLES was not able to climb out of the crater. Some Marines that were disembarked from hung up LCVPs huddled behind CUDDLES for cover from the intense enemy fire.
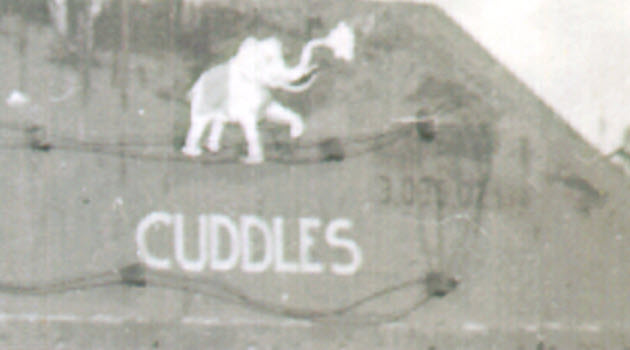
This photograph taken by Seaman First Class Wallace L. Colcord after Betio was secured shows Seabees (Naval Construction Battalion members) resting on top of the CUDDLES. Support brackets were attached to the side of the hull and turret to support heavy wire which would hold palm tree fronds (leaves) in place as camouflage.
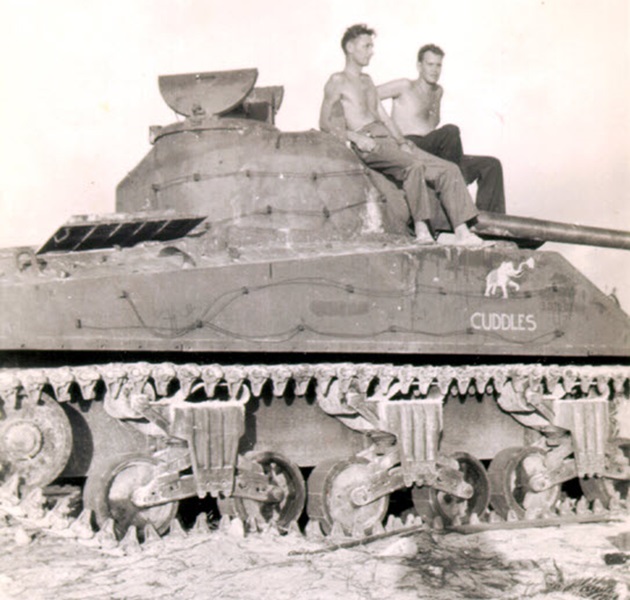
This is a close up of the above photo. Forward of the elephant and the name is registration number 3035021. This tank probably was used by the US Army as a training tank before it handed over to the Marines.
CONGA
Sherman named CONGA of 2nd Platoon was named for the Cuban carnival dance (a conga line) which was popular in Southern California at that time.
Early in the battle, CONGA successfully destroyed a Japanese pillbox that had pinned down marines. Later that same day, after its successful engagement, CONGA fell into a shell crater somewhere near the base of the main pier and was temporarily abandoned. During the night, the crew and any available marines worked to extricate CONGA from the shell crater. There is no record if another tank assisted them by towing CONGA but the next morning CONGA was back in action.
On the second day, CONGA engaged Japanese pillboxes near the airfield. At some point, CONGA was hit by several rounds coming from surviving Japanese guns positioned along the Black Beaches on the south side of the island. Just a little later CONGA was hit right square in the front by what believed to be a 75mm round. They did not know where it came from. Then CONGA was hit again. The gunner spotted a little puff of smoke and fired at it. The Japanese gun was hit flipping it into the air and it landed on its crew wiping them out. The gun was believed to be a Type 41 (1908) 75mm mountain gun.
At about 1430 hours, CONGA was finally knocked out of action by what is believed to be our own mortar fire. A US mortar round landed on CONGA’s engine deck and the thin ventilation grill was penetrated damaging one or possibly both of the engines rendering the tank inoperable.
No photos of CONGA had been found.
CANNONBALL
Sherman named CANNONBALL of 3rd Platoon served as the command tank for Second Lieutenant Louis R. Largey. CANNONBALL and the other tanks of 3rd Platoon landed on Beach Red 3 about 30 yards (27.4 meters) west of Burns-Philp Pier and found an opening in the seawall. Inland, the tanks formed into a line abreast and crossed the taxiway into the central triangle of the airfield. After crossing the taxiway, CANNONBALL was hit by a Japanese Type 88 gun.
While attempting to maneuver out of the line of fire of the Japanese gun, the driver steered into a camouflaged ditch filled with aviation fuel drums. CANNONBALL’s right track slid into the ditch, and the fuel was ignited possibly by a US Navy plane or enemy machine gun fire. The resulting blaze caused the CANNONBALL’s main gun rounds to explode, which reportedly tore the front right sponson plate section off the tank.
This is the left side of CANNONBALL.
Despite the fire and explosion, Lieutenant Largey and his crew managed to escape from the tank. They eventually joined other surviving tankers behind enemy lines before trekking back to secure Marine positions.
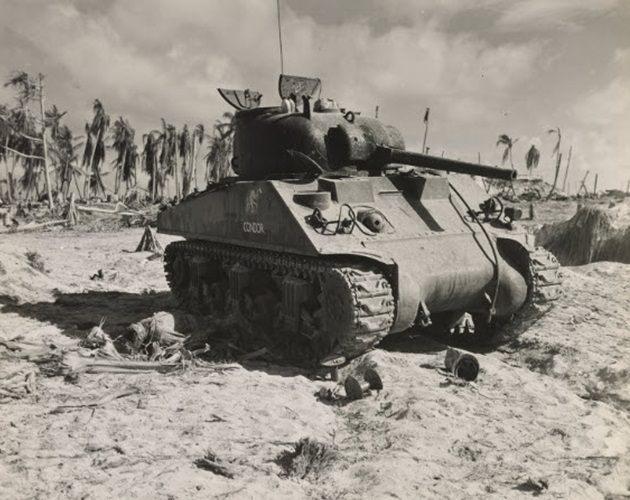
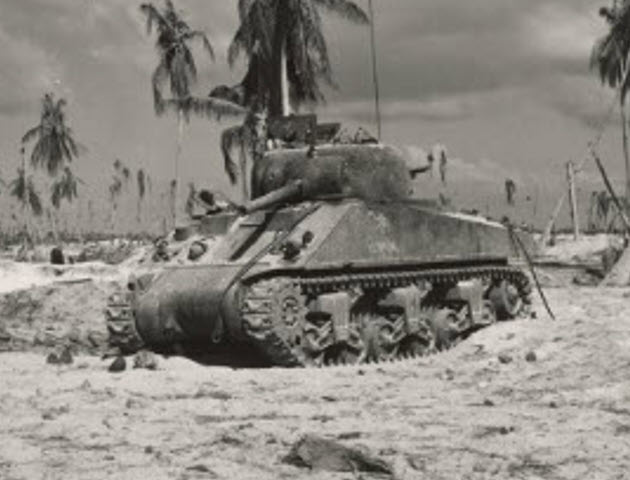
CONDOR
The Sherman named CONDOR was knocked out within an hour of landing on Beach Red 3 on November 20th. The reason for CONDOR’s loss is not clear. Numerous accounts state an unidentified US Navy dive bomber pilot, acting on reports of Japanese tanks on Beach Red 3, mistook the advancing Shermans for enemy tanks and attacked. Veterans (including the crewmen) state CONDOR was abandoned when a malfunctioning warning light indicated the engine was on fire.
The crew of CONDOR consisted of:
- Commander: Sergeant Robert F. Shook
- Gunner: Private Joe D. Woolum (WIA)
- Driver: Corporal Raymond A. Barker (MIA, his remains were identified and repatriated in 2017)
- Assistant Driver: Private Harry O. Grey
- Loader/Radio Operator: Private Herschel D. Fulmer
The Sherman tank’s name was selected by the driver, Corporal Barker, which is a huge bird.
The gun barrel was oriented in such a way that Corporal Barker could not open his hatch.
CHARLIE
Sherman named CHARLIE of the 3rd Platoon landed on Beach Red 3. After crossing the airfield taxiway and coming under fire, CHARLIE reportedly moved into a position between CANNONBALL and the Japanese fire to cover CANNONBALL crew’s escape. CHARLIE then was hit by a high-velocity gun, most likely a 75mm gun.
This is my close up of the side hull of CHARLIE.
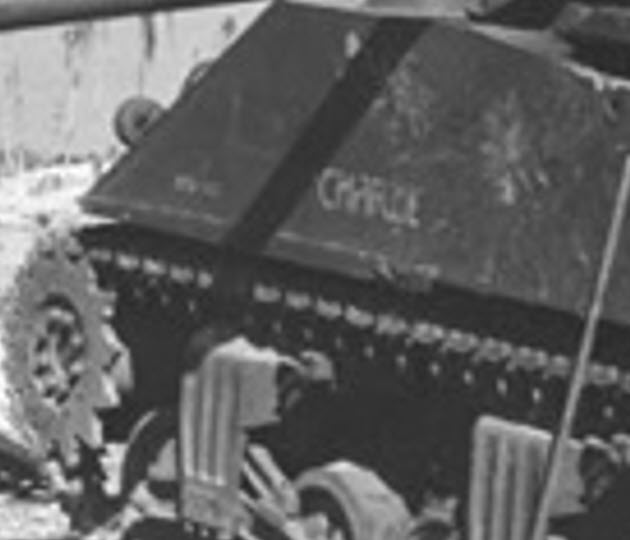
This is my close up of the rear hull of CHARLIE.
The tank commander, Platoon Sergeant George Trinka, was wounded during the engagement and survived.
CONDOR, CHARLIE, and CANNONBALL most likely had been hit by Japanese 75mm gun(s). There were eight Type 88 75mm guns on Betio and their possible positions are marked in red. Two of these positions were probably Type 41 75mm Mountain guns. See more about the Type 88 gun below. (AB) is Anti-Boat.
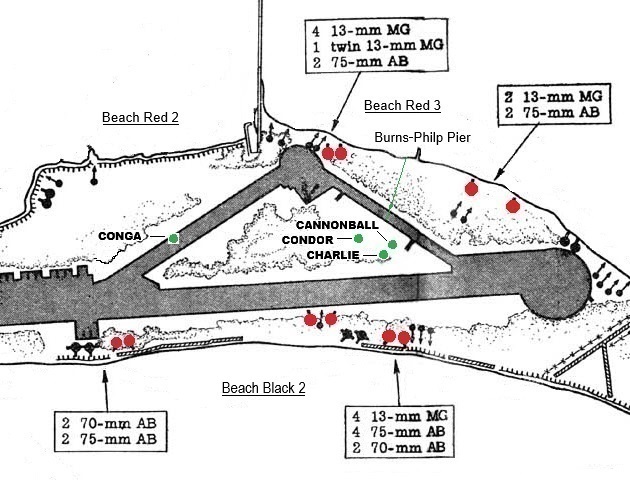
Burns-Philp Pier – Burns Philp (properly Burns, Philp & Co, Limited) was a major Australian shipping line and merchant that operated in the South Pacific.
These are the positions of destroyed and disabled Sherman tanks on Betio.
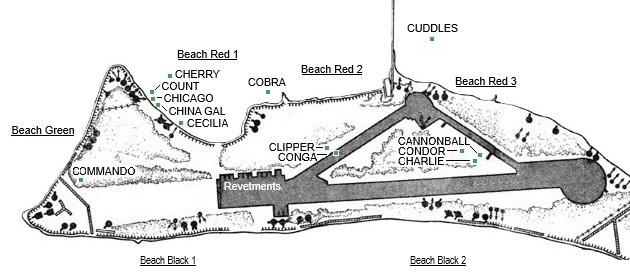
CHINA GAL was temporarily damaged on the first day but was back in action the next morning. CONGA’s position was identified with some uncertainty. COLORADO is not displayed because it was operational during the whole invasion.
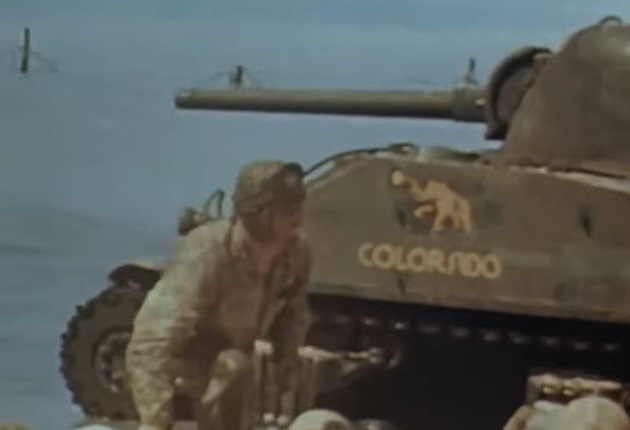
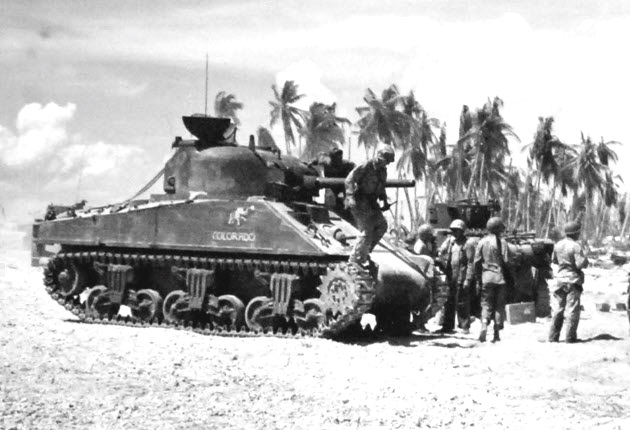
COLORADO
The tank was named COLORADO in honor of radio man, PFC William F. Schwenn, who was from the US state Colorado.
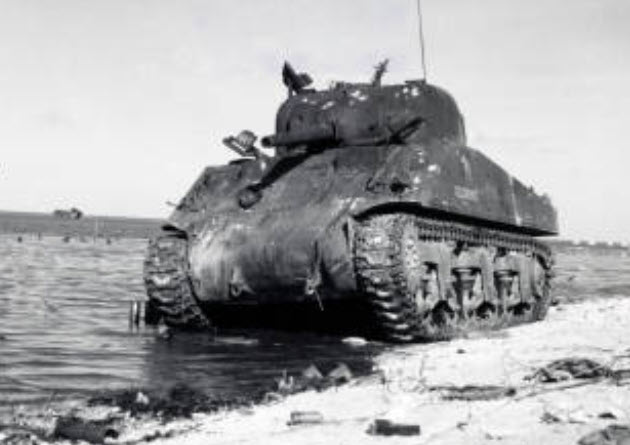
COLORADO was one of only two Sherman tanks from C Company to survive the battle in serviceable condition. Upon landing on Beach Red 3, COLORADO was immediately hit on its front hull by a Japanese 75mm shell.
During the fighting, COLORADO was also hit by a “gasoline bomb” (Molotov cocktail) that set it ablaze. The driver saved the tank by racing back into the surf of the lagoon to extinguish the flames.
Despite being “dented and charred,” COLORADO often worked with Seabees bulldozers to seal Japanese pillboxes and frequently returned to the beach to reload. When there were no 75mm tank rounds available, tank rounds were scrounged from the disabled Shermans or they used 75mm pack howitzer rounds instead.
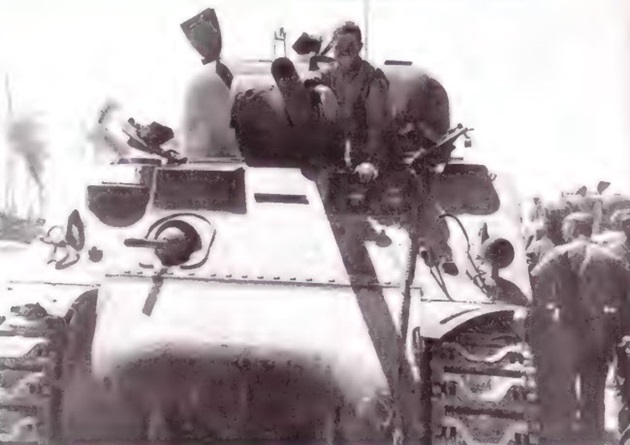
This is my close up of the Sherman tank in the above photo. A US Marine Recon Guide is trying to get the tankers’ attention by banging on side of the turret with the butt of his rifle.
Film: With the Marines at Tarawa (1943)
This is my screen frame capture of COLORADO from the above film.
These two photos of COLORADO were taken on the beach at different times.
The tide had went out when this photo of COLORADO was taken.
Driver PFC “Tex” Rudloff posing in COLORADO on November 22nd.
On the 3rd day of the battle, COLORADO successfully repelled a Japanese banzai charge by firing a high-explosive round directly into the charging Japanese soldiers.
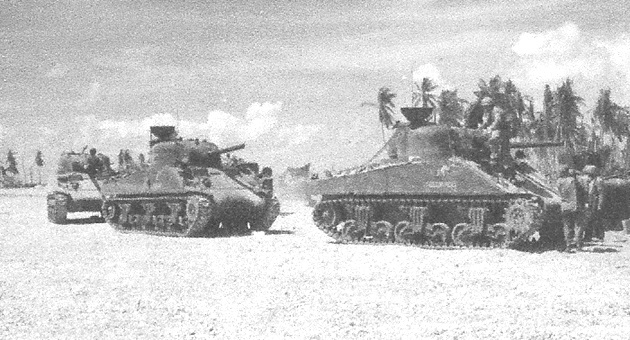
These tanks are in an assembly area near Beach Red 2 on the last day. In line is COLORADO (right), CHICAGO (center) and CHINA GAL (left). CHICAGO was recovered from the underwater crater.
This is my close up of COLORADO in the assembly area.
M3A1 light tanks
The M3A1 light tanks were among the few critical items not truly combat loaded on the attack cargo ships, being carried in the very bottom of the cargo holds. Indiscriminate unloading during the first 30 hours of the landing had further scrambled supplies and equipment in intervening decks. It took hours to get the light tanks clear and loaded on board LCMs.
Due to the unpredictably low tide, 16 LCMs carrying M3A1 tanks got hung up on the reef and forced to drop their ramps. Many of those tanks either immediately sank in the lagoon or fell into deep shell craters while wading ashore under fire. During the invasion, only 37 M3A1 tanks managed to land on Betio.
In the early evening of the second day, this B Company M3A1 tank is wading ashore to Green Beach. The code “KA20-4” on the stern of the LCM on the left designates the parent ship was the USS Virgo (AKA-20), an Andromeda-class attack cargo ship.
This is a close up of the M3A1 tank in the above photo. This M3A1 tank has jettison-able auxiliary fuel tanks mounted on the top of the hull which extended the tank’s operational range.
Once ashore, the surviving M3A1 tanks faced intense fire. At least one M3A1 tank was destroyed by a Japanese soldier placing a magnetic mine on its engine deck, and another was knocked out by mortar fire. By the end of the second day, only two light tanks remained operational on Green Beach.
The M3A1 tanks were primarily used for close-in infantry support, bunker busting, and direct-fire suppression of machine-gun nests. The M3A1’s 37mm gun was ineffective against most of the Japanese bunkers, forcing the tankers to drive right up to the bunker embrasure and fire high explosive rounds directly into the gun-slits. Also, the thinner armor of the M3A1 tank could not withstand hits from the Japanese anti-tank guns.
In this photo, there are at least 6 M3A1 Tanks of different companies parked in the Japanese plane revetments on November 22nd or later.
This is a close up of the closest B Company M3A1 tank in the above photo. This tank has a single track grouser bar attached to each track which provides more traction in sand and mud. The circular plate on the tank’s right sponson covers the hole in the armor for a fixed .30 Caliber machine gun which was either not installed or removed.
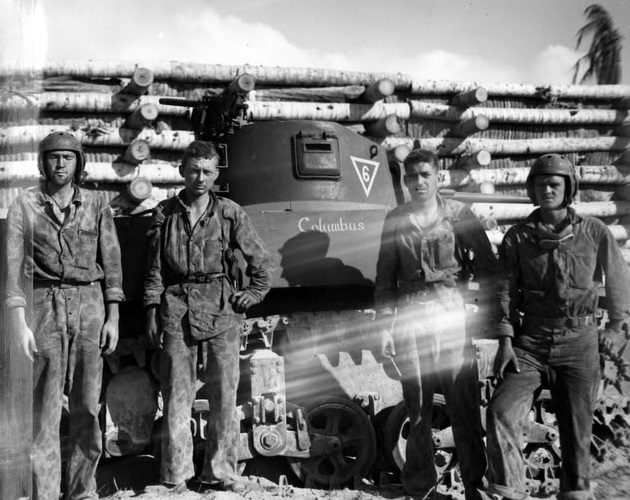
The crew of a Company C M3A1 light tank named “Columbus” pose in front of their tank next a revetment wall. It appears that the direction of where the triangle on the turret is pointing indicates the company, pointing up (A Company), pointing left (B Company), and pointing down (C Company).
Two more M3A1 tanks parked by the revetments. These tanks had not jettison their auxiliary fuel tanks.
A Company B M3A1 tank is towing a M3 37mm AT gun from the Weapons Company of the 6th Marines to the 1st battalion, 6th Marines on November 22nd.

Japanese Type 88 Gun
The Type 88 75mm Anti-Aircraft gun was used by the Imperial Japanese Army during WWII. The Type number was designated for the year the gun entered service, 2588 in the Japanese imperial year calendar, or 1928 in the Gregorian calendar.
While their primary role was anti-aircraft, they were utilized as dual-purpose weapons for coastal defense and anti-boat fire on Betio. The Japanese also found the gun’s high velocity rounds were an extremely effective anti-tank weapon when fired horizontally.
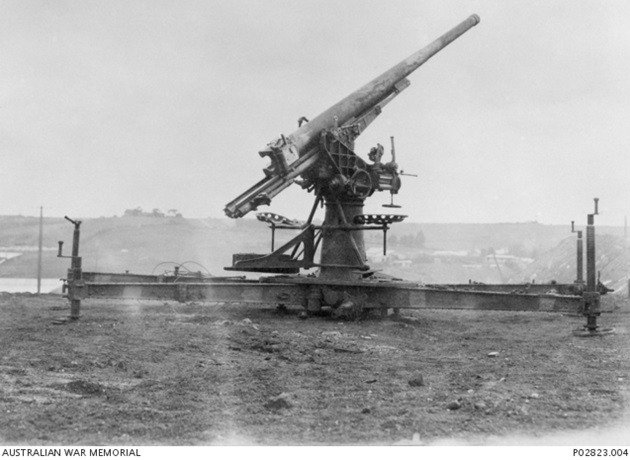
Specifications:
Crew: 12 (minimal 4)
Elevation: 0 to +85 degrees
Traverse: 360 degrees
Rate of fire: 15–20 rounds/minute
Muzzle velocity: 720 meters/second (2400 feet/second)
Effective firing range: 9097.6 meters (29848 feet)
Maximum horizontal range: 13800 meters (approximately 15000 yards)
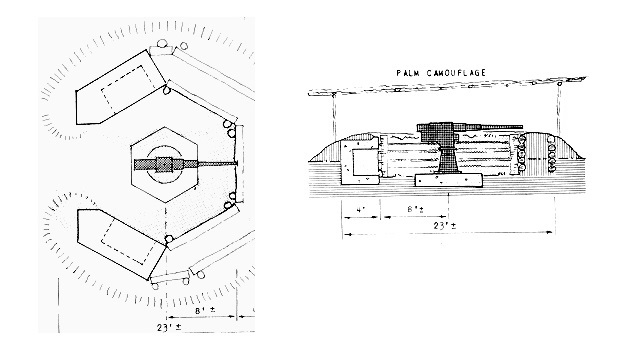
The Type 88 guns were mounted in specialized five-sided, open-top emplacements dug roughly 5 feet (1.524 meters) into the ground and revetment was usually built with materials like concrete, coconut logs, boards, or empty drums. The palm camouflage above the position was made of palm tree fronds and not added if the gun is used for anti-aircraft fire.
A Type 88 75mm gun on a Betio beach on 31 December 1943. This might be Beach Black 1 or 2 on the south side of the island.

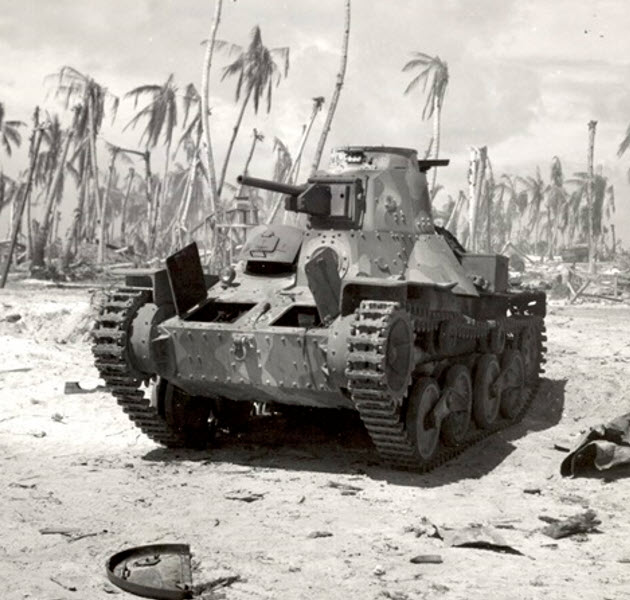
Japanese Tanks
Of the 14 Type 95 Ha-Go tanks of the 7th Sasebo SNLF on Betio, 11 of them were destroyed and 3 were abandoned during the battle.
Film: 1943 – A US Marine Lights A Cigarette near Jap Tank, And A Panorama Shows Video
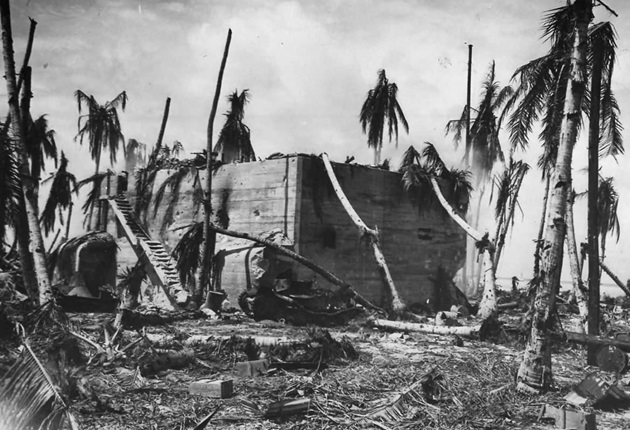
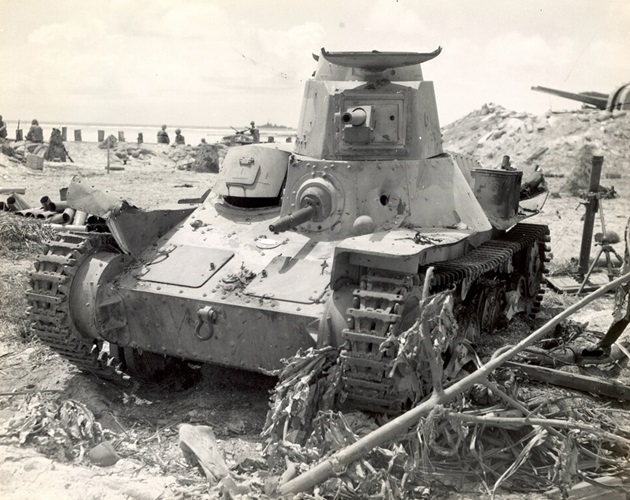
This is the south side (the rear) of Rear Admiral Keiji Shibasaki’s command bunker. Beach Red 3 is not far behind it. This imposing bunker withstood direct hits from US Navy 16-inch (406.4 mm) shells and aerial 500-pound (226.8 kg) bombs. In the foreground on the right is a Ha-Go tank. Note a tank turret is laying on its side on the ground next to the tank and in the background to the right of the bunker is knocked out tank without a turret. The two tanks were immobilized by a lack of fuel.
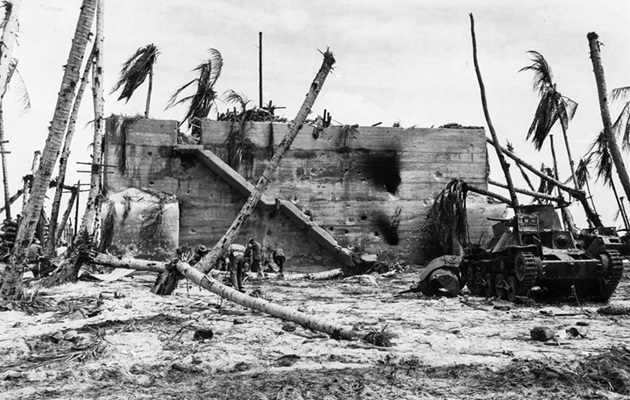
Sometime in the mid-afternoon of November 20th, Rear Admiral Shibazaki was KIA. Reportedly, he and all his senior officers were moving to their secondary command post when they were caught out in the open and hit by naval shellfire from US Navy destroyers USS Dashiell (DD-659) and USS Ringgold (DD-500).
This is the left side view of the knocked out tank at the rear of the command bunker. The turret is rotated to the right and the rear of the turret is seen. This photo shows closer details of the shell holes and the exterior damage of the bunker.
This view is the southeast corner of the command bunker and the other Ha-Go tank next to it.
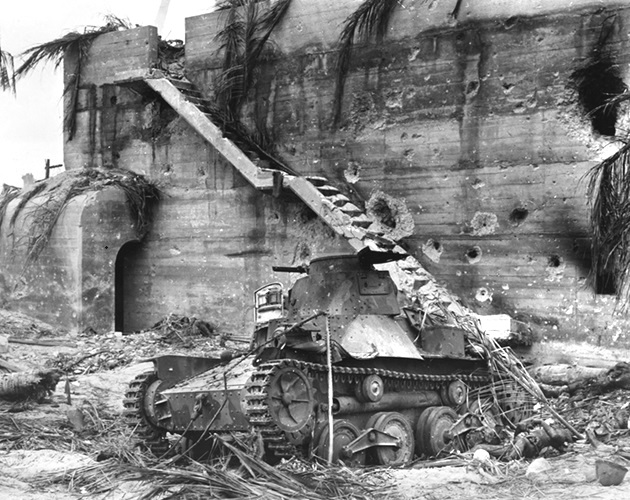
This is my close up of the knocked out Japanese tank in the above photo. This tank probably was hit by a US Navy 5-inch (127mm) shell and the turret was blown high into the air and could have landed next to the tank behind the bunker. Note the open access hatch cover on the front right of the hull and the damage to the left track and suspension.
This is the front view of the knocked out tank at southeast corner of the bunker. The Marine is pouring water from a canteen for a cat. He has an M17 binoculars case hanging on his belt next to his canteen. Compare the open access hatch cover on the tank’s front hull and the damaged left track in this photo with the above photo.
Film: 1943 – After The Battle Of Tarawa, US Marines Shower, Begin Constructing
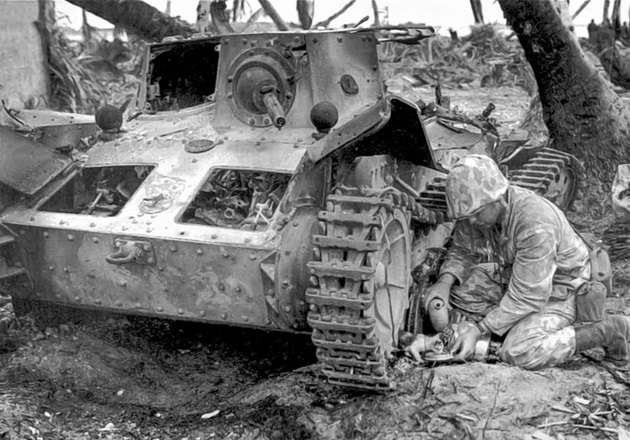
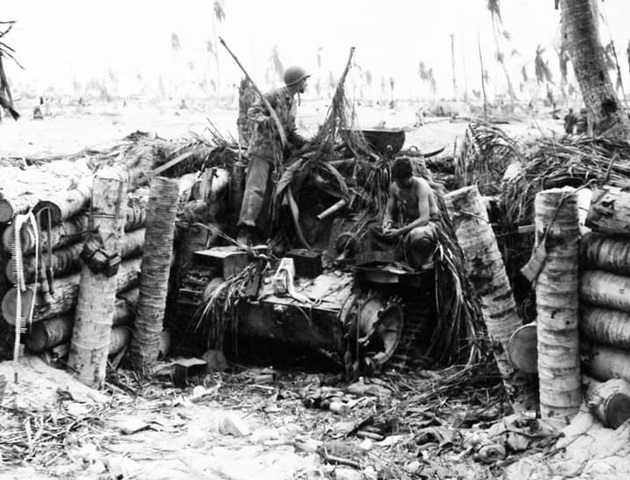
US Marines examining a knocked out Type 95 Ha-Go tank among palm trees.
This is a rear view of a Type 95 Ha-Go tank. Note the camouflage paint pattern on the turret and the rear hull.
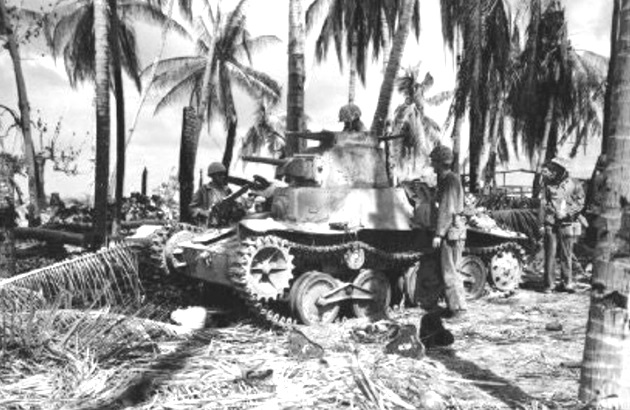
Two Marines are inspecting the shell hits on a Type 95 Ha-Go tank.
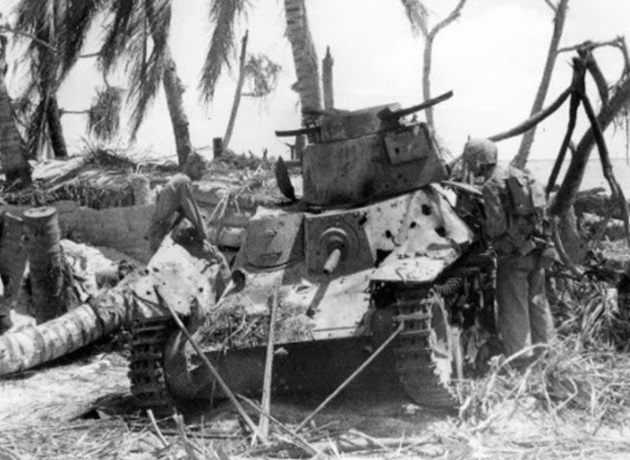
Two Marines are looking over a dug-in Type 95 Ha-Go tank which was used as a pillbox. Note the damage to the tank’s right track and sprocket.
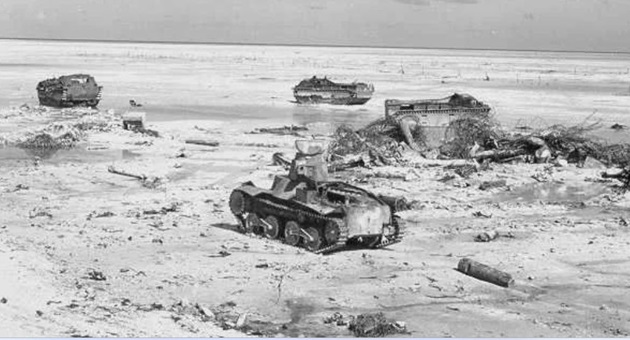
A knocked out Type 95 Ha-Go tank on a beach. In the background on the right, appear to be the barrels of Twin-Mounted 127mm guns. This might be Beach Black 1 on the southwest side of the island.
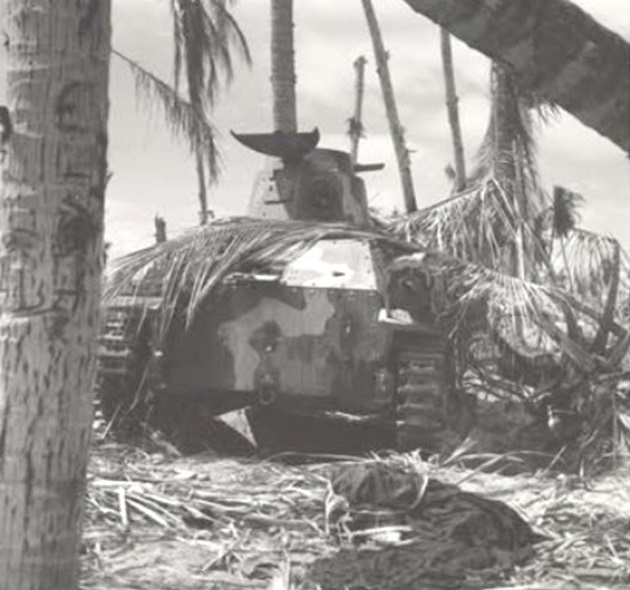
A Type 95 Ha-Go tank abandoned on a beach. It appears to had some mechanical problems.
An abandoned or knocked out Type 95 Ha-Go tank on a beach at low tide. In the background are three abandoned US LVT-1s.
US Aircraft
On 7 November 1943, aircraft carrier USS Nassau CVE-16 with US Navy Fighter Squadron 1 (VF-1) “High Hatters” flying Grumman F6F-3 Hellcat Fighters sailed for Tarawa with Task Force 52. The Nassau’s mission was to transport VF-1 to Tarawa and to send it ashore as soon as the captured airfield was available.
The invasion of Tarawa commenced but heavy enemy resistance was encountered. As a result, VF-1 was instead assigned to combat air patrol and flew bombing and strafing missions from the carrier in support of the assault troops. The squadron had flown a total of 106 sorties and logged 237 hours of flying time in the four days of combat operations without losing a single plane or pilot. On November 25th, VF-1 F6F Hellcats were the first US aircraft to land on Betio.
Film: 1943 – Us Navy Planes Land On A Beach Of Tarawa, One Video (Color)
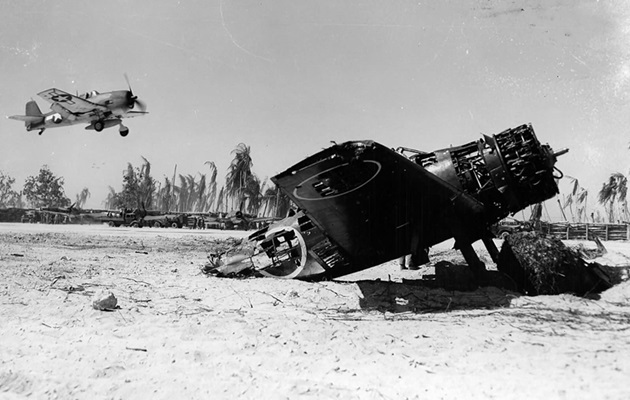
On 29 November 1943, a F6F-3 Hellcat landing on Betio. In the background, US planes and airfield vehicles are parked in the revetments. In the foreground is the remains of a Mitsubishi A6M2 “Zero” fighter.
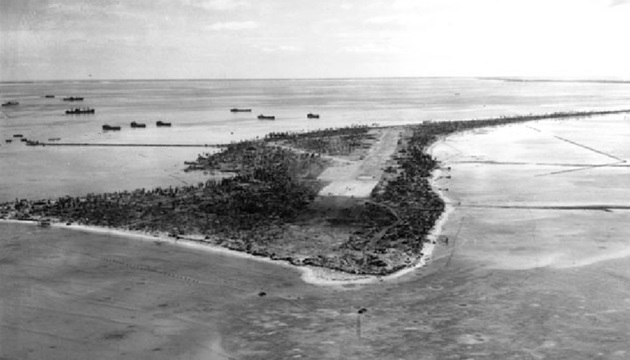
This aerial view of the landing approach to the airfield on Betio was taken in December 1943, two weeks after US forces captured Betio.
Film: Battle of Tarawa in Color
The Cost
Of the 3636 Japanese in the garrison, only one officer and sixteen enlisted men survived. Of the 1200 Korean laborers brought to Tarawa to construct the defenses, only 129 survived. In total, 4690 of the island’s defenders were killed.
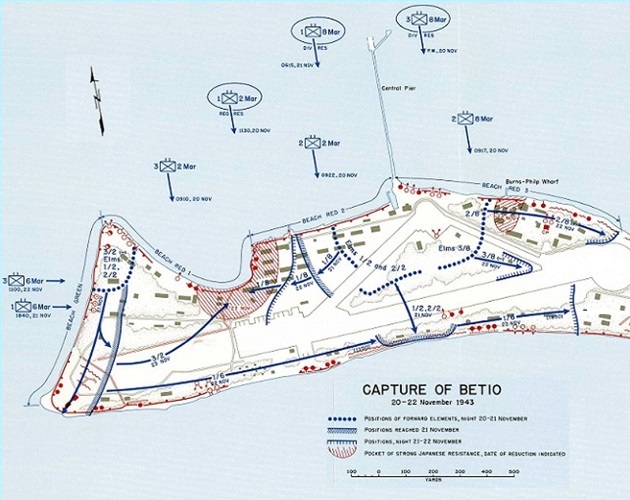
The US 2nd Marine Division suffered 894 KIA, 48 officers and 846 enlisted men, while an additional 84 wounded later succumbed, 8 officers and 76 enlisted men. A further 2188 men were WIA, 102 officers and 2086 men. Of the roughly 12000 US Marines on Tarawa, 3166 officers and men were casualties. Nearly all of these casualties were suffered in the 76 hours between the initial landings at 0910 hours on November 20th and the island being declared secured at 1330 hours on November 23rd.
Hawkins Field
On November 25th, the airfield was named in honor of USMC First Lieutenant William Dean Hawkins who was KIA on Betio. On November 21st, Hawkins personally initiated an assault on a hostile position fortified by five Japanese machine guns, refused to withdraw after being seriously wounded and destroyed three pill boxes before he was mortally wounded. For his actions above and beyond the call of duty, Hawkins was posthumously awarded the Medal of Honor.
After the island was secured, US Navy Seabees from the 2nd Battalion, 18th Marines, 74th and 98th Naval Construction Battalions bulldozed all the debris off the airfield and extended the runway right to the western end and coral surfaced it. Initially, the USAAF moved the 41st Bombardment Group to Hawkins which operated four squadrons of B-25 Mitchell medium bombers from the airfield starting in December 1943.
In January 1944, Hawkins became the HQ of the USAAF VII Bomber Command, directing operations against Japanese forces in the Marshall Islands. The USAAF then stationed the B-24 Liberator-equipped 11th Bombardment Group at Hawkins.
Two B-24 Bombers crashed on 21 January 1944:
B-24J-1-CO “Miss Bee Haven” 42-72982, crashed on takeoff at 0021 hours. This bomber took off to the east but was unable to attain an altitude of 100 feet (30.48 meters). Both pilots lowered the nose slightly in an attempt to gain speed, then pulled up sharply before impacting the Tarawa Lagoon tail first. The bomber exploded on impact roughly 150 yards (137.16 meters) off the southern shore of Betio roughly two-thirds of a mile east of the runway. Three (pilot, co-pilot and navigator) survived the crash and seven were killed on impact.
B-24J-1-CO 42-72999 took off to the east. The engines did not sound as though they were developing power. After reaching an altitude of roughly 250 to 300 feet (66.66 to 91.44 meters), the bomber started to settle slowly and at 0038 hours crashed into the sea roughly 3 miles (4.83 km) to the east. The wreckage of this B-24 sank to a depth of 24 feet (7.3 meters). The crash was believed to have been caused by water in the fuel lines. The entire crew was presumed to be killed in the crash and were all listed as MIA.
The length of the runway was marginal for the bombers, and the USAAF units were moved to Bairiki (Mullinix) Airfield on nearby Bonriki Island which had a longer runway. By the end of January 1944, the USAAF moved both bomber groups over to Bonriki and Hawkins was then used by US Navy aircraft and as an emergency landing airfield for Mullinix. Elements of US Navy squadrons assigned to Hawkins included VP-52, VP-72, VP-102, VB-142, and VB-144.
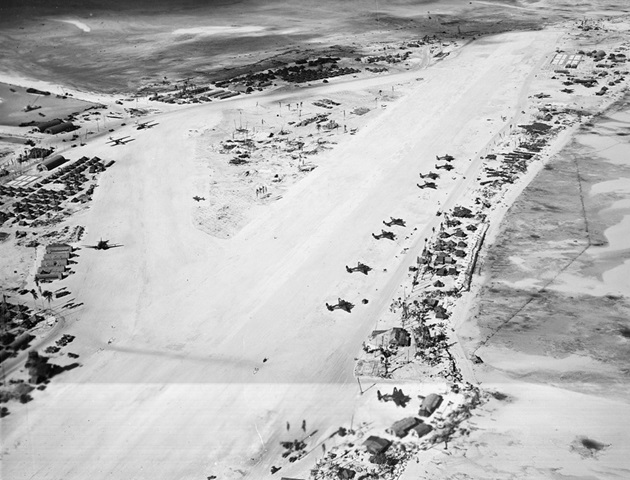
Aerial view of Hawkins Field in March 1944. Visible on the airfield are a Douglas R4D (DC-3), two Consolidated PBY-5A Catalinas, and several Lockheed PV-1 Venturas.
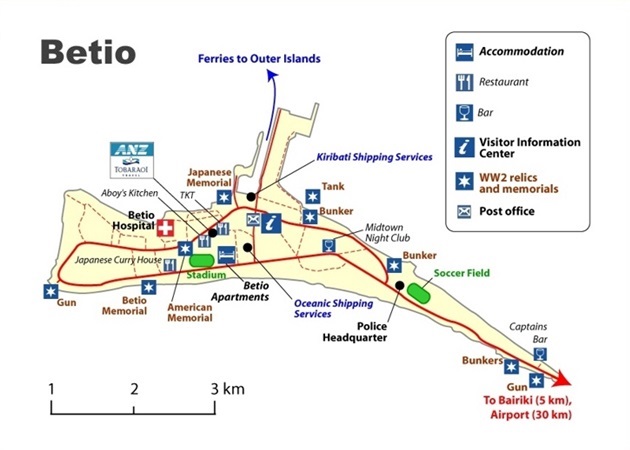
Today
The island of Betio, part of the Republic of Kiribati, is a living museum. After the war, the island was redeveloped using much of the materiel left by the Americans. Today, the roads on the island reflect the outlines of the airfield and supporting roads of the wartime facilities.
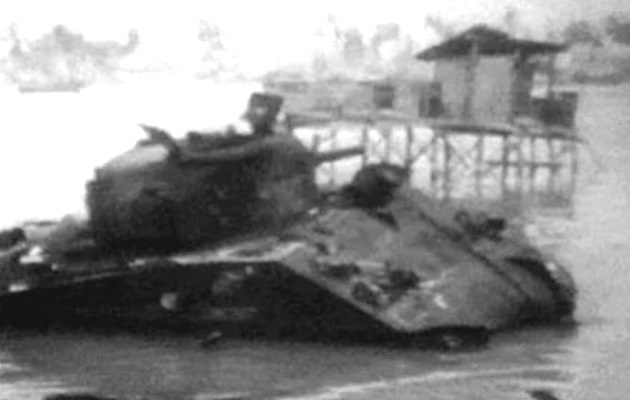
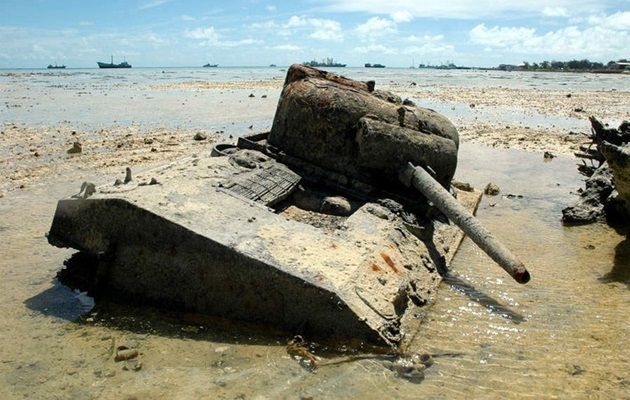
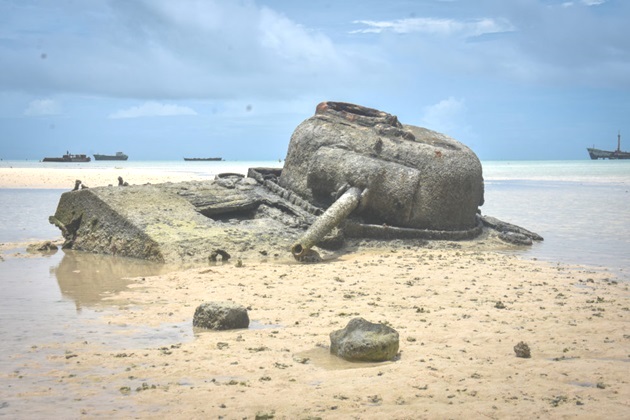
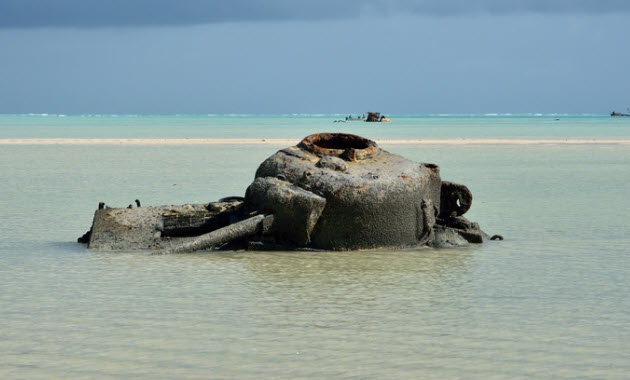
Sherman Tank:
A rusted M4A2 Sherman lies half-buried in the sand off Red Beach 2. It is often fully exposed and accessible on foot during low tide. The identity of the remaining relic in the Tarawa lagoon today is often debated. Some say it is CECILIA, others claim it is actually the Sherman named COBRA.
Japanese Type 95 Tanks:
Several Japanese tanks remain on the island, including one on Beach Red 2, another in the surf near Beach Red 3, and a third on the southeast side near Beach Black 2.
Submerged Craft:
At low tide, the remains of LVT-1 or LVT-2 Amtracs (amphibious tractors), sunken landing craft, and some wreckage of B-24J “Miss Bee Haven” off shore can be seen.
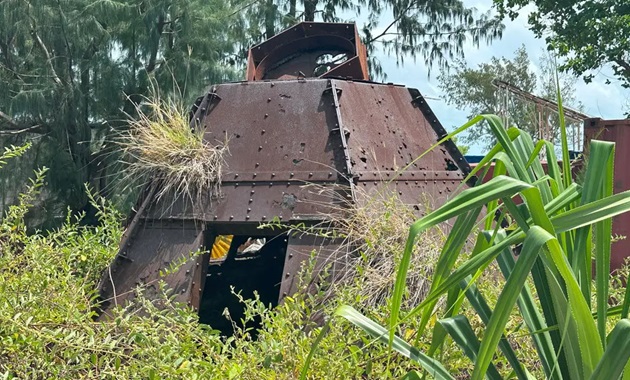
Coastal Defense Guns:
Four 8-inch (203mm) Vickers guns are still in relatively good condition at the eastern and western ends of the island.
Pillboxes and Bunkers:
Numerous concrete fortifications, including Shibazaki’s Command Bunker and Bonnyman’s Bunker, are scattered throughout the island.
First Lieutenant Alexander “Sandy” Bonnyman Jr., a US Marine Corps combat engineer of 2nd Battalion, 8th Marines, 2nd Marine Division and a Medal of Honor recipient, was KIA on 22 November 1943. Bonnyman led an assault on a huge bombproof bunker located northwest of Shibazaki’s Command Bunker, just east of the main pier. This bunker was covered by sand making it appear as a large hill. Today, only the concrete bunker still exist surrounded by buildings.
Parts of Bonnyman’s actions were captured on film by combat cameraman Norman Hatch and featured in the 1944 documentary “With the Marines at Tarawa”, making it the first Medal of Honor action captured on film.
A rusty Japanese steel pillbox on Betio today.
Shibazaki’s Command Bunker today.
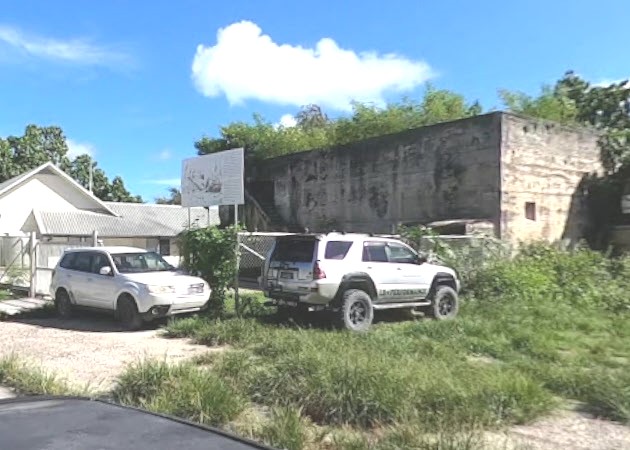
The sign state Rear Admiral Shibazaki was killed on 22 November 1943, the 3rd day. Other sources state he was killed on November 20th, the first day.
Book
Tanks in Hell: A Marine Corps Tank Company on Tarawa – 2015
by Romain Cansière (Author) and Oscar E. Gilbert (Author)
Winner of THE GENERAL WALLACE M. GREENE, JR. AWARD for outstanding nonfiction.
Model Kits and Decals
1/35:
Dragon 6062 M4A2 “Tarawa” – 2006
Dragon 6767 IJA Type 95 Light Tank “Ha-Go” Early Production – 2013
Dragon 6770 IJA Type 95 Light Tank “Ha-Go” Late Production – 2014
Italeri 6462 LVT-2 Amtrac – 2007
Italeri 6498 M3A1 – 2012
Archer AR35223 USMC M4A2 Shermans in Tarawa Decals – 2006
1/48:
EMP3d (EMP) 72011945-48 Wrecked type 95 Ha-Go tank – closed hatch – 2026
EMP3d (EMP) 72011946-48 Wrecked type 95 Ha-Go tank – open hatch – 2026
Gaso.line GAS48109K Hull M4A2 Sherman Conversion (Resin Kit)
Gaso.line GAS50149K Japanese light tank type 95 “Ha-Go” (Resin kit)
Military Scales (IDAP Technology) PMI0118C LVT 1 – 2023
Military Scales (IDAP Technology) PMI0119C LVT 2 – 2023
Archer AR49016 USMC M4A2 Shermans in Tarawa Decals – 2006
1/72:
Dragon 7305 M4A2 Sherman Tarawa – 2007
EMP3d (EMP) 72011945-72 Wrecked type 95 Ha-Go tank – closed hatch – 2026
EMP3d (EMP) 72011946-72 Wrecked type 95 Ha-Go tank – open hatch – 2026
Military Scales (IDAP Technology) PMI0118B LVT 1 – 2022
Military Scales (IDAP Technology) PMI0119B LVT 2 – 2022
Braille Strike 72035 M4A2 USMC Tarawa Decals – 2017