Designated as Operation Detachment, the objective was to capture Iwo Jima with its two airfields. The battle of Iwo Jima (19 February to 26 March 1945) was bloodiest battle in US Marine Corps history. Due to the extreme ferocity of the fighting, 27 Medals of Honor were awarded to US servicemen. This is the highest number of Medals of Honor ever awarded for a single battle in US history.
Following the US capture of the Mariana Islands in mid-1944, the US Army Air Forces (USAAF) began launching B-29 bombing raids against mainland Japan. Iwo Jima sat directly along this flight path and it posed a strategic and operational threat to the USAAF bombing campaign against Japan.
- Japanese radar installation on Iwo Jima detected incoming US bombers. This gave the Japanese up to two hours of advance notice to prepare air defenses and scramble interceptors.
- Between November 1944 and January 1945, Japanese bombers and fighters on Iwo Jima launched destructive one way raids against the US airfields on Saipan and Tinian. These attacks destroyed 11 B-29s on the ground and damaged dozens more.
- B-29 bombers with combat damage, a mechanical problem or low on fuel were forced to ditch in the sea.
The Joint Chiefs of Staff ordered the seizure of the island, setting the stage for the amphibious invasion in early 1945.
US Blockade
The US military conducted a 9-month air-and-sea isolation campaign against Iwo Jima. US submarines and carrier aircraft successfully choked off Japanese supply convoys, preventing reinforcement troops, additional ammunition, and food from reaching Iwo Jima. The US Navy conducted the longest preliminary shore bombardment of the war. Battleships and cruisers routinely shelled the island’s surface assets. US Navy/Marines carrier attack squadrons flew air strikes against the airfields on Iwo Jima. USAAF B-24 bombers also aggressively struck the island day and night. Iwo Jima was subjected to the most relentless pre-invasion “softening-up” campaign of the Pacific War.
The naval blockade successfully stopped the arrival of Japanese reinforcements and supplies, however, the naval bombardment and the USAAF bombing campaign failed to destroy the garrison on the island. They survived the US bombardment and aerial attacks largely unharmed, forcing the US to launch a bloody ground invasion.
Japanese Forces
The Japanese forces on Iwo Jima were organized under the Ogasawara Army Group (also known as the Ogasawara District Group), commanded by Lieutenant General Tadamichi Kuribayashi. The Army Group comprised approximately 21000 to 22000 troops, split between the Imperial Japanese Army (IJA) and the Imperial Japanese Navy (IJN).
Due to the US blockade, General Kuribayashi ordered the construction of Airfield No. 3 to be halted and to start the construction of 11 miles (17.7 km) of deep underground tunnels and bunkers throughout the island.
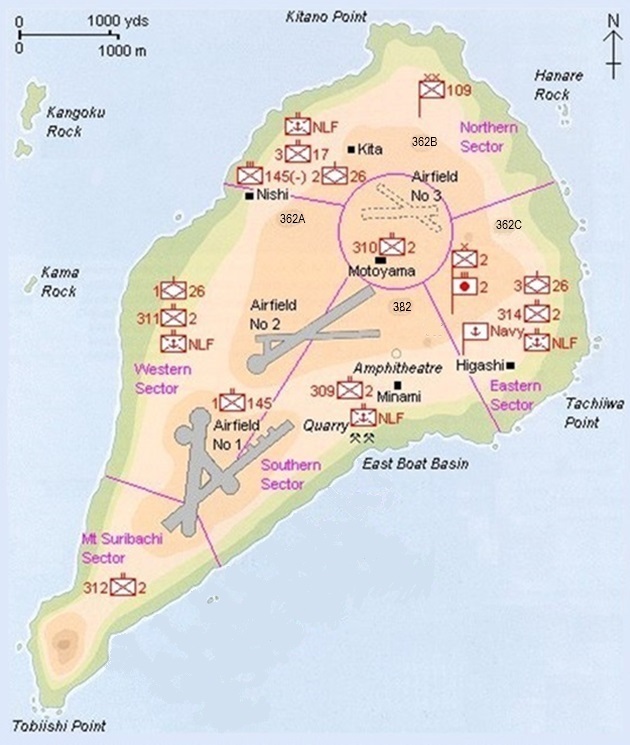
Map 1
IJA Units (approximately 13500 to 14000 troops):
109th Division Headquarters & Signal Company: Led directly by General Kuribayashi.
145th Infantry Regiment: Commanded by Colonel Masuo Ikeda, this high-quality, standard infantry regiment was deployed from the Japanese mainland.
2nd Mixed Brigade: Commanded by Major General Kotau Senda, this fortress-style unit contained five Independent Infantry Battalions (the 309th, 310th, 311th, 312th, and 314th).
3rd Battalion, 17th Independent Mixed Regiment: A reinforced infantry detachment.
26th Tank Regiment: Commanded by Lieutenant Colonel Baron Takeichi Nishi (gold medalist equestrian show jumper at the 1932 Los Angeles Olympics).
Brigade Artillery Group & Specialized Artillery Units: Consisted of the 20th Independent Artillery Mortar Battalion, the 2nd and 3rd Independent Medium Mortar Battalions (armed with massive 320mm spigot mortars), and the 109th Division Antiaircraft Artillery Battalion.
IJN Units (approximately 7000 to 7500 troops):
The naval units were commanded by Rear Admiral Toshinosuke Ichimaru and fought completely dug-in alongside the Army.
27th Air Flotilla (Elements): Ground crews, radio operators, and anti-aircraft personnel who remained on the island after their aircraft were destroyed.
Iwo Jima Naval Landing Force (NLF): Dedicated infantry-style ground combat unit providing defense for the airfields and coastal artillery.
204th Naval Construction Battalion: Engineers responsible for carving out the underground tunnel defense system network.
Japanese Armor
The 26th Tank Regiment was formed in Manchuria in April 1944 from the reconnaissance unit of the 1st Armored Division. The battalion-strength unit consisted of roughly 600–800 men and 41 tanks. The tanks was a mix of Type 95 Ha‑Go light tanks (37mm gun) and Type 97 Chi‑Ha medium tanks (57mm howitzer). Also included were Type 90 75mm field guns (towed). The regiment was stationed in Mudanjiang (Mudankiang) in northern Manchuria.
For an operation to retake Saipan, it moved to Pusan, Korea, on 20 June 1944 and waited there. However, the Saipan operation was cancelled and the regiment was sent to Iwo Jima. On July 1st, the regiment departed from Pusan and sailed to Yokohama, Japan. The regiment boarded two ships of Convoy No.3714 at Tateyama, Japan (across Tokyo Bay from Yokohama). The convoy set sail on July 14th, bound for Chichi-jima and Iwo Jima to deliver reinforcements and supplies. It consisted of multiple fast transport and cargo ships including the Nisshu Maru, Hassho Maru, Katsuragawa Maru, Unkai Maru No. 10, and escorted by naval subchasers and a kaibōkan (coastal defense ship).
During the journey, the convoy was intercepted and attacked by the US submarine USS Cobia (SS-245). The transport ship Nisshu Maru was torpedoed and sunk. While almost all the personnel survived, 28 of the regiment’s tanks went down with the ship. The second ship did delivered 13 tanks, the regiment’s artillery, and infantry elements. On 19 July 1944, Convoy No.3714 arrived at Iwo Jima. It was not until December 1944 when Japan shipped 22 replacement tanks to Iwo Jima.
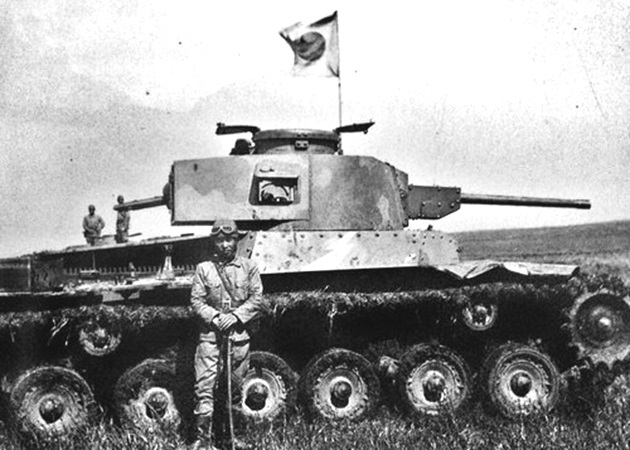
A tank commander posing beside his Shinhōtō Chi-Ha tank armed with a 47mm Type 1 high-velocity gun on Iwo Jima in 1944.
By February 1945, the regiment had 22 or 23 operational tanks on the island.
- 11 or 12 Type 95 Ha-Go light tanks.
- 11 Type 97 Chi-Ha medium tanks, standard 57mm models and a number of upgraded Shinhōtō Chi-Ha (Type 97-Kai) tanks.
Island Defenses
Iwo Jima was the first campaign which the Japanese made an extensive use of land mines. They were the most common cause of US tanks losses.
The beaches on Iwo Jima were composed of steep, 15-foot (4.572 meters) terraces of deep soft, black volcanic ash. Anti-tank land mines were planted all over the beaches and along the beach exits. Concealed artillery and anti-tank guns were positioned above the beaches with overlapping fields of fire.
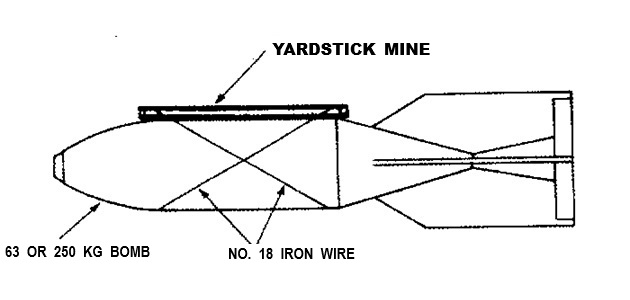
Since all the Japanese planes were destroyed on the ground during the US naval bombardment and air strikes, the stocks of aerial bombs were converted into unconventional, improvised landmines. Many of these aerial mines were located around Airfield No. 1 on the southern flats near Mount Suribachi and further north around Airfield No. 2 and near the village of Motoyama. The taxi strips, runways, and the corridors connecting the airfields were the most heavily mined areas.
A 62 kg or 250 kg (136.7 or 551 lbs) aerial bomb with an attached yardstick mine as a detonator. About 336 lbs (152.4 kg) would set off the yardstick mine.
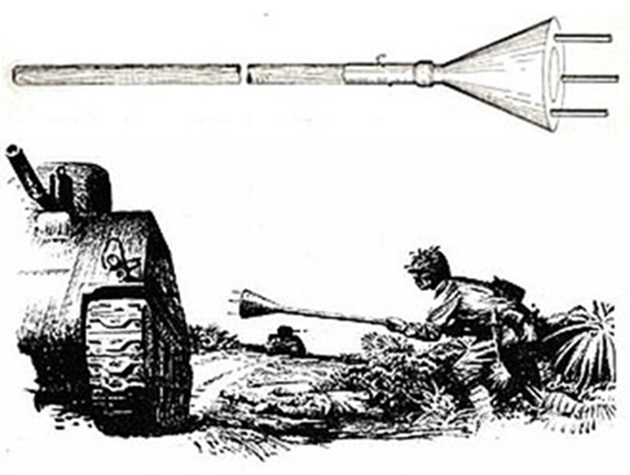
Japanese Infantry Anti-tank weapons:
The Shitotsubakurai Lunge mine was a conical hollow charge anti-tank mine attached to the end of a wooden pole. The Japanese soldier would remove the safety pin, run towards the Sherman as if making a bayonet charge, and thrust the top of the mine against the tank.
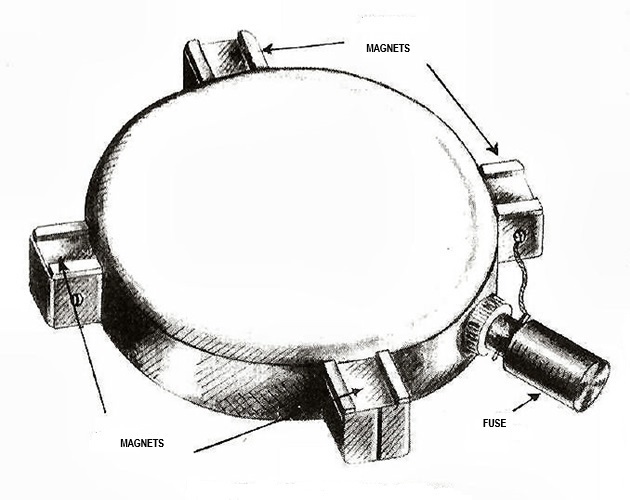
The armor of the Sherman’s hatch covers was significantly thinner and was the most vulnerable and accessible structural weak points on the tank. Japanese Magnetic mines (like this Type 99 Type A) used shaped charges to blast a jet of molten metal through thin steel, periscopes and air ventilators.
US Forces
The US V Amphibious Corps (VAC) was responsible for the assault on Iwo Jima. Commanded by Major General Harry Schmidt, this corps was specifically organized for large-scale amphibious operations and had three marine infantry divisions during the invasion. The VAC also included the 1st Provisional Artillery Group (USMC 2nd and 4th 155mm Howitzer Battalions), amphibious truck (DUKW) battalions, and specialized engineering units.
US 3rd Marine Division “Fighting Third”, “Caltrap”
- 3rd Marine Regiment (Infantry) Held in reserve and never landed.
- 9th Marine Regiment (Infantry)
- 12th Marine Regiment (Artillery)
- 21st Marine Regiment (Infantry)
- 3rd Marine Tank Battalion
US 4th Marine Division “Fighting Fourth” “Maui Marines”
- 14th Marine Regiment (Artillery)
- 23rd Marine Regiment (Infantry)
- 24th Marine Regiment (Infantry)
- 25th Marine Regiment (Infantry)
- 4th Marine Tank Battalion
US 5th Marine Division “Fighting Fifth”, “The Spearhead”
- 13th Marine Regiment (Artillery)
- 26th Marine Regiment (Infantry)
- 27th Marine Regiment (Infantry)
- 28th Marine Regiment (Infantry)
- 5th Marine Tank Battalion
Flamethrower Tanks
In Hawaii, the US Army Chemical Warfare Service and the US Navy Seabees successfully designed and built a main armament flamethrower based on the Sherman M4A3 tank. It was designated as the M4A3 POA-CWS-H1 (Seabee CB-H1) Flamethrower Sherman. POA-CWS-H1 stood for Pacific Ocean Areas, Chemical Warfare Service, Hawaii. The tank’s 75mm main gun was replaced with a faux 75mm barrel which the flamethrower fired through.
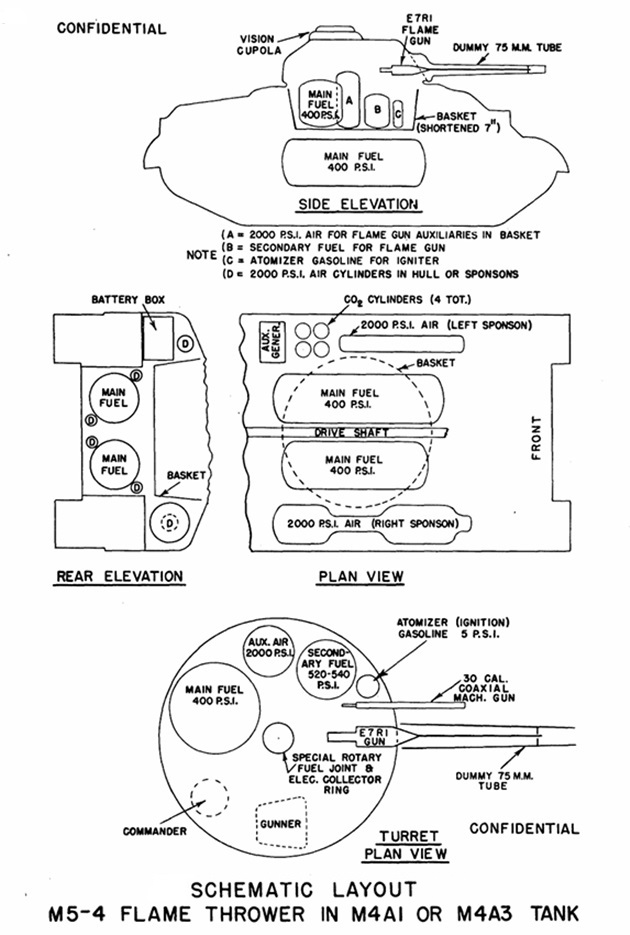
M4A3 POA-CWS-H1 Specifications
Fuel Tank Capacity:
290 US gallons (approximately 1100 liters) located beneath the turret basket.
Effective Range:
60 to 80 yards (55 to 73 meters) when using thickened napalm fuel.
Total Firing Time:
Up to 2.5 minutes (150 seconds) of intermittent or continuous fire.
Propellant System:
Compressed carbon dioxide (CO₂) gas.
The loader no longer had shells to heft into a breech. Instead, the loader’s duties shifted entirely to managing the complex internal chemical and pressure systems required to fuel the weapon.
Eight M4A3 POA-CWS-H1s was sent to Iwo Jima. They were evenly split between the 4th and 5th Marine Tank Battalions. The 3rd Marine Tank Battalion did not received any POA-CWS-H1s because it was equipped with the older diesel engine M4A2 Shermans.
On Iwo Jima, the M4A3 POA-CWS-H1s were mainly used for attacking the large bunkers, caves and tunnels on the island.
Converted Tanks
On Iwo Jima, 48 M4A3 Gun tanks had the E4-5 auxiliary mechanized flamethrower installed which replaced the hull machine gun. They were split between the 4th and 5th Marine Tank Battalions (24 each). The 3rd Marine Tank Battalion had a number of their M4A2s with the E4-5 auxiliary flamethrower installed.
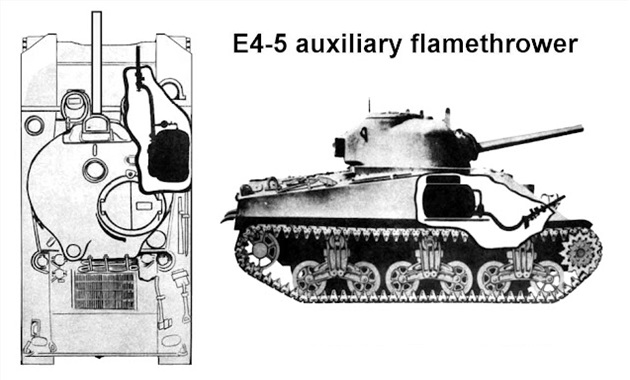
E4-5 Auxiliary Flamethrower Specifications
Fuel Tank Capacity:
170 to 190 gallons (644 to 719 liters) bolted inside the front right hull.
Discharge Rate:
Approximately 4 liters (about 1 gallon) per second.
Total Firing Time:
Up to 50 seconds of continuous fire.
Effective Range:
49 to 70 yards (45 to 64 meters).
Operating Pressure: 375 psi.
In combat, the E4-5 Auxiliary Flamethrower was unpopular with the tank crews because of its limited fuel capacity, short range, and was awkward to aim. The driver had to physically turn the entire tank to aim.
Improvised Flail Tank
After Saipan and the “perfect landing” on Tinian, the 4th Marine Tank Battalion returned to Hawaii to recuperate prior to the invasion of Iwo Jima. While engaging in a battalion-wide refit, Captain Robert M. Neiman (commander of Company C, 4th Marine Tank Battalion) and his tankers found an issue of the Armored Force Journal or the Infantry Journal that had an article describing the anti-mine “flail” tanks developed by the British which they used for mine-clearing operations in North Africa. Recognizing the potential for such an apparatus but knowing that none existed within the US Marine Corps, Neiman and his officers decided to build one from scratch.
Neiman singled out two of his NCOs, Sergeants Sam Johnston and Ray Shaw, as instrumental in its construction. Oklahoman Johnston had worked as an oil field roughneck and driller prior to joining the Marines. To build the mine-clearing tank, Johnston salvaged a dozer tank and replaced the dozer blade with a flail. Using the drive shaft and differential of a truck with heavy chain attached to a rotating drum, they transferred power from the tank drive shaft via a transmission stripped from a Jeep. The marine tankers collaborated with the 117th Naval Construction Battalion (Seabees) to engineer and test this makeshift mechanism.
The US Marines improvised flail tank on the island Maui in Hawaii, late 1944 or early 1945.
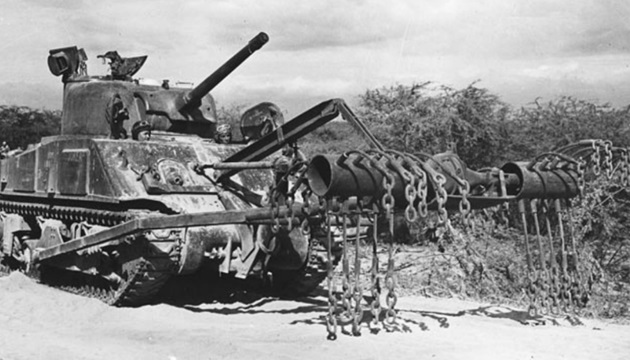
After successful testing, another flail tank was constructed and it was assigned to A Company, 4th Marine Tank Battalion.
Iwo Jima D-Day
Map 2
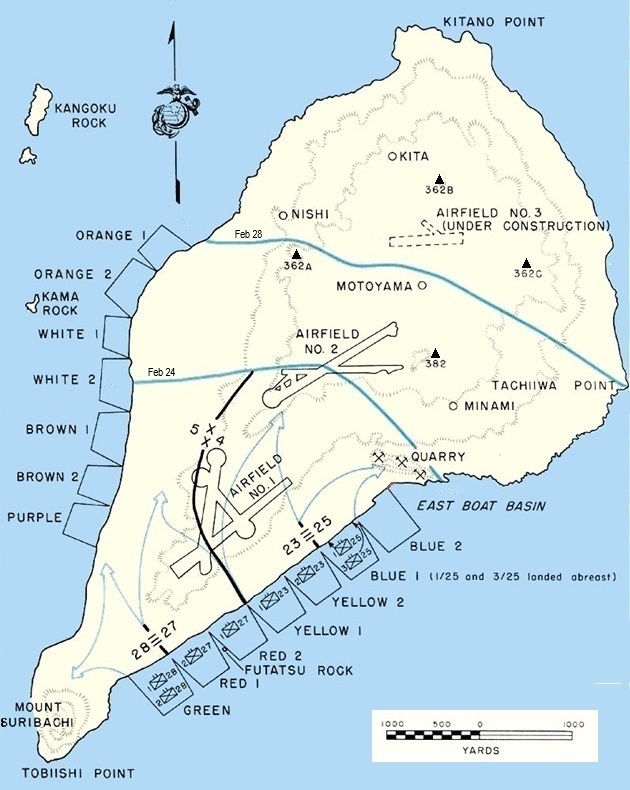
Beaches Purple, Brown, White and Orange were designated as the alternate western landing beaches. Initially, these beaches served as a diversion. While the primary forces hit the eastern side, naval elements feigned movements off the western coast to confuse Japanese defenders about the true landing site. After the battle shifted northward, these beaches (particularly White and Orange) were used as secondary logistical channels to offload ammunition, rations, and heavy equipment.
The primary US amphibious assault took place on the southeastern coast across Beaches Green, Red, Yellow, and Blue where the 4th and 5th Marine Divisions landed. The 3rd Marine Division was held as a floating reserve. The original operation plan intended to utilize multiple sections of the beachhead to land the tanks, but chaotic combat conditions, steep volcanic terraces, and heavy traffic caused significant adjustments during the day.
The 5th Marine Tank battalion’s tank companies came ashore as follows:
Company A:
Landed on Red 1 Beach early in the day and formed the initial armored support for Regimental Combat Team 27 (RCT 27).
Company C:
Explicitly designated to support RCT 28 assaulting Green Beach. When ordered to come ashore late in the morning, Green Beach was entirely bottle necked with disabled vehicles, choked with loose volcanic ash, and was receiving devastating, direct artillery fire from Mount Suribachi. To prevent the armor from being completely destroyed in the water or on the shore, command diverted Company C’s tanks, to Red 1 and Red 2 Beaches (further to the east).
Due to extreme congestion and poor terrain on Red 1 Beach, the battalion commander, Lieutenant Colonel William Robert Collins, attempted to divert Company C to land on Red 2 Beach. However, naval control vessels denied the request and ordered them back to Red 1 Beach. Company C ultimately landed on Red 1 Beach around 1130 hours and was forced to perform a difficult lateral movement northward across the sand to find an exit.
Company B:
Was held offshore waiting for the first two companies to clear the narrow lanes. It did not begin landing until approximately 1300 hours and faced severe delays getting off the Red 1 Beach to join up with the Marine infantry.
The 4th Marine Tank battalion’s tank companies came ashore as follows:
Company C:
Landed on Yellow Beaches (Yellow 1 and Yellow 2) to support RCT 23. Their primary mission was to push inland and help the Marine infantry assault and secure Airfield No. 1.
Company A:
Landed on Blue Beaches (Blue 1 and Blue 2) to support RCT 25. On Blue 1 Beach, they immediately faced a massive, pre-registered enemy minefield just 100 yards (91.44 meters) off the shoreline.
Company B:
Also landed in the Blue sector and worked in coordination with Company A to deliver heavy supporting fire against the heavily fortified bunkers, caves, and pillboxes carved into the Quarry, which directly overlooked the right flank of the invasion beaches.
On the first day shortly after hitting the beaches, many of the the heavy Shermans lost traction, sank to their bellies, and threw tracks. Several of the tanks ran over hidden anti-tank mines. The immobile tanks became easy targets for the concealed Japanese artillery and anti-tank guns.
Film (Color): To the Shores of Iwo Jima
Film: The Battle of Iwo Jima: The Color Footage You’ve Never Seen
Although many US tanks were continually disabled, the US Marines used Armored Recovery Vehicles (ARV) to recover, repair and return a significant number of the disabled tanks back into the fight.
US Tank Markings
The tactical markings for the three Marine tank battalions on Iwo Jima were not the same. While they operated under a loosely shared Marine Corps framework, each battalion used vastly different visual systems, font styles, colors, and layout formats to identify their tanks.
The marine tankers understood the markings, however, the average marine infantryman was generally unaware of the specific differences between the tactical markings of the 3rd, 4th, and 5th Marine Tank Battalions. Instead, infantrymen relied on visual identifiers such as the tank’s nickname and the Unit Numerical System (UNIS) instead of deciphering armor codes and organizational symbols in the middle of combat.
5th Marine Tank Battalion
The three tank companies of the 5th Marine Tank Battalion were identified by three different geometric shapes: a square for A Company, a circle for B Company, and a diamond for C Company.
Two numbers were painted inside the company shape. The first number was 1 to 6, indicated which platoon the tank belonged to: 1 to 4 was for the first four combat platoons, 5 for replacement tank platoon, and 6 for the HQ and Service (H&S) Platoon.
The second number indicated the position of the tank within the platoon. In theory, each platoon was made of three M4A3 tanks with number 0 for the platoon leader and 1 or 2 for the other two tanks in the platoon. The HQ and Service Platoon included a bulldozer tank and an M32B3 Armor Recovery Vehicle (ARV) based on a M4 chassis.
For aerial recognition, a red triangle was painted on the top of the turret. Sometimes the red triangle was edged with a white outline to make the triangle more visible.
Protection Descriptions per Company:
A Company tanks had wooded planks on the hull sides for protection again magnetic mines. Wooden planks were also mounted on the suspension to prevent Japanese soldiers placing mines or explosive charges against the lower hull. All the tank’s hatches were covered with nails.
B Company tanks had corrugated steel plates on the hull sides. This was the only unit on Iwo Jima that used corrugated steel plates to protect against magnetic mines. All the hatches were surmounted with a frame on which chicken wire mesh or pierced steel plates were attached.
C Company tanks had had wooded planks on the hull sides. The hatches on the turret were covered with nails and the hull hatches were covered with chicken wire mesh cages.
C Company tank names:
C Company assigned a sequence of three letters to each of its platoons. Thus the letters A, B, and C were assigned to the HQ Platoon (AVENGER 62 [tankdozer], CALAMITY 63), letters D to F to the 1st Platoon (EARBANGER 11, DEAR MOM 10), letters G to I to the 2nd Platoon (HOBO 21), letters J to L to the 3rd Platoon (JEANNIE, KILLER, LUCKY 30), and letters M to O to the 4th Platoon (MOONSHINE 42, NITEMARE 40). The names of the tanks in the platoon can begin with any of the three letters assigned to the platoon.
M4A3 Sherman named “EARBANGER” of 1st Platoon, C Company (Diamond 11), moved up Red 1 Beach and is firing at enemy positions on Mount Suribachi in the background. Note the target clock painted on the wading trunk on the rear.
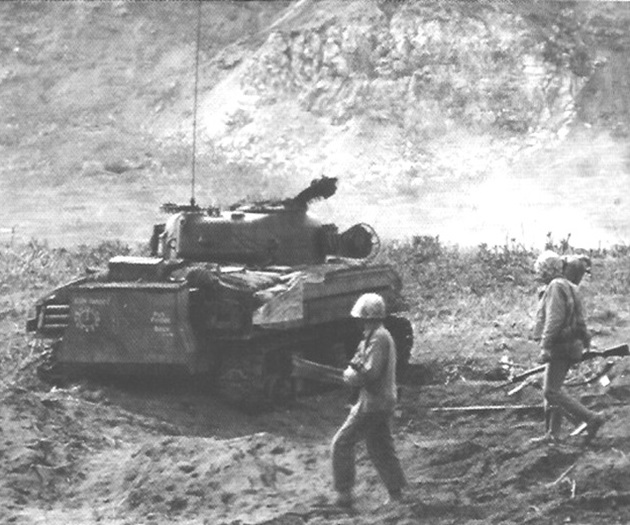
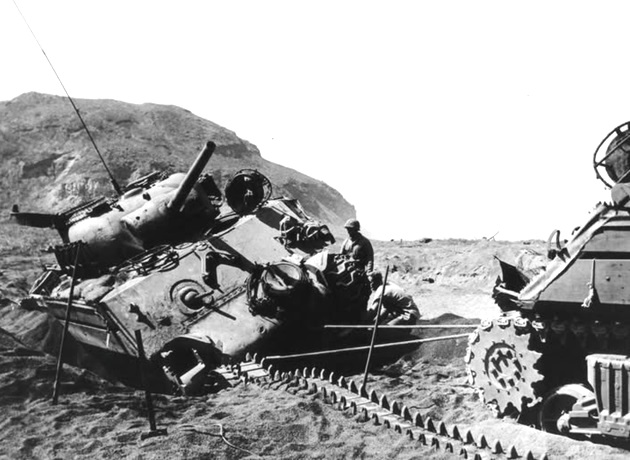
Marines are working to recover a disabled Sherman which most likely ran over a mine. Towing cables are attached to the Sherman’s towing lugs ready to tow it out of the volcanic ash. In the back ground is Mount Suribachi.
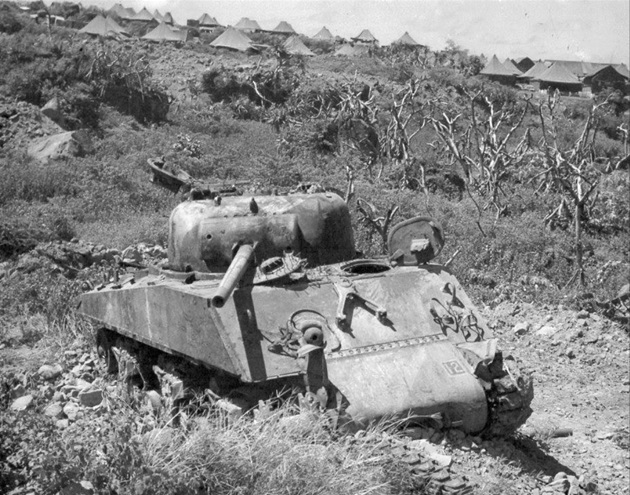
Disabled M4A3 serial number 49606 of the 5th Marine Tank Battalion on Iwo Jima. Date and location unknown.
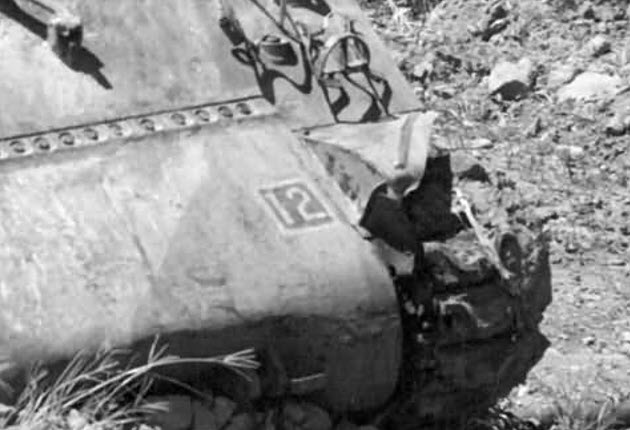
This is my close of the above photo. The number 12 in the square indicate this tank was in the 1st platoon of A Company and it was named “SCORPION”.
M4A3 named “CYCLONE” of 2nd Platoon, A Company (Square 21), was disabled by mines. The unique feature on this tank is the .50 Caliber machine gun mounted on the top of the turret.
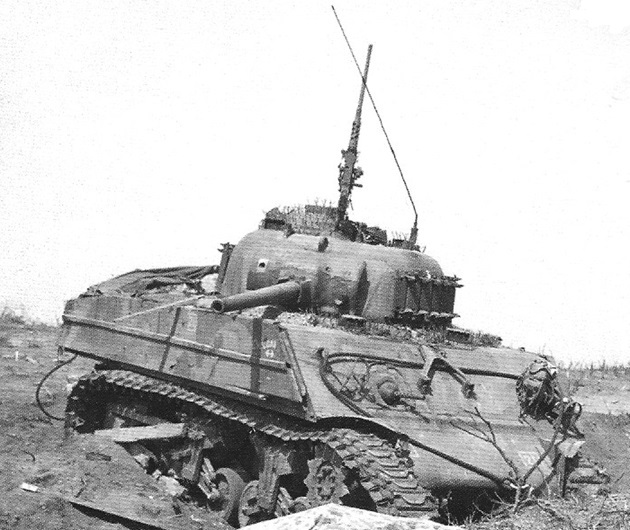
It would been risky for a crewman to fire the machine gun due to the nails on the turret and hull. The crewman also would been exposed to enemy fire.
M4A3 named “TOKYO EXPRESS” of the 5th Marine Tank Battalion stuck in a crater after an artillery shell landed behind the tank, damaging the engine. The hatches, periscopes and ventilator housings are covered with a “bed of nails”. It has sandbags and wooden planks on the hull side and running gear, with metal saw teeth sandwiched in between the wooden planks. The gun barrel and mantlet has the remains of a waterproof cover for the amphibious landing.
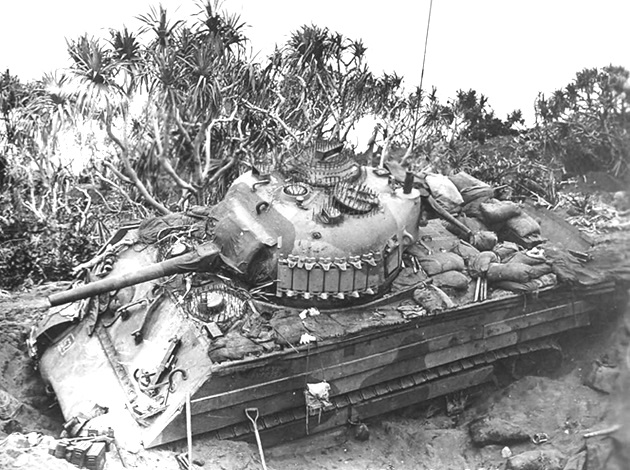
The nails, while highly effective at repelling enemy troops climbing on the tank, were not as effective as defending against the enemy placing explosives on the tank. Grenades could get jammed in between the nails, and satchel charges could very easily snag on them. They could keep a satchel charge or magnetic mine from sitting directly over a hatch, periscope and vents which were the armor weak spots on a tank.
The nails were also dangerous to the crew as well. It would be hard to get out of the tank in a hurry, as not only were the nails welded to the top of the hatches, they were also on the rim around the hatch. Being bogged down, the escape hatch underneath the tank was useless.
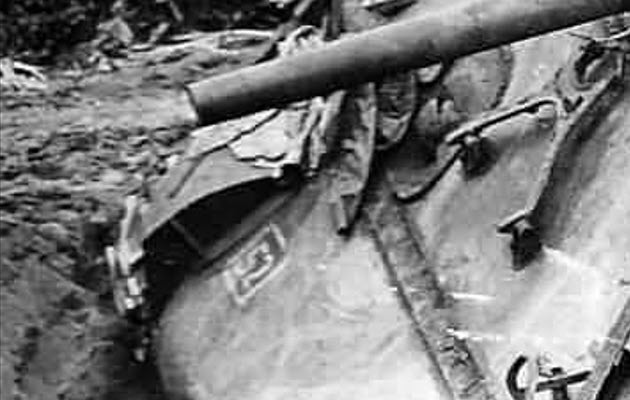
This is my close of the above photo. This tank was in the 5th platoon of A Company.
A crewman standing on the hull of M4A3 named “DAVY JONES” is handing a 75mm shell down to the loader, February 23rd. The wooden planks covering the suspension prevents the Japanese from stuffing satchel charges or placing magnetic mine on the suspension or against the thinner lower hull armor.
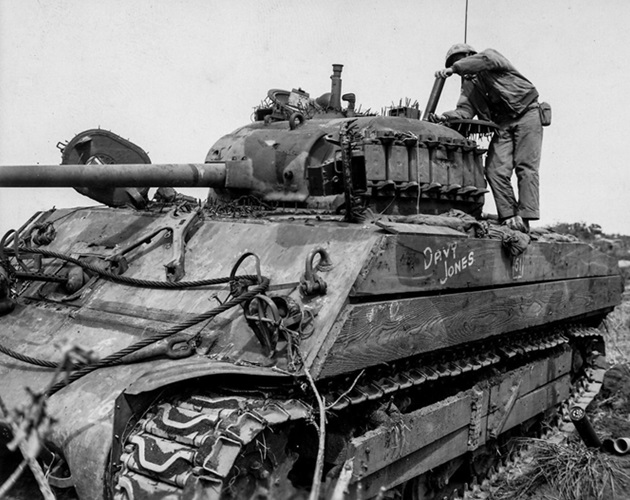
The US Marine Corps is a department of the US Navy and it followed many of the Navy’s traditions. In maritime tradition, “Davy Jones” is a name used as a euphemism for the sea or the ocean’s depths, often associated with the “Davy Jones’ Locker”, a metaphor for the watery grave of drowned sailors. In this case, the tank is Davy Jones’ Locker on land.
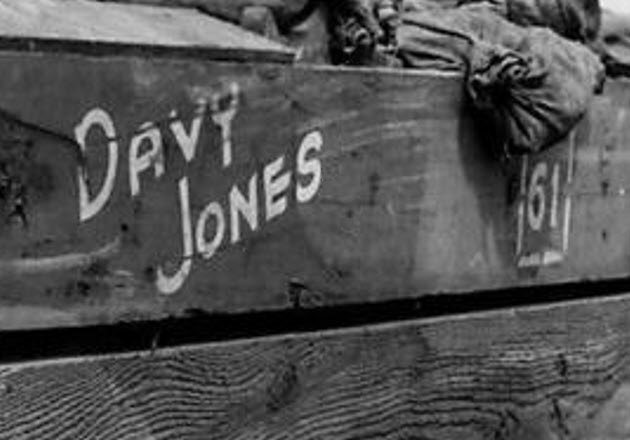
This is my close of the above photo. This tank was in the H&S platoon of A Company. Note the wood grain patterns on the lower wooden plank.
About a week or two later, M4A3 “Davy Jones” was hit three times by a Japanese Type 94 75mm mountain gun or a Type 90 75mm field gun (often referred to in field accounts as a 77mm artillery gun) which set it on fire. All of the crewman abandoned the tank before the ammunition cooked off and completely burnt the hull.
This is the burnt out M4A3 Davy Jones towed to a collection area. The tow cables are still attached to the front of the tank. Note the name is painted on the armor plate on the side of the hull.
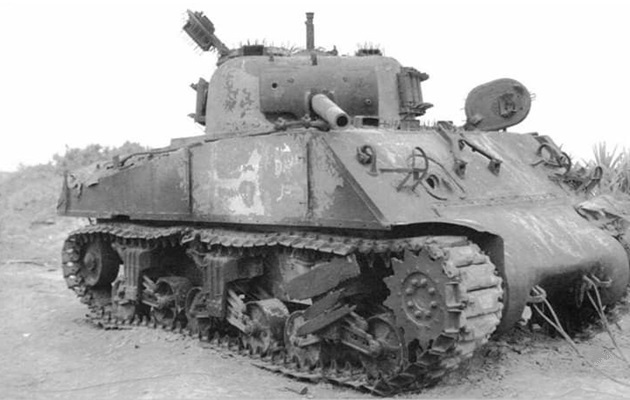
Barely visible on the glacis to the right of the gun travel lock of this 5th Marine Tank Battalion M4A3 is a yellow circle with a number 22 indicating 2nd Platoon, B Company. Part of the red aerial recognition triangle on the top of the turret is visible on the air ventilator. The hull sides are protected by corrugated steel plates over concrete.
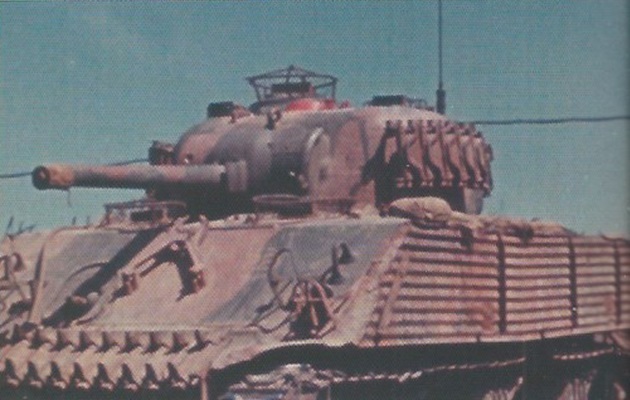
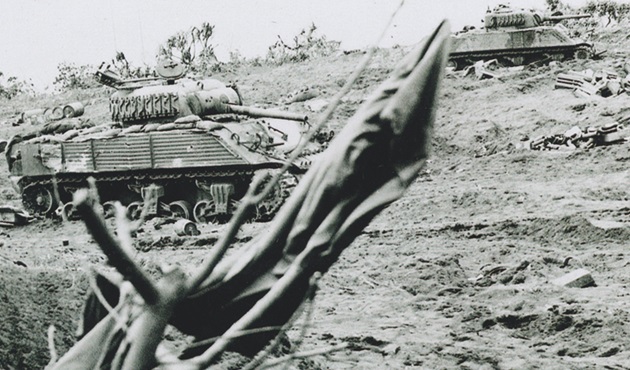
Two more Shermans from B Company, 5th Marine Tank Battalion, with corrugated steel plates on the hull sides.
Platoon Leader Second Lieutenant Leonard Francis Blake’s M4A3 named “LUCKY” (Diamond 30) of 3rd Platoon, C Company, 5th Marine Tank Battalion.
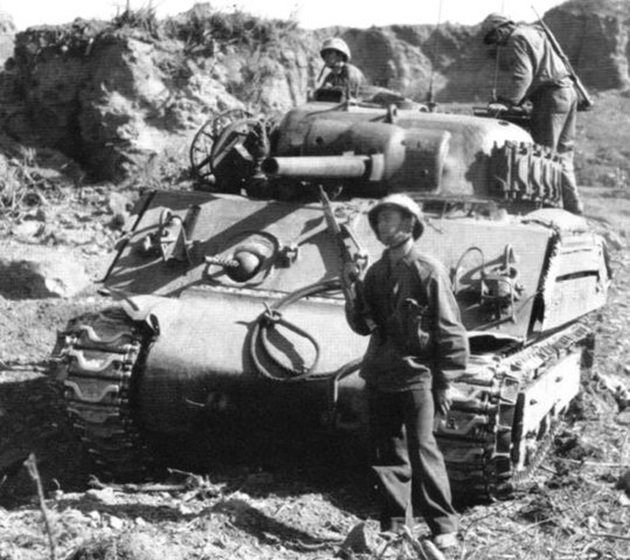
On 1 March 1945, Lieutenant Blake observed from his tank that a tank in his platoon had been disabled and was surrounded by enemy forces. After dismounting from his tank, Blake and two of his crewmen killed three Japanese soldiers attempting to attack the disabled Sherman. This action cleared the way for the trapped crew to escape to safety. For his conspicuous gallantry and intrepidity, Blake was awarded the Silver Star and the Bronze Star. He also received the Purple Heart for wounds sustained in action.
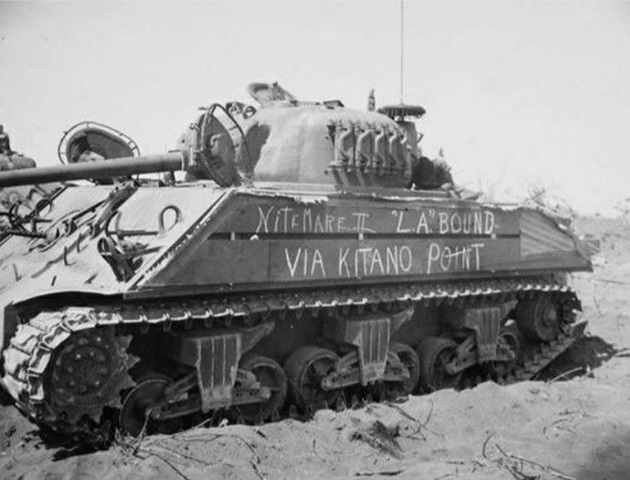
Platoon Leader First Lieutenant Melvin H. Hazaleus’s M4A3 with “NiteMare II ‘L.A.’ BOUND VIA KITANO POINT” painted on the side hull, 12 March 1945. M4A3 NiteMare II survived heavy combat at Kitano Point, the bloody final pocket of Japanese resistance on the northern tip of Iwo Jima (See Map 3 below).
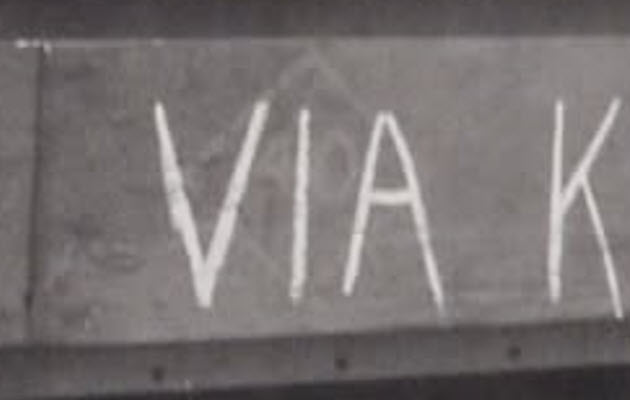
This is my close up of the above photo. Barely visible behind the “VIA” on the hull side is a faded diamond with number 40 for C Company, 4th Platoon.
Shermans of C Company, 5th Marine Tank Battalion, moving up with the Marine infantry.
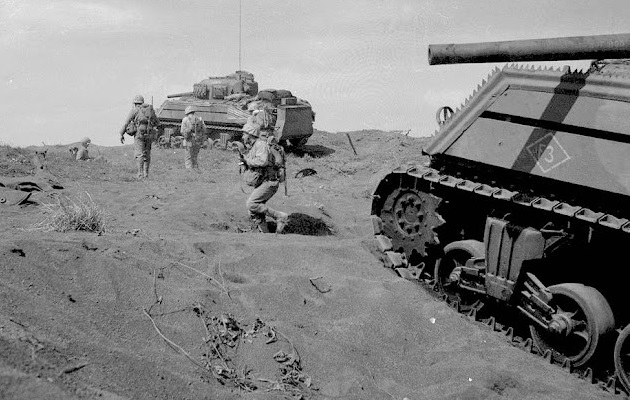
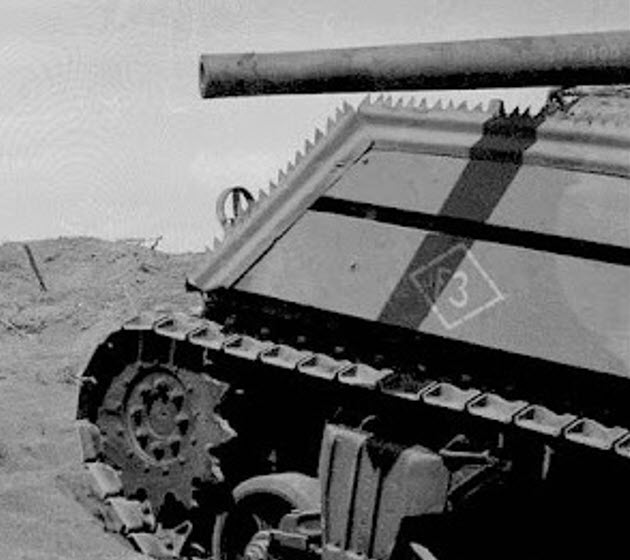
This is may close up of the above photo. The M4A3 on the right is a POA-CWS-H1 Flamethrower tank of the HQ Platoon, C Company, with tactical marking Diamond F3 and has “HOT ROD” painted on the 75mm gun barrel which is barely visible in the upper right corner. This flamethrower tank was named “THE FIVE ACES”. Note the trimming along the edge of the glacis and hull with the sharp teeth. This prevents enemy soldiers from climbing onto the tank.
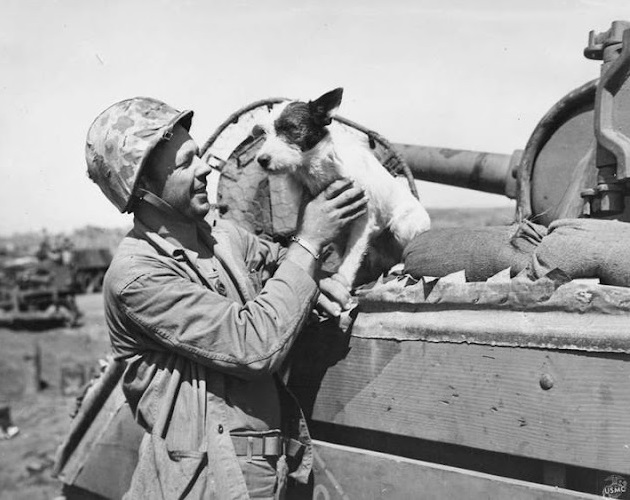
Lieutenant Howard L. Dalton served as the Maintenance Platoon Commander of the 5th Marine Tank Battalion. His platoon was tasked with the grueling job of retrieving, repairing, and patching up knocked-out and disabled Sherman tanks under heavy fire, ultimately repairing dozens of vehicles during the campaign.
Dalton’s dog, a Fox Terrier named “Marine Sergeant Bombspew C. Injector”,” was his beloved companion and the unofficial mascot of the Dalton’s armor maintenance platoon.
On 19 February 1945 (D-Day), Lieutenant Dalton went ashore in command of a M32B3 tank retriever/tender to establish a beach recovery and repair post on Beach Green 1. Injector, his loyal dog he had successfully kept with him through training, waded ashore directly into combat by his side in the second wave of the assault. Injector was the first American dog to set paw on Iwo Jima.
Lieutenant Dalton posing with his dog Injector on a M4A3 tank of C Company, 5th Marine Tank Battalion.
4th Marine Tank Battalion
The 4th Marine Division used UNIS codes to identify all its sub-units, including the 4th Marine Tank Battalion. For company identification, the 4th Marine Tank Battalion used a UNIS 3-digit code enclosed within a semi circle, the battalion’s insignia. A Company did not paint the UNIS marking on its tanks.
The UNIS Codes for the 4th Marine Tank Battalion were 911 (HQ&S Company), 912 (A Company), 913 (B Company), and 914 (C Company).
The tank’s names began with the company’s letter, A, B , or C. The name was painted in large letters and was associated with a number indicating the position of the tank in the battalion. The names of the tanks in the HQ & Service Company began with the letter D. In 1945, the Marine Tank Battalions had no D Company (light tank).
The tank numbers were 1 to 16 (A Company), 17 to 32 (B Company), 33 to 51 (C Company), and 52 to 53 (HQ & Service Company).
Except for B Company, the number was painted on the tank’s hull next to the name. B Company painted the tank’s number on the track links welded on the side of the turret.
| Company | HQ Platoon | 1st Platoon | 2nd Platoon | 3rd Platoon | 4th Platoon |
|---|---|---|---|---|---|
| A | 1 2 3 4-F AMEN (a) No #/Name (c) | 5 THE AIT BALL 6 APPLEJACK 7 | 8 ASIATIC 9 AMAZON 10 ALLEY-OOP AFLAMO (b) | 11 12 13 APE | 14 15 ASHLAND 16 ASTRO |
| B | 17 BEELZEBUB 18 19 BOOMERANG 32 (c) | 20A BED BUG 21 BLACKJACK 22 | 23 24 BUGABOO 25 | 26 BOUNCER 27 BRONCO 28 BUNNY (e) | 29 BUTCH (e) 30 BETTY 31 BANDIT (e) |
| C | 33 CYCLONE 34 CYANIDE (a) 35 CYCLOPS (d) 36 CYUZIE 51 CASSIE (c) | 37 COBRA 38 COMET 39 COUNT 40 COED (b) | 41 CAIRO 42 CALCUTTA 43 CAPETOWN | 44 CRISPY (b) 45 CLEAVER 46 CRACKER | 47 CLODHOPPER 48 CLANGOR 49 COUGAR 50 CLEO (b) |
| HQ&S | 52 53 DORIS |
(a) Flail tank
(b) Flamethrower tank
(c) M32B3 (ARV)
(d) Dozer tank
(e) Name and/or number not certain
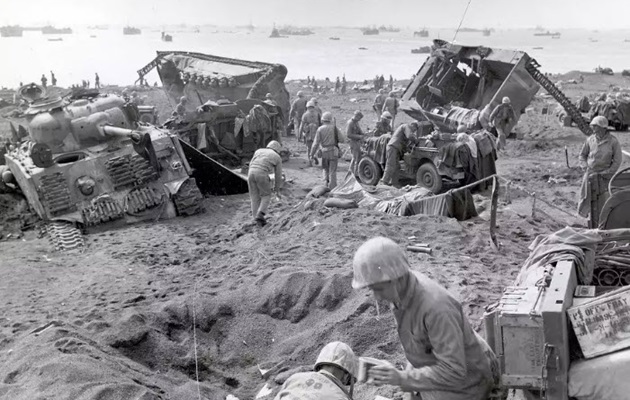
A M4A3 Sherman tank of the 4th Marine Tank Battalion disabled on Beach Blue 1. Behind the Sherman are two destroyed LVTs.
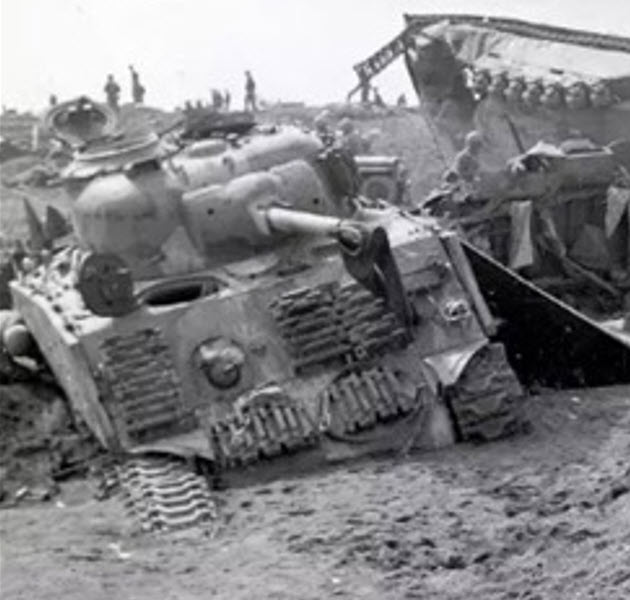
This is a close up of the Sherman in the above photo. The Sherman had sunk down into the volcanic ash and its right track was damaged by a mine.
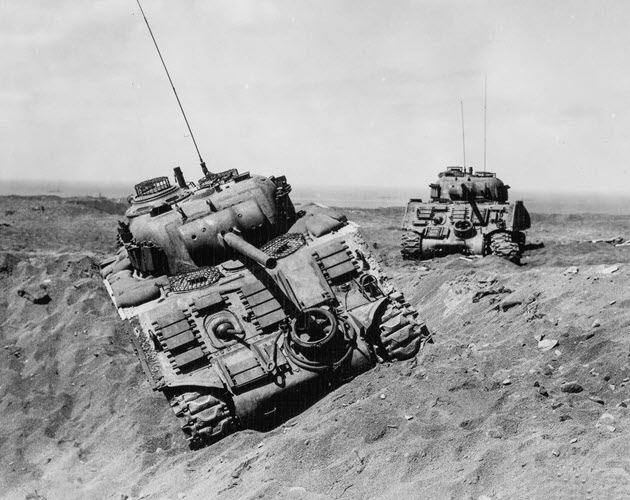
Two more 4th Marine Tank Battalion Shermans disabled. The Sherman in the foreground is bogged down in the volcanic ash on a slope and the Sherman in the background had a damaged left track.
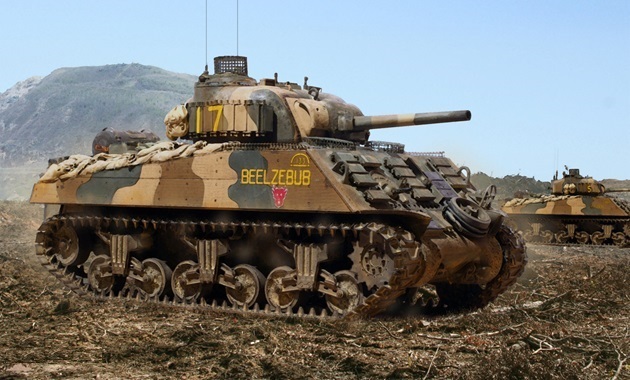
M4A3 named “BEELZEBU” of B Company driving on Beach Blue 1. The tank number 17 was painted on the track links on the turret. Above the name is the UNIS code in the half circle. The crew hand painted a devil insignia below the name. Either the crew mis-spelled “BCELZEBUB” or the center part of the first E had faded or peeled off.
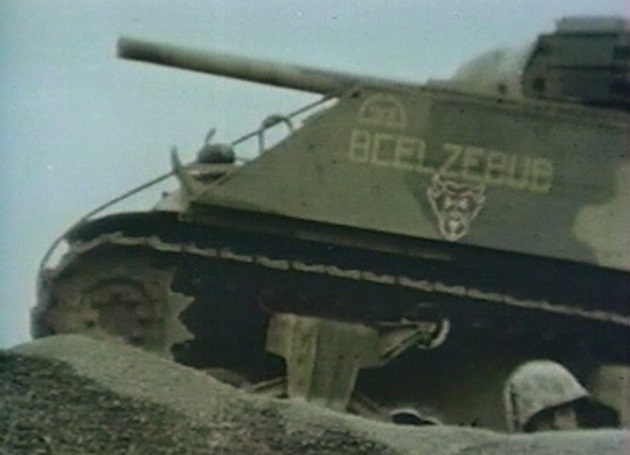
In the Christian New Testament, Jesus uses Beelzebub as a direct synonym for Satan, the Devil.
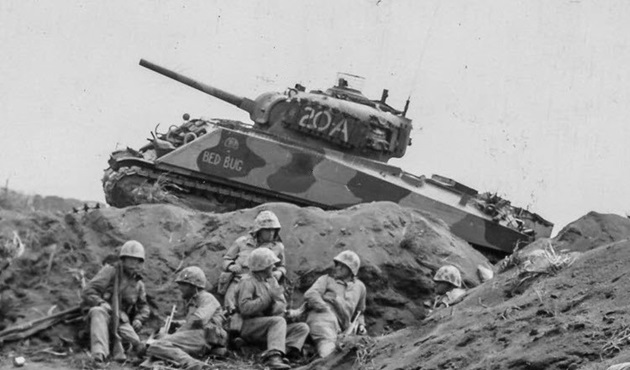
M4A3 number 20A named “BED BUG” of B Company moving pass marines near the Airfield No. 1 or while moving toward Airfield No. 2 on February 22nd. There is no information on what the letter A after the number 20 mean.
M4A3 named “BUGABOO” of B Company on Iwo Jima. The number 24 was painted on a metal plate which was mounted on the track links on the turret. It appears a E4-5 flamethrower has replaced the bow machine gun.
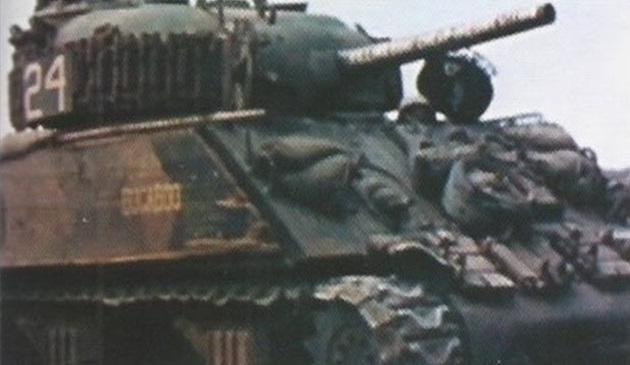
Bugaboo refers to the boogeyman, an unseen monster, or a hidden source of intense fear.
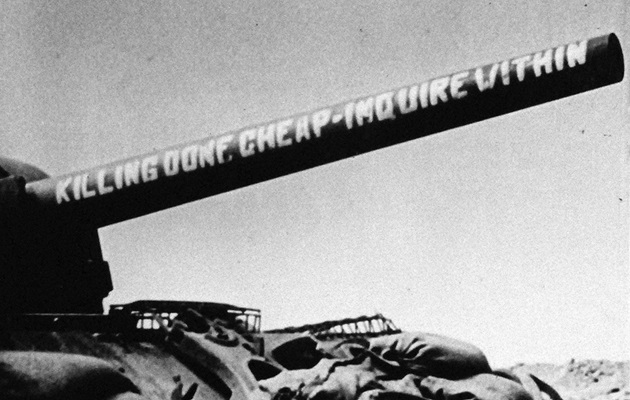
This is a close up the of the gun barrel of M4A3 “BUGABOO”. The crew painted a “For Hire” sign on the gun barrel, “KILLING DONE CHEAP – INQUIRE WITHIN”. The lower part of the letter E in the word “DONE” has faded or peeled off and it appears as “DONF.”
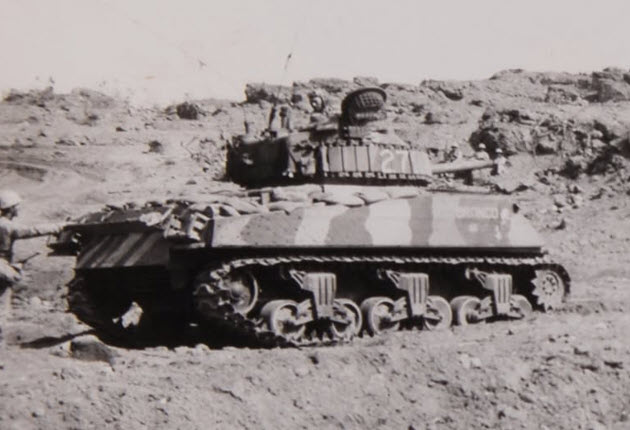
M4A3 named “BRONCO” number 27 of 3rd Platoon, B Company supporting the marines on Iwo Jima.
Improvised Flail tanks
The US Marines deployed the two improvised flail tanks in combat for the first and only time on Iwo Jima.
C Company Flail tank named “CYANIDE” number 34 following another tank (probably tank “CYCLONE” number 33) through the black volcanic ash on Yellow beach. It was assigned to the HQ Platoon, under the command of Sergeant Rick Haddix. It has wading trunks with sandbags and wooden planks protection on the hull. The flail arm and chains are visible on the front of the tank.
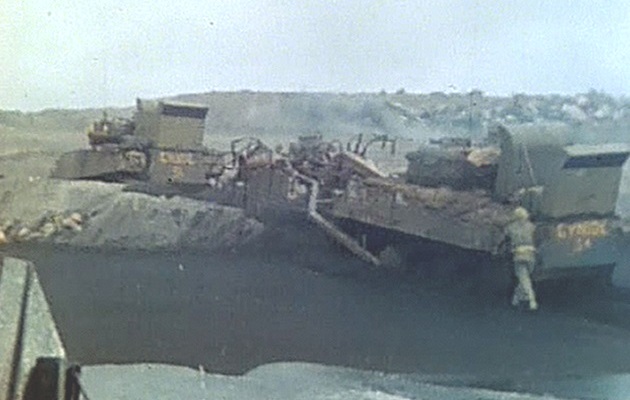
Film: US 4th Marine Division engaged in the Battle of Iwo Jima
(See time segment 1:06 in this film for flail tank “CYANIDE” number 34)
Flail tank “CYANIDE” managed to advance to Airfield No. 1. Near the airfield there was a series of small flags. Haddix believed these were marker flags for a minefield and ordered the tank to move forward. However, these flags were actually registration markers for Japanese heavy-mortars that were hidden in an elevated position nearby. The tank was caught in a barrage of enemy mortar fire, damaging the flail assembly and the tank itself. The tank was recovered and repaired, but it was later lost to a mine. Thankfully, the crew survived.
While details are not clear, it would appear the second Flail tank number 4-F, named “AMEN”, was attached to A Company, HQ Section shared a similar fate. It has a damaged left track. Note there is no wooden planks or concrete on the hull side.
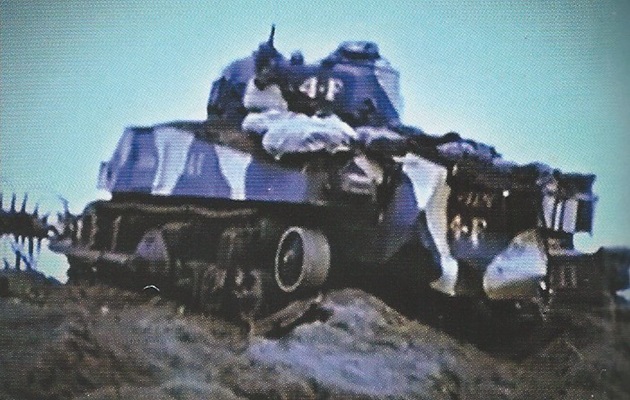
4-F Origin:
According to the Sindecuse Museum of Dentistry at the University of Michigan, during the American Civil War a practical rule was followed. A man could only be deemed fit for military service if his four front incisors were in good condition. This was necessary because all soldiers needed to be able to tear open the cardboard cartridges for their rifle. If a man lacked these four teeth or they were in bad condition, he was labeled “4F”, meaning “four front teeth missing”, and was considered unfit for military service.
The tank crew probably wished they were classified as 4-F so they would been safe back home in the US rather than dodging enemy artillery fire and anti-tank mines on Iwo Jima or maybe they considered their tank was 4-F, unfit for combat on Iwo Jima.
Initially, Japanese tanks were used in static defensive positions to counter the US Marines advances. The first attested Japanese tank reaction to the US landings occurred in the early hours on February 21st. It was a local night counterattack conducted by three tanks of the 2nd Battalion, 26th Tank Regiment, against the 3/23 Marines on the northern end of Airfield No. 1. The Japanese attackers were quickly dispersed when the US Marines accurately directed their artillery on the advancing enemy tanks. One of them, a Type 97 Chi-Ha, was disabled and later captured by US forces, while the other two retreated without causing any damage.
The 1st and 2nd Companies took part in the defense of Airfield No. 2, respectively in the eastern and western sectors. During this phase, the Japanese tanks fired at the advancing US Marines Shermans. Their performance cannot be assessed due to a lack of records. The 1st Company made efforts to defend Hill 382, where it lost two tanks. One of them, a Type 97 Shinhōtō Chi-Ha (47mm gun), was destroyed by a M4A3’s 75mm gun.
On February 27th, B Company of the 4th Marine Tank Battalion was supporting the 1/23 Marines against Hill 382. In his M4A3 named “BANDIT,” Sergeant William H. Edgar got word that an enemy tank was holding up the infantry’s progress. Edgar’s tank moved forward but had a hard time locating the enemy tank. It was down in a revetment and was being used as an artillery piece to fire upon the US Marine infantry. When the Type 97 Chi-Ha was finally discovered by the tank crew, it was knocked out with a single 75mm round.
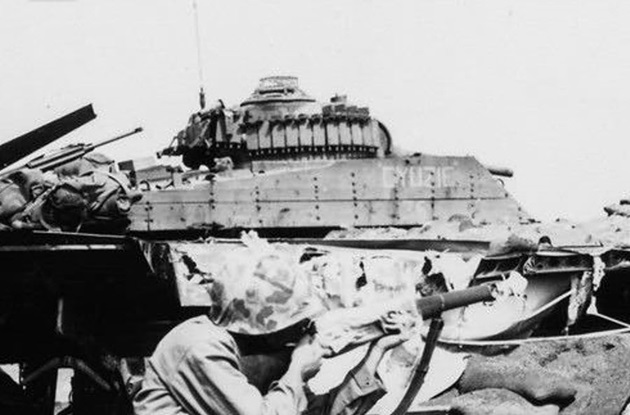
M4A3 named “CYUZIE” number 36 next to wrecked Japanese aircraft. It was the Executive Officer’s (XO) tank for Company C, 4th Marine Tank Battalion, and it was commanded by Sergeant Jim Parker.
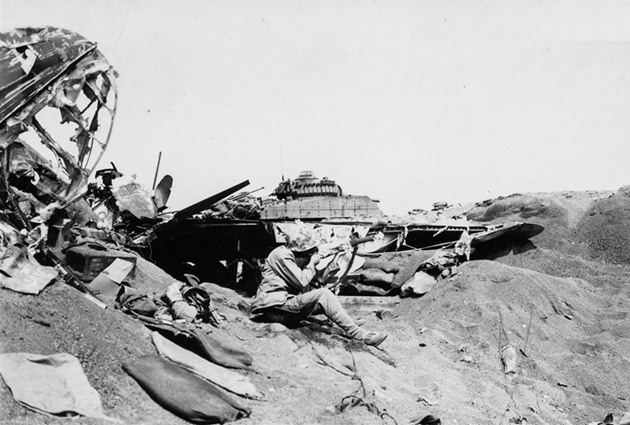
This is my close up the above photo. The name “CYUZIE” is visible and below it barely visible is the number 36.
US Marines are in a foxhole utilizing the wing wreckage of a Japanese plane for overhead cover.
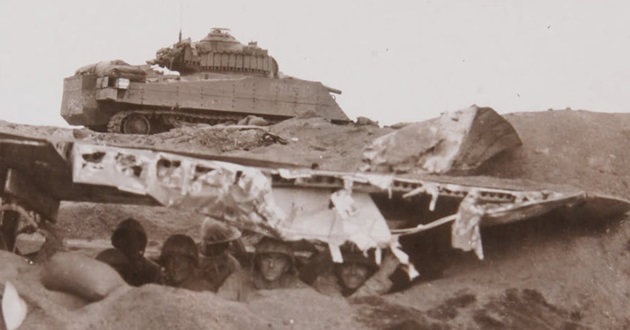
On or around February 27th, M4A3 “CYUZIE” was actively operating in the heavily contested high ground area between the Airfields No. 1 and No. 2. During the fighting, CYUZIE drove over an improvised Japanese land mine. While the blast was powerful enough to blow off the tank’s right track, the large aerial bomb wired to the yardstick mine fortunately failed to detonate. All five crew members escaped safely, and the tank was repaired and returned to the company bivouac area.
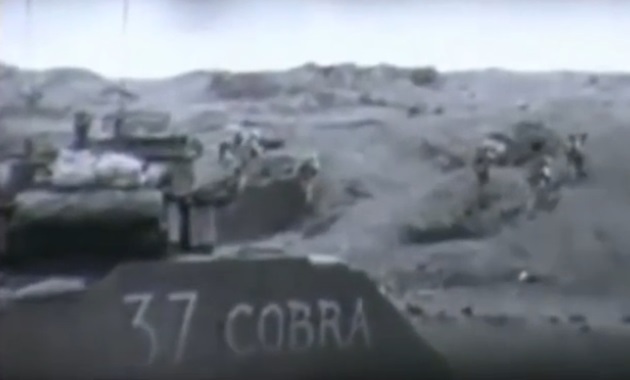
M4A3 named “COBRA” number 37 of 1st Platoon, C Company, supporting the 23rd and 24th Marine Regiments advancing toward Airfield No. 1. It appears this tank has no wooden planks on the hull side. The number and name appear to be painted on a large armor plate welded to the hull side. This is an image taken from a frame of a film.
M4A3 named “COMET” number 38 of 1st Platoon, C Company, moving off the landing beach. The tank has various types of improvised armor and wire cages welded on top of the hatches.
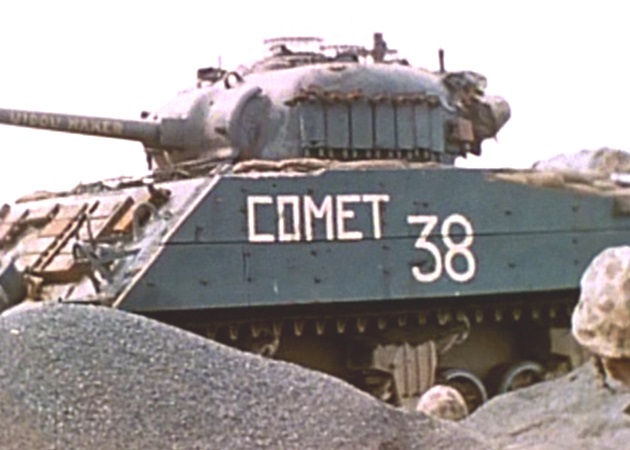
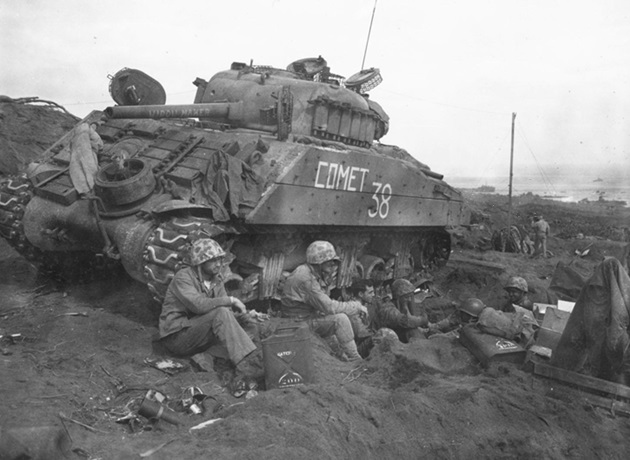
M4A3 “COMET” near the edge of Airfield No. 1 after it survived multiple hits and a land mine encounter. US Marines rest beside the tank during a break from the action around February 23rd. In the background to the right is the landing beach.
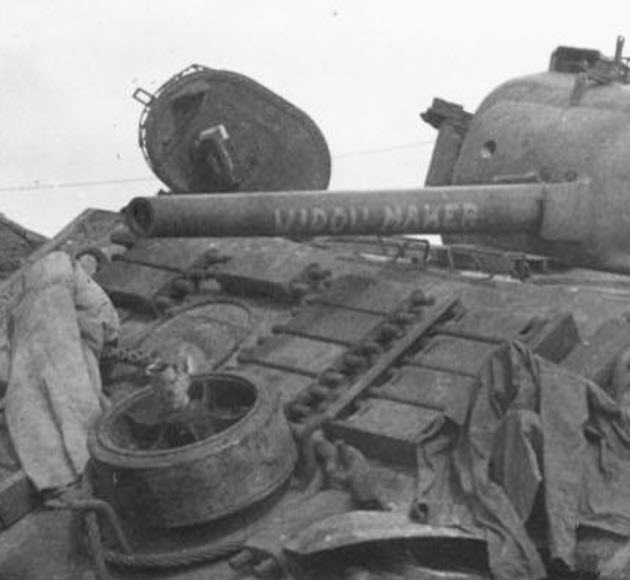
This is my closeup of the above photo. The name “WIDOW MAKER” is painted on the tank’s 75mm gun barrel. Note the spare road wheel is not laying flat on the tank’s transmission cover.
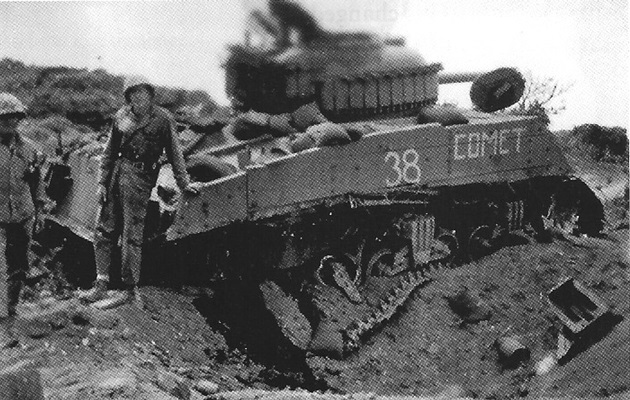
This is the right side view of M4A3 “COMET” showing it was damaged by a land mine. The date and location is unknown.
Film: Marine tanks in action on Iwo Jima (4th TB)
M4A3 named “COED” number 40 of 1st Platoon, C Company, was one of the POA-CWS-H1 Flame tanks in a defensive position near Airfield No. 2. The sandbag wall in front of the tank is part of a bunker dug out beneath the tank which the crew used for shelter during the night on March 1st.
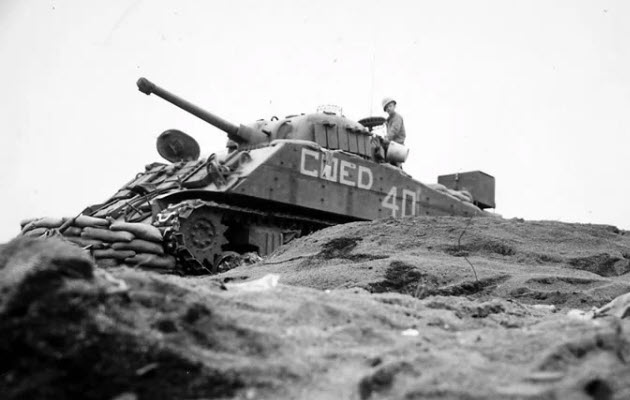
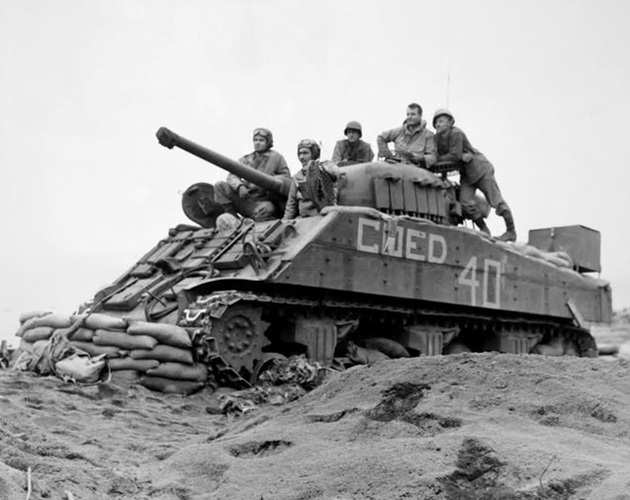
The crew of M4A3 “COED” in the above photo (Left to right):
Assistant Driver: Private J.W. Lukac, Springdale, Pennsylvania
Driver: Corporal B. Skoll, Newport, Vermont
Gunner: Corporal E.L. Randall, Oak Park, Illinois
Tank Commander: Sergeant R.A. Grotenhuis, Los Angeles, California
Loader: Corporal J.E. Schutt, Miami Beach, Florida
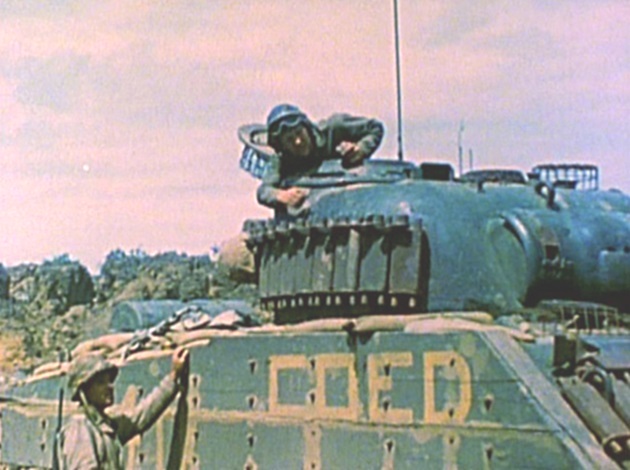
Film: Marines Advance & Use Flame-Throwing Tank On Iwo Jima, 03/13/1945 – 03/14/1945
This is a colorized image of a frame from the film above.
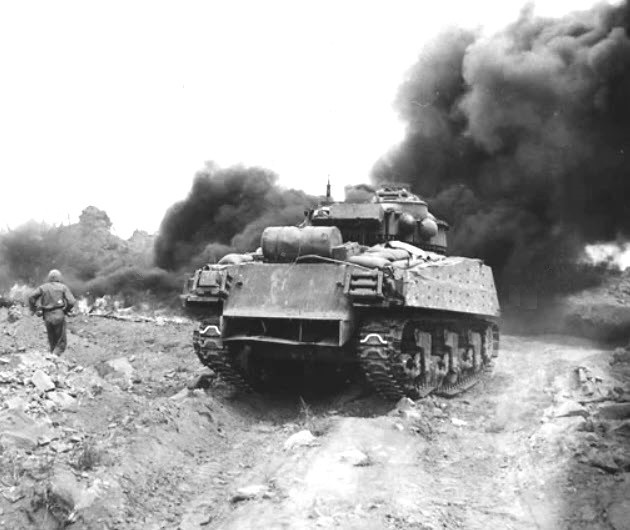
This is the rear of M4A3 “COED”. Location and date unknown.
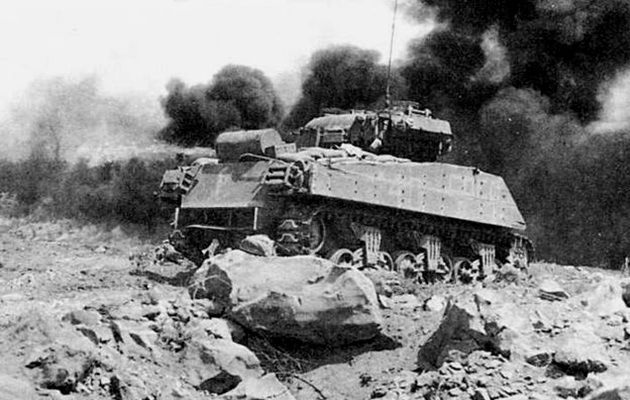
This is the right side of M4A3 “COED”. The number 40 and “COED” are barely visible on the hull side.
This is M4A3 “COED” firing at a Japanese position.
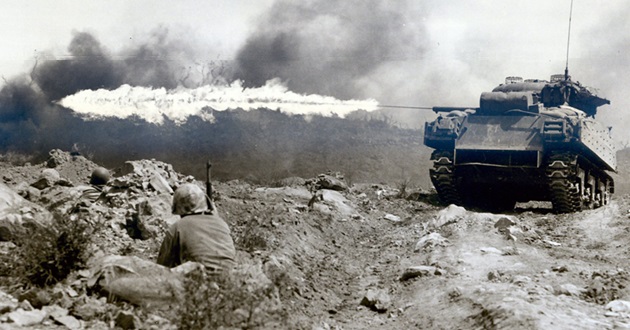
Film: New Footage: Flame Tanks on Iwo Jima (Silent)
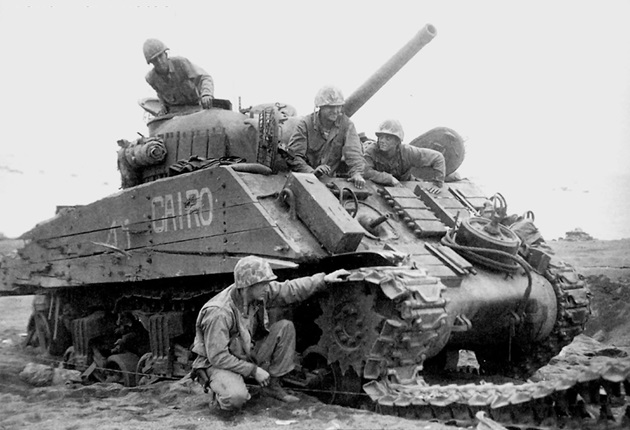
The tanks in 2nd Platoon, C Company, 4th Marine Tank Battalion, were systematically named after world capital and major cities beginning with the letter C, including “CAIRO,” “CALCUTTA,” and “CAPETOWN”.
M4A3 named “CAIRO” number 41 was the Platoon leader’s tank of 2nd Platoon. It ran over a land mine and received five artillery hits, but the crew abandoned the tank unharmed. In the turret is Sergeant James Reeves, of Dallas, Texas. Under the main gun, Left to Right, Corporal Lynn Evans, Corrigan, Texas, and PFC Lloyd Spickage, Springfield, Illinois. Sergeant Charles Saulman, Olney, Illinois is examining the broken right track.
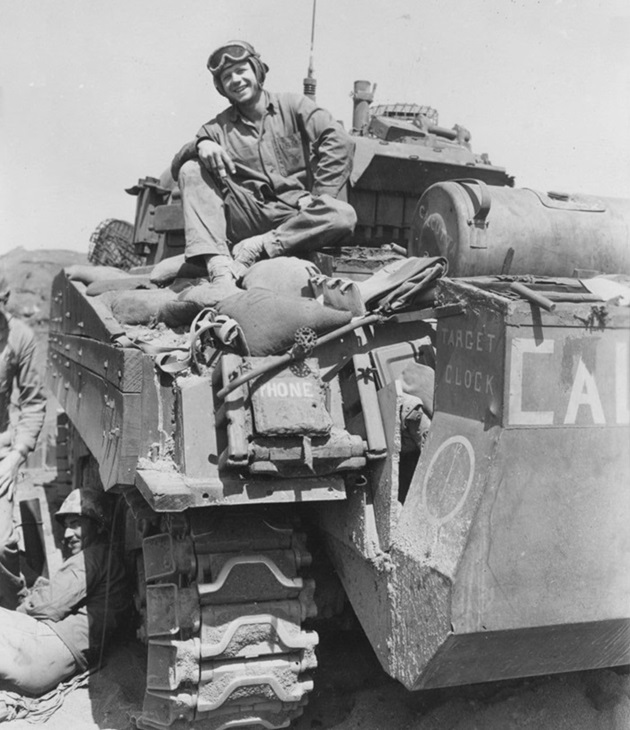
Lieutenant Henry L. Bellmon, a Platoon leader in C Company, lost a total of three tanks on Iwo Jima. His first tank was hit and disabled by Japanese fire immediately as he attempted to move off the black ash landing beach. Bellmon survived and continued to direct his tank platoon. His second and third tanks were shot out from underneath him later in the campaign. The devastating blast on one of these tanks killed several members of his crew.
Each time when his tank was destroyed/disabled, Bellmon commandeered another tank to continue leading his platoon. He eventually completed the campaign commanding M4A3 named “CALCUTTA”. For his exceptional bravery and leadership while under fire during the invasion, he was awarded the Silver Star. After the war, Bellmon went into politics and served as the first Republican Governor of Oklahoma.
Lieutenant Bellmon sitting on the rear of his tank “CALCUTTA” number 24. The modifications made by the 4th Tank Battalion are shown in this photo, and include a water tank and spigots, target clock on the wading stack, phone on the rear fender, and up-armoring efforts with wood planking, sandbags, and wire mesh “birdcage” hatch protectors. The water tank is actually a repurposed M3A1 Stuart light tank external auxiliary fuel cell.
This photo was taken through the periscope of another tank in the platoon. On the right is the rear of M4A3 “CAPETOWN” number 43 advancing up a hill near Airfield No. 2. The marine infantrymen are moving cautiously across open, rugged terrain, utilizing the tank and ground contours for whatever minimal cover available.
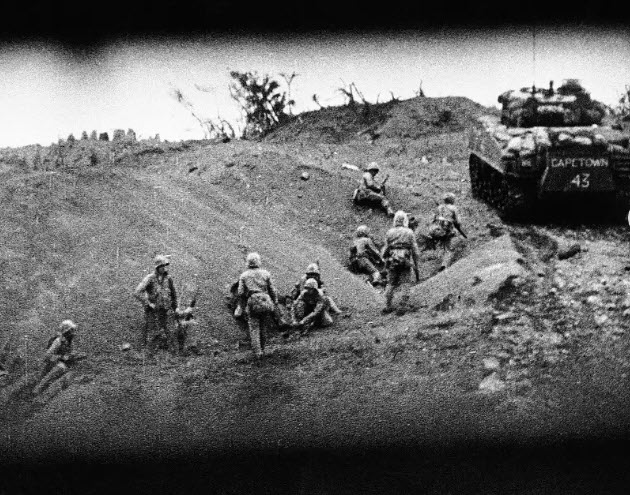
Sometime after this photo was taken, M4A3 “CAPETOWN” was set afire and destroyed by a aerial bomb land mine on Airfield No. 2. Sergeant Vincent Brencick, the tank commander, was the sole survivor of the crew and he was severely burnt.
M4A3 named “CRISPY” number 44 was converted to a flamethrower tank with a bow-mounted flame gun. The tank number was repeated on the rear but not the name.
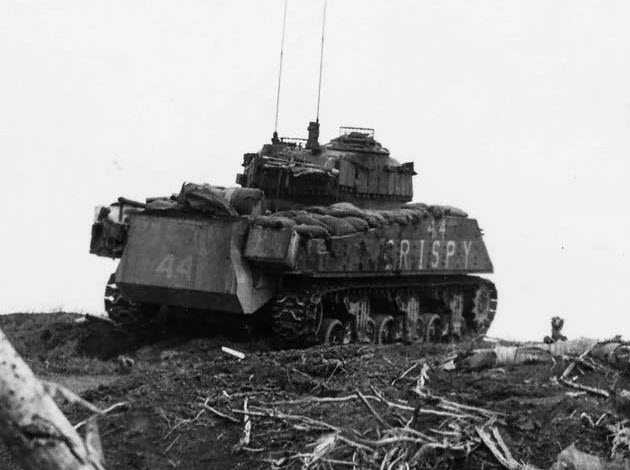
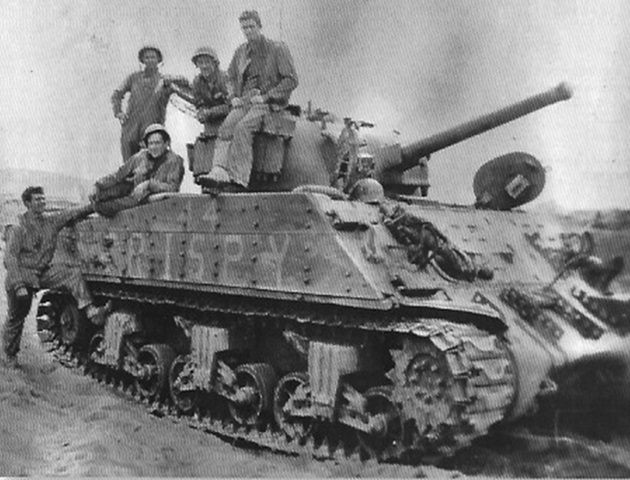
M4A3 “CRISPY” was the platoon leader’s tank of 3rd Platoon, C Company, commanded by First Lieutenant Gearl M. English. Lieutenant English is sitting on top of the turret with his legs draped down over the track links.
M4A3 named “CLODHOPPER” number 47 was knocked out by a Japanese Type 1 47mm anti-tank gun at close range on March 15th.
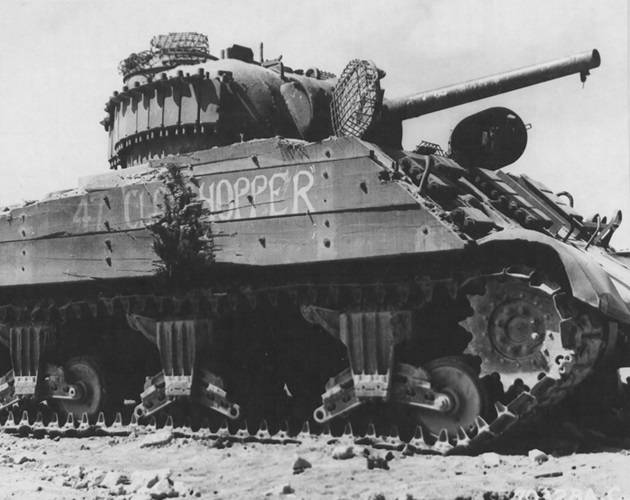
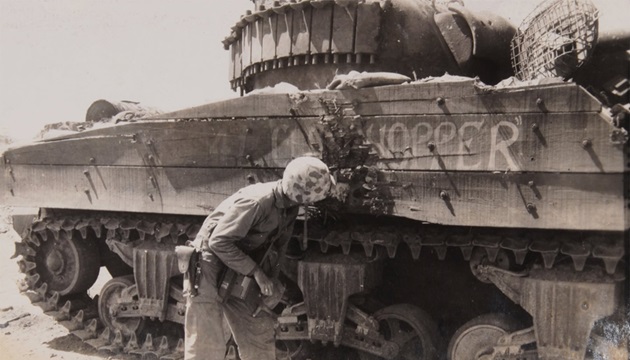
The word “clodhopper” was a common 1940s American slang term used to describe a clumsy, awkward rustic person, or a heavy, thick-soled boot used for plowing through rough mud and dirt. It was a humorous, self-deprecating name for a massive, heavy armored vehicle built to clumsily “hop” over the deep volcanic ash, craters, and jagged terraces of Iwo Jima.
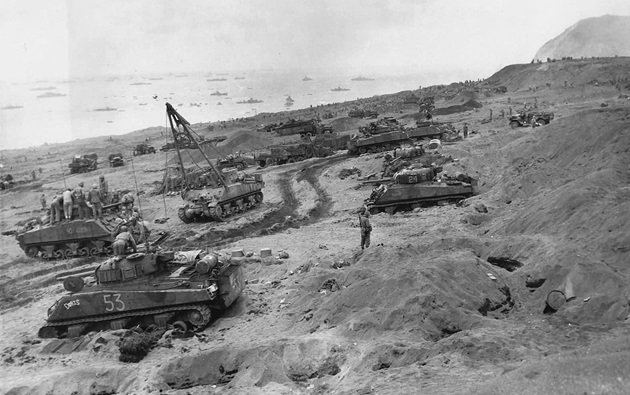
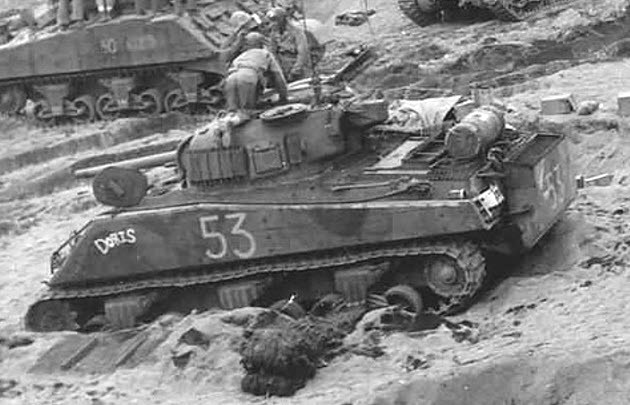
Tanks of the 4th Marine Tank Battalion on the beach. In the foreground is M4A3 “DORIS” number 53, the tank of the 4th Marine Tank Battalion commander, Lieutenant Colonel Richard K. Schmidt. Behind M4A3 “DORIS” to the left is M4A3 “CLEO” number 50. To the right of it is a M32B3 ARV with its crane erected. Further to the right is M4A3 named “BUGABOO” of B Company with number 24 painted on the turret track links.
This is my close up of M4A3 “DORIS” in the above photo.
3rd Marine Tank Battalion
For Operation Detachment, the 3rd Marine Tank Battalion brought their older mid-production and late production diesel engine M4A2 tanks from Guam. There was no time the add the wooden planks to the sides of the hull and the nail or wire protection to top of the hatches.
Only a few modifications were made to the tanks to improve the armor protection. Two-inch (50.8mm) appliqué steel plates were welded onto the exterior hull over the areas where ammunition bins are located and to the forward right hand side of the turret, the tank’s thinnest armored areas.
Tank Markings:
A Company
| 1st Platoon | 2nd Platoon | 3rd Platoon | 4th Platoon | HQ Platoon |
|---|---|---|---|---|
| 1 ATABRINE 2 ANGEL 3 (Tankdozer) | 4 ACE 5 AGONY 6 AILEEN | 7 ANN 8 APACHE 9 ATEBALL | 10 11 12 | 13 ANDREA 14 ADDER 15 ALMIGHTY (M32B2) |
B Company used geometric shapes to indicate the company. The number in the shape is the tank’s position in the platoon.
| 1st Platoon [ Square ] | 2nd Platoon ( Circle ) | 3rd Platoon < Diamond > | 4th Platoon / Triangle \ | HQ Platoon No Shape |
|---|---|---|---|---|
| 1 2 TOKYO EXPRESS 3 | 1 DYNAMITE 2 MARAUDER 3 | 1 2 3 | 1 BUTCHER 2 NIP CLIPPER 3 | 1 DOUBLE TROUBLE 2 3 |
C Company
| HQ Platoon | 1st Platoon | 2nd Platoon | 3rd Platoon | 4th Platoon |
|---|---|---|---|---|
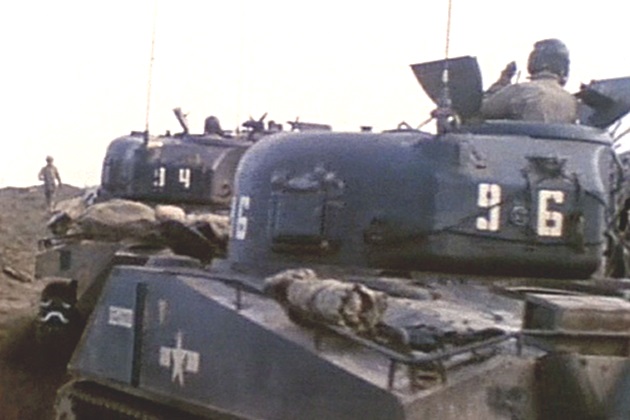
| 52 DAGWOOD 54 (Tankdozer) 56 M32B2 (No #/Name) | 62 DIMPLE 64 66 DEMAGOG | 72 74 76 DOOD-IT | 82 84 86 | 92 94 96 DEMIGOD |
The Battalion Insignia was a white winged star painted on the rear of the turret, the turret roof (for aerial identification), and sometimes the hull sides.
On 19 February 1945 (D-Day) offshore of Iwo Jima, LST-477, loaded with 3rd Marine Tank battalion tanks, was damaged during a Kamikaze attack. The LST crewmen and onboard Marines spent three days repairing the damage and kept the ship afloat.
On 23 February 1945 (D+4), tanks of the 3rd Marine Tank battalion disembarked from LSM-46 onto a beach. This mid-production M4A2 number 9 named “ATEBALL” belonged to 3rd Platoon, A Company. It has the older split commander’s hatch and no loader’s hatch on the turret. Steel plate hoods are in front of the driver’s and assistant driver’s hatches.
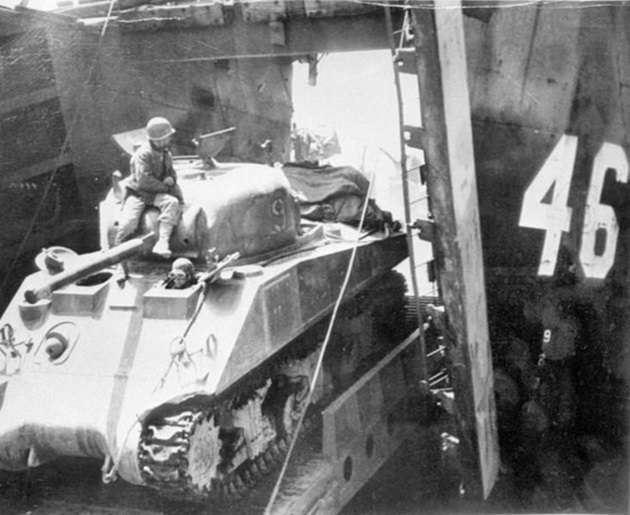
Overhead view of a C Company mid-Production M4A2 disembarking from a LST (most likely LST-477). This photograph was taken looking down from the forward railing of the LST’s forecastle deck immediately above the open clam shaped bow doors.
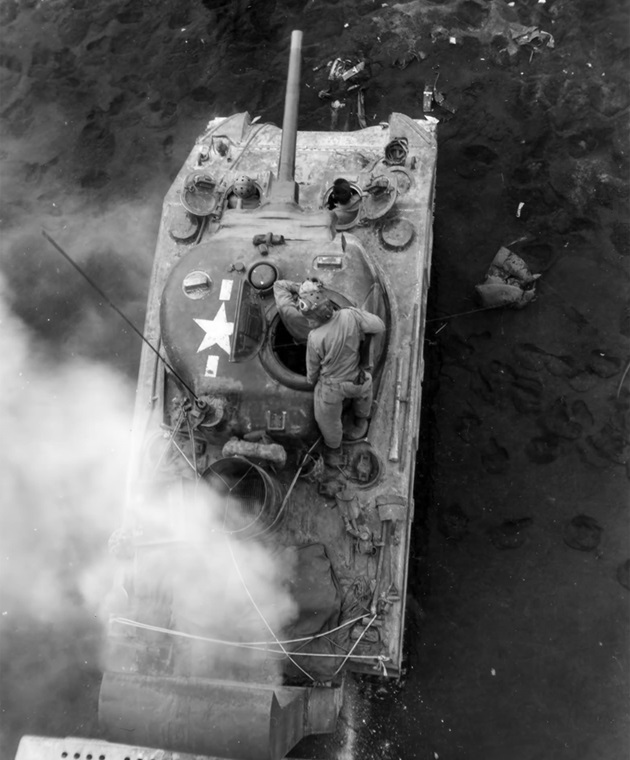
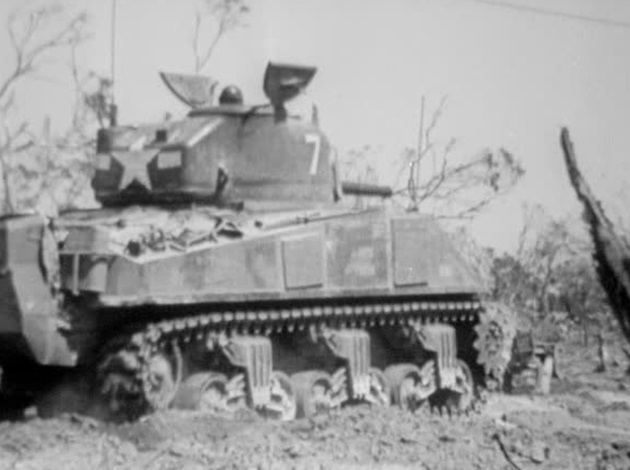
M4A2 number 7 of 3rd Platoon, A Company, 3rd Marine Tank Battalion disembarking from LST-477 on the morning of February 23rd about 45 minutes after the US flag raising on Mount Suribachi. This M4A2 is named “ANN”.
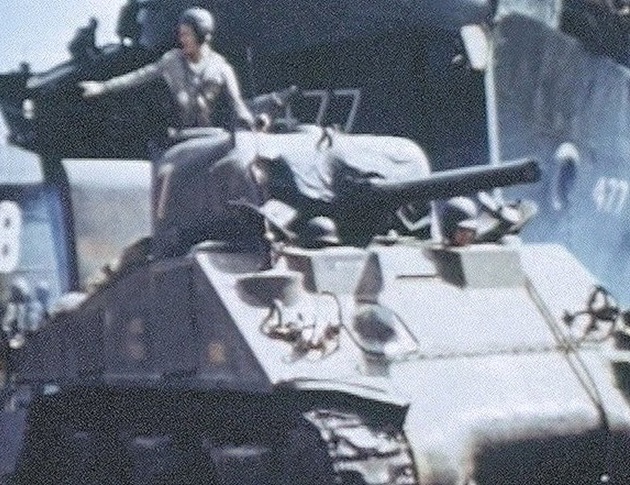
Film: US 3rd Marine Division tanks landing on Iwo Jima
M4A2 named “AILEEN” number 77 of the 2nd Platoon, A Company, 3rd Marine Tank battalion seen in the above film.
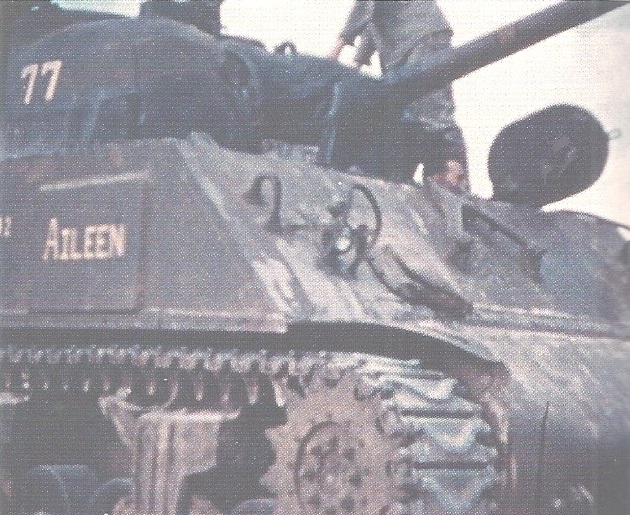
When the 3rd Marine Tank Battalion was training and preparing on Guadalcanal prior to the Iwo Jima invasion, A Company used a standard 70-series block for its tanks. As part of that initial layout, “AILEEN” was designated as tank number 77. This tactical number was painted onto the sides of the turret for easy identification during maneuvers.
Just before the Iwo Jima invasion, A Company reshuffled its layout into the unique 5-platoon, 3-tank format. This structurally altered their tactical call signs to the newer 1-to-15 system. M4A2 “AILEEN” was changed to number 6.
Because these massive operations moved rapidly, the crew of “AILEEN” did not completely strip or sand down the heavy, durable base layers of paint from their training cycles before loading onto LST-477. While their operational call sign shifted to its new 1-to-15 slot for radio and deployment logs, the original 77 training number remained clearly visible on the turret cheek as it rolled out of LST-477.
Map 3
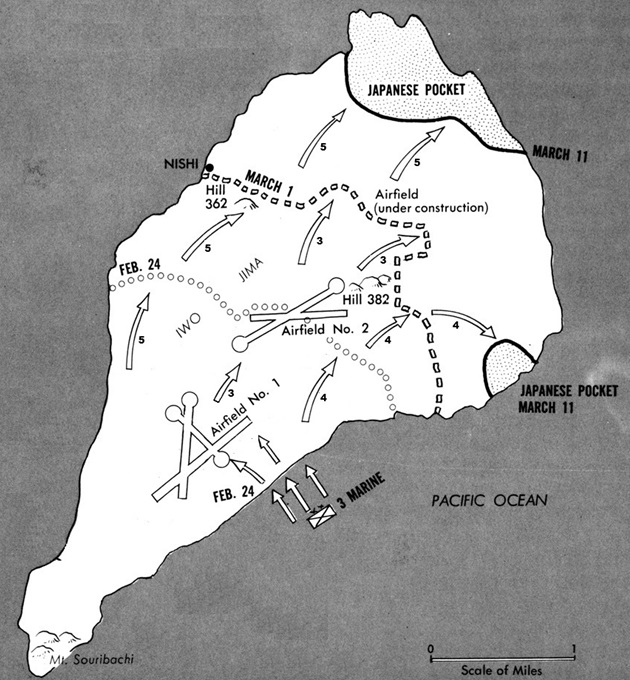
After Mount Suribachi was captured on February 23rd, Major General Harry Schmidt (commander of the V Amphibious Corps) ordered a drive north with three marine infantry regiments. For the attack, Schmidt consolidated all the tanks from the 3rd, 4th and 5th Marine Tank Battalions into a regimental sized armored task force commanded by Lieutenant Colonel William R. “Rip” Collins. It was officially known as the Regimental Armored Task Force (or simply the Armored Task Force) which was the largest US Marines armor command of WWII consisting around 150 tanks.
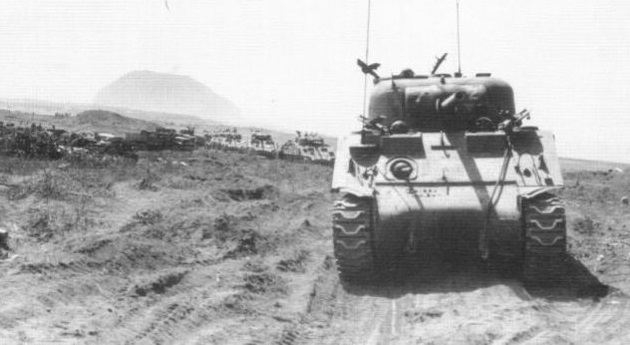
By the end of February 24th, all the tanks of the 3rd Marine Tank Battalion had landed. These are 3rd Marine Tank Battalion tanks parked on the side of Airfield No. 1 with Mount Suribachi in the background.
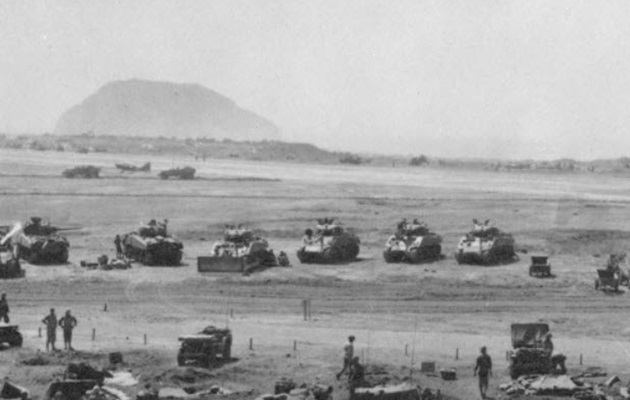
A column of 3rd Marine Tank Battalion tanks advancing northward with Mount Suribachi in the background.
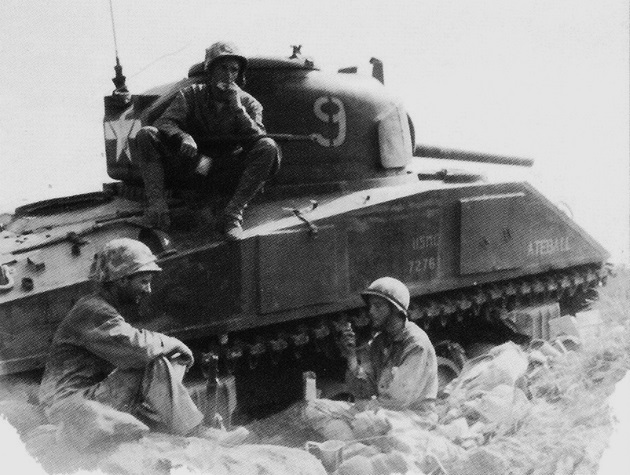
Three US Marines of the 3rd Marine Division rest near a foxhole dug beneath disabled M4A2 Sherman tank number 9 on February 29th. The name “ATEBALL” is on the side of the hull on the right. Note the right side front drive sprocket is missing.
This photo of M4A2 number 7 named “ANN” was taken from a frame of film.
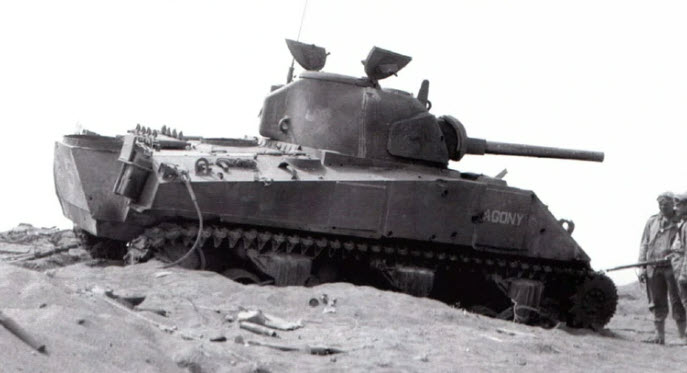
M4A2 named “AGONY” number 5 of 3rd Platoon, A Company, was disabled by multiple penetrations from Japanese 47mm anti-tank gun on the morning of February 26th while participating in an assault alongside the 9th Marine Regiment near the base of Hill Peter, aiming to secure Airfield No. 2. Note the three shell holes on the hull around the name.
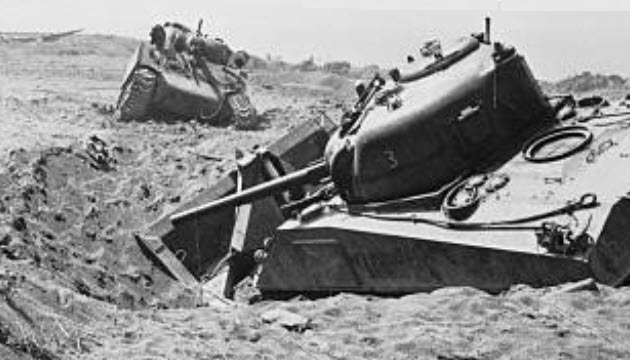
M4A2 tankdozer of 1st Platoon, A Company, bogged down in a crater on March 7th. The ring on the engine deck behind the turret is the mounting for a drum shape exhaust stack. A number 3 is on the turret and in the background is a disabled M4A3 of the 4th Marine Tank Battalion.
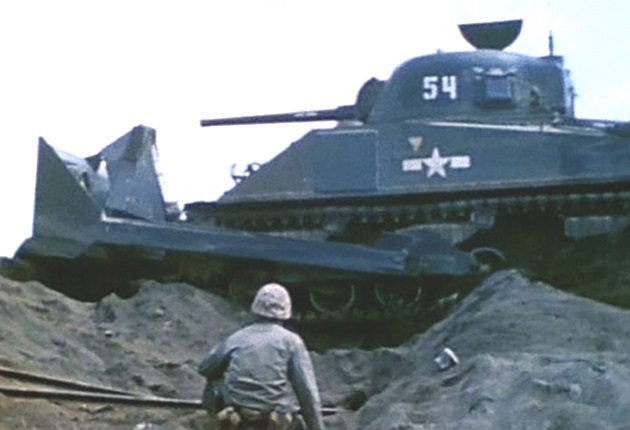
Film: US 3rd Marine Division tank fires flamethrowers at Japanese positions on Iwo Jima.
M4A2 tankdozer number 54 of HQ Platoon, C Company, in action on Iwo Jima. There appears to be a two word name painted on the 75mm gun barrel but it is too far away to read.
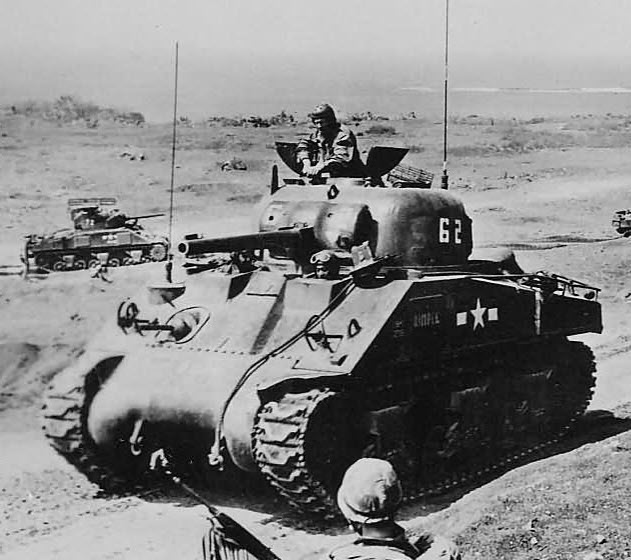
Platoon Leader’s M4A2 number 62 named “DIMPLE” of 1st Platoon, C Company, has a second radio antenna mounted on the front hull.
M4A2 number 66 named “DEMAGOG” of 1st Platoon, C Company, was following M4A2 “DIMPLE” in the above photo.
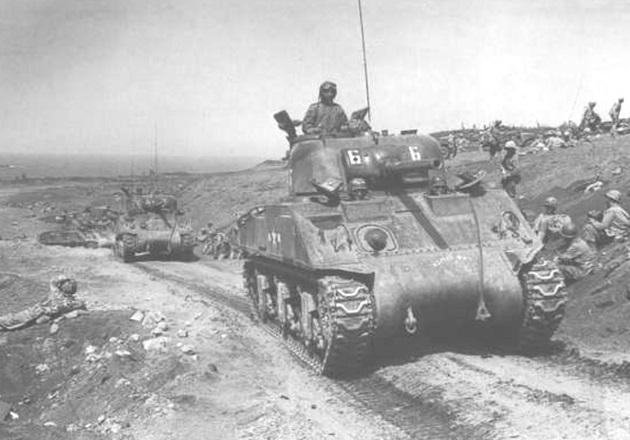
A demagog is a political leader who masterfully manipulates people through “fiery speech” and loud, aggressive rhetoric to control them. For the tank crew, their M4A2 spoke its own form of “aggressive rhetoric”, the deafening roar of its 75mm gun and the chatter of its machine guns. Naming their tank DEMOGOG was saying their tank was going to do the “talking” and dictate terms to the enemy.
M4A2 number 96 named “DEMIGOD” of 4th Platoon, C Company, is following M4A2 number 94. Note the hand rail added to the top edge around the rear hull.
On 10 March 1945, Cushman’s Pocket was located in the central-northern part of Iwo Jima, specifically positioned east of Motoyama village, southeast of Airfield No. 3, and southwest of Hill 362C (See Map 2 above).
Named after Lieutenant Colonel Robert E. Cushman Jr., commander of the 2nd Battalion, 9th Marines, this heavily fortified Japanese stronghold was a rock-strewn labyrinth of caves, pillboxes, and emplacements cut directly into the sandstone. It was one of the final major areas of Japanese resistance in the 3rd Marine Division’s sector.
The most unusual Japanese tank action of the fighting on Iwo Jima occurred on March 10th in Cushman’s pocket, involving a Japanese-manned Sherman. That day, Shermans of 1st Platoon, B Company, 3rd Marine Tank Battalion, was supporting the advance of the 3/21 Marines when Sergeant John O’Hara’s M4A2 (Square 2) named “TOKYO EXPRESS” was fired at by M4A2 number 86 of 3rd Platoon, C Company, 3rd Marine Tank Battalion. M4A2 number 86 had been knocked out the previous day and was occupied during the night by two Japanese soldiers, who familiarized themselves with the Sherman’s firing mechanism under cover of darkness.
The next day, the tank crew of M4A2 “TOKYO EXPRESS” stated the Japanese fired a 75mm high explosive shell at their tank. The shell exploded outside the right side of the turret which had an armor plate welded onto the turret cheek. The concussion caused shrapnel to fly inside the turret and it killed Corporal Mervin P. Birtcil, the gunner. If it have been an armor piercing 75mm shell, all five crewmen would been dead. The four survivors managed to abandon the Sherman under a hail of machine gun fire before a US Marine bazooka team finally silenced the Japanese-occupied Sherman. Japanese sources claim that one of the two occupants of this Sherman was Second Lieutenant Ishiro Otani from the Artillery Company of the 26th Tank Regiment.
US Tank Losses
| Tank Battalion | Initial # | # Destroyed | # Operational | Losses |
|---|---|---|---|---|
| 3rd | 46 | 15 | 31 | 33% |
| 4th | 53 | 11 | 42 | 21% |
| 5th | 51 | 18 | 33 | 35% |
| Total | 150 | 44 | 106 | 30% |
Operational includes temporary damaged and bogged down tanks.
| Tank Battalion | # Personnel | # KIA/DOW | # WIA/Sick | # MIA | Losses |
|---|---|---|---|---|---|
| 3rd | 601 | 20 | 95 | 1 | 19% |
| 4th | 687 | 24 | 98 | 0 | 18% |
| 5th | 589 | 16 | 66 | 0 | 14% |
| Total | 1877 | 60 | 259 | 1 | 17% |
DOW is “Died of Wounds”, Sick includes battle fatigue.
Japanese Tank Losses
Map 4
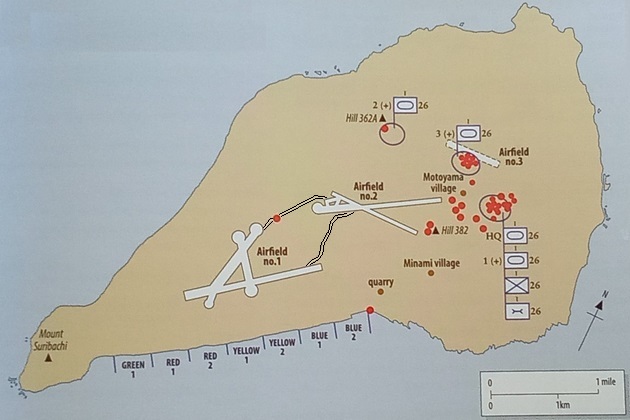
The red dots represent the destroyed and abandoned Japanese tanks on Iwo Jima after the island was secured.
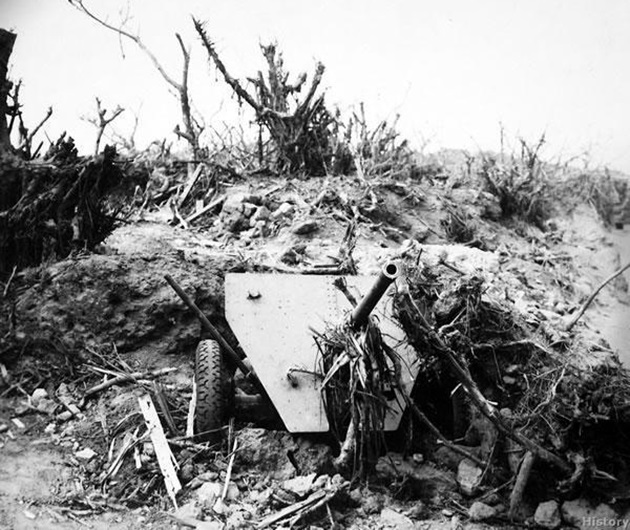
A Japanese Type 1 47mm anti-tank gun in a camouflage position. Most of the foliage covering the gun had been pulled away. These guns were not effective against the frontal armor of the Sherman but was capable of penetrating the thinner armor of the Sherman sides and rear.
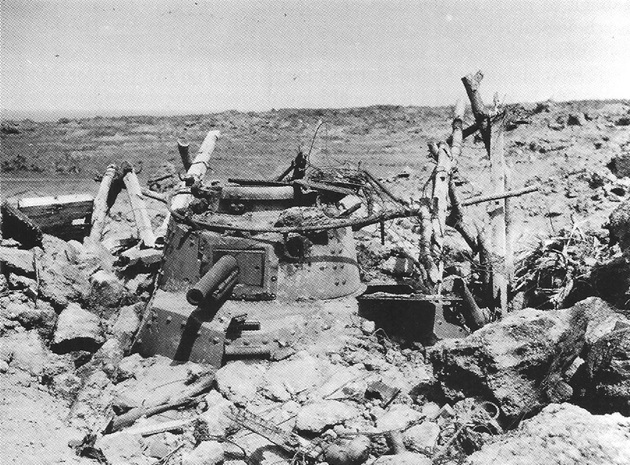
A Type 97 Chi-Ha medium tank (57mm gun) belonging to 2nd Company, 26th Tank Regiment, is buried and camouflaged near Hill 362A. It was knocked out by Shermans of B Company, 5th Marine Tank Battalion on February 27th. This tank has the circular radio antenna frame mounted on the turret.
Rear view of a Type 95 Ha-Go light tank (37mm gun) in a dug-in position covering the approach to Airfield No. 2.
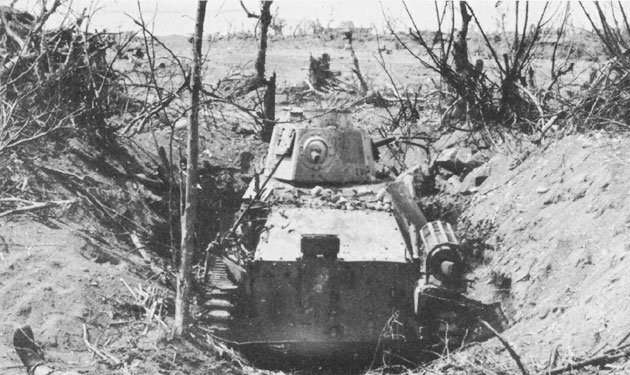
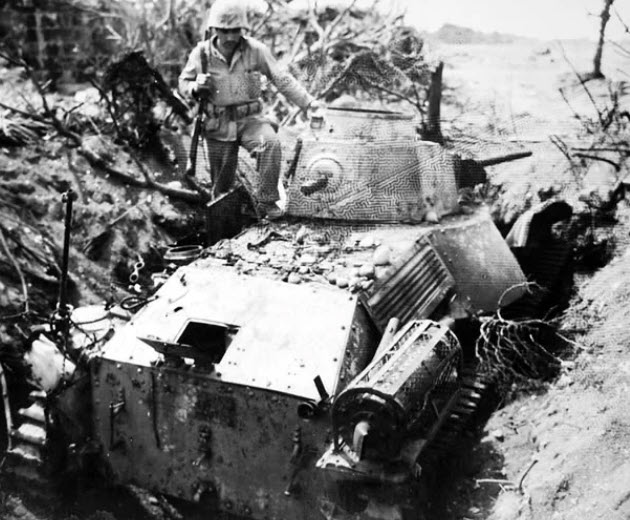
A US Marine is examining an abandoned Type 97 Chi-Ha tank.
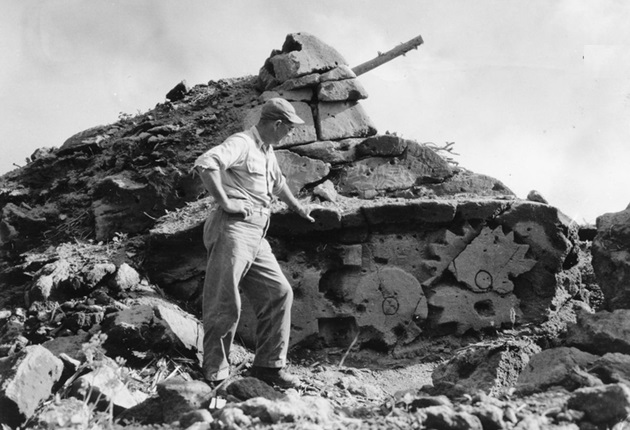
The Japanese carved this decoy tank directly out of soft volcanic ash rock near Hill 382 east of Airfield No. 2. The meticulously sculpted details such as turret outlines, tracks, and gear teeth simulated an armored vehicle.
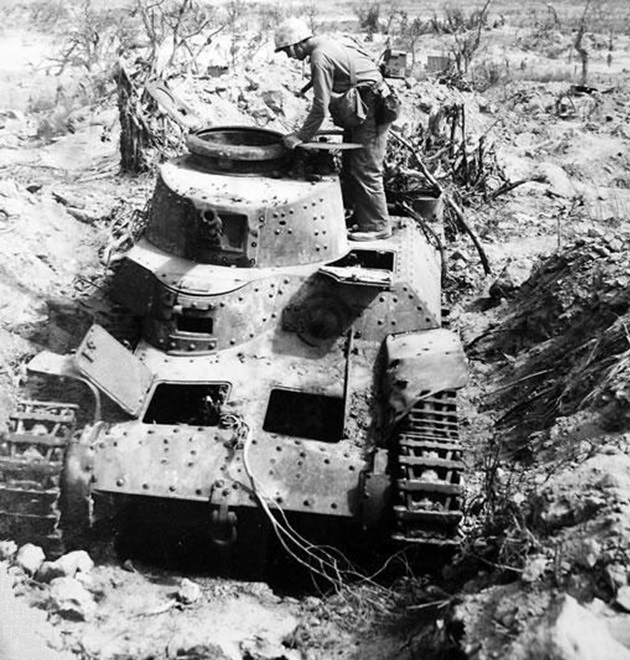
A US Marine standing next to a Type 95 Ha-Go tank hidden in a crevice near Hill 382. Lying on the ground in the foreground is a bicycle.
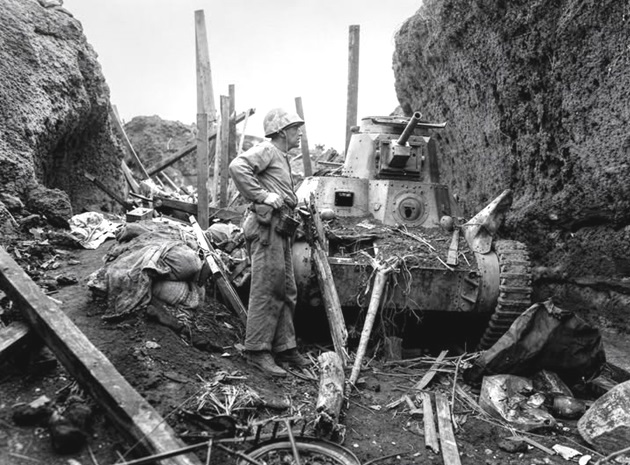
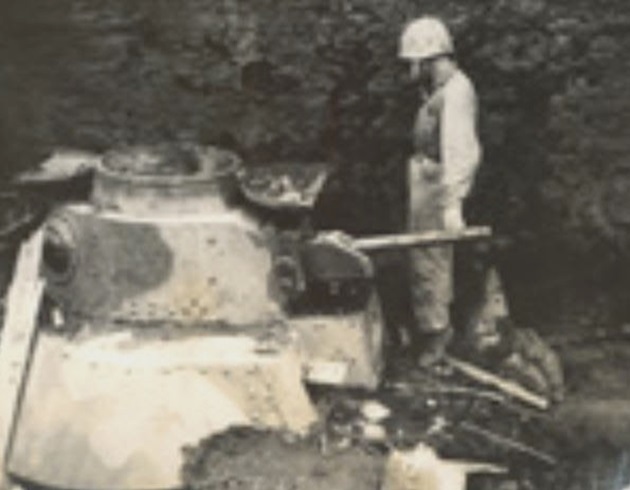
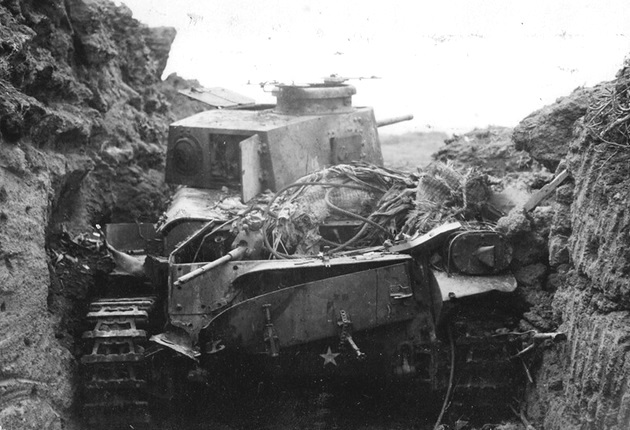
Rear view of a Type 97 Shinhōtō Chi-Ha tank in a crevice.
This is a close up view of the above Type 97 Shinhōtō Chi-Ha. Note the small white star painted on the rear hull.
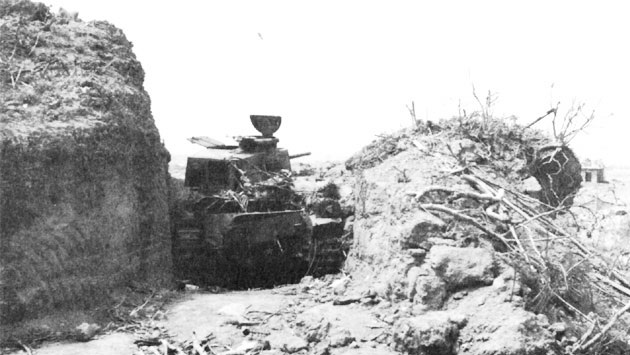
Type 97 Shinhōtō Chi-Ha Tanks (47mm gun) dug-in and camouflaged on or near Hill 382.
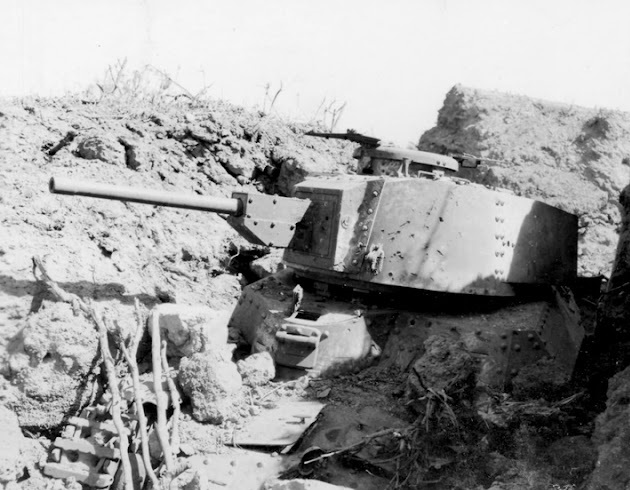
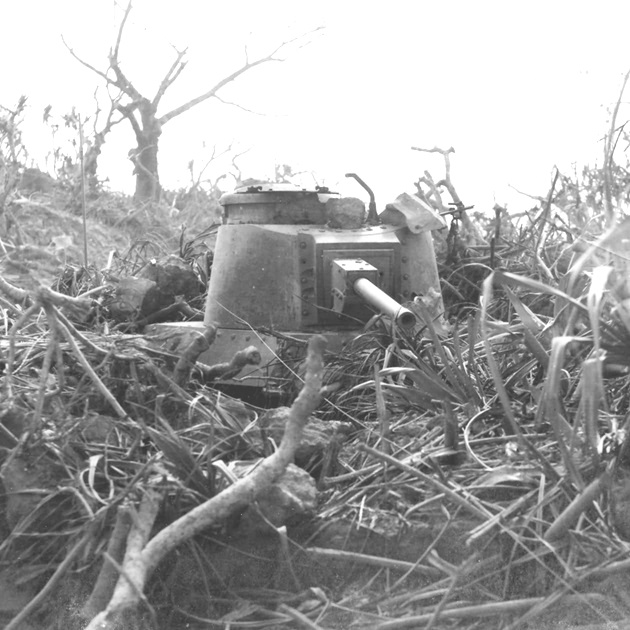
A disabled Type 97 Chi-Ha tank on the side of a road on or near Hill 382.
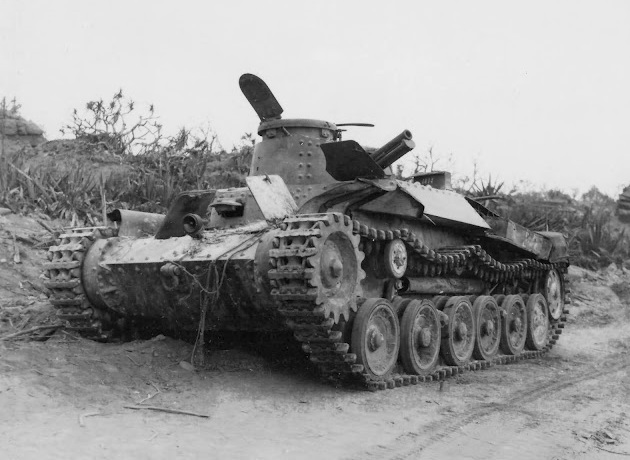
Film: US crew trying out a Japanese Type 95 Ha-Go light tank captured on Iwo Jima in March 1945
Safe Haven
On February 20th, the US Marines captured Airfield No. 1. As soon as the US Marines cleared the southern airfield, advance elements of the primary assault construction unit, 133rd Naval Construction Battalion (NCB), immediately moved onto the strip to clear mines, fill bomb craters, and grade the volcanic surface.
While working through heavy Japanese artillery and mortar barrages, the 133rd NCB managed to make the runway smooth enough to safely receive light Marine observation planes in a few days.
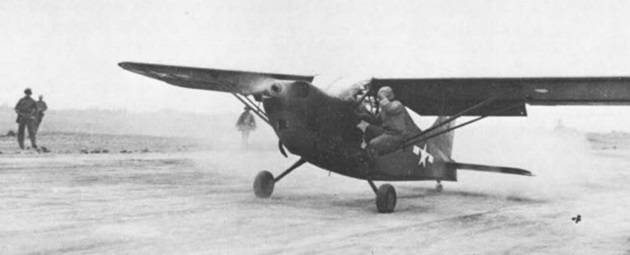
Consolidated-Vultee OY-1 (L-5) Sentinel BuNo 02766 taxis after landing on Airfield No. 1 on February 25th. It was piloted by Lieutenant Harvey Olson of Marine Observation Squadron 4 (VMO-4) and it was the first US aircraft to land on the repaired runway.
On 4 March 1945 while the battle for the island was still fiercely raging, B-29 42-65286 named “Dinah Might” flown by First Lieutenant Raymond Malo of the 9th BG, 1st BS, was the first B-29 to make an emergency landing on Airfield No. 1. The aircraft’s call sign was “X Triangle 9”.
B-29 “Dinah Might” surrounded by US Marines and Seabees shortly after landing on Iwo Jima.
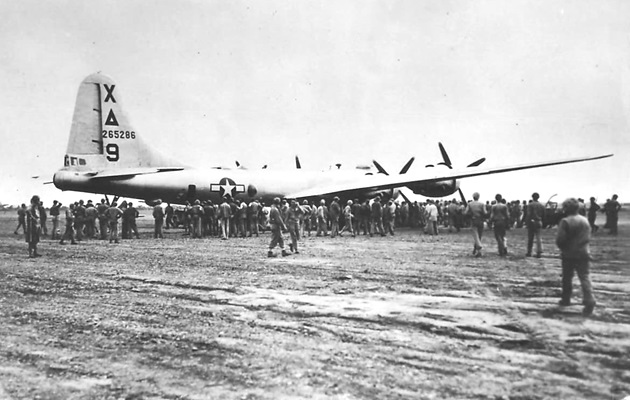
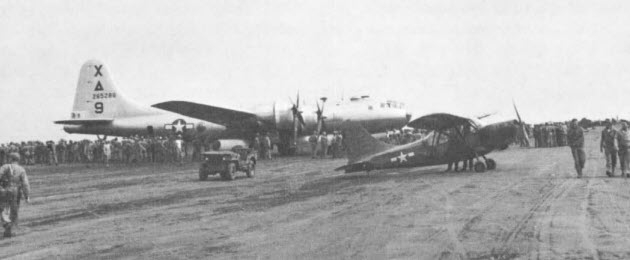
B-29 “Dinah Might” was repaired, refueled and flown out. On 12 April 1945, B-29 “Dinah Might” landed again on Iwo Jima due to severe battle damage or mechanical failure during another raid. Because it could not be repaired right away, the crew left the aircraft behind on the island. Over time, ground service groups repaired it and it returned to the US on 28 April 1946 where it was eventually scrapped.
On 6 March 1945, P-51D Mustangs of the 47th Fighter Squadron, 15th Fighter Group, was the first to touch down on Airfield No. 1, closely followed by the rest of the group (45th and 78th Fighter Squadrons). On that same day, they were joined by 12 Northrop P-61 Black Widow night fighters of the 548th Night Fighter Squadron which provided the nocturnal defense over the island.
The strategic importance of the island’s airfields peaked on:
7 June 1945:
Due to a combination of severe combat damage and acute fuel depletion following a massive daylight raid over Osaka, Japan, 102 B-29s landed on Iwo Jima.
24 July 1945:
An unprecedented, large-scale multi-city strike coordination that stretched aircraft fuel reserves to their limits, combined with targeted enemy resistance caused a record 186 B-29s to land on Iwo Jima in 24 hours.
By the end of WWII, a total of 2451 B-29s made forced or emergency landings on Iwo Jima. These emergency landings provided a critical haven for an estimated 26961 flight crewmen, many of whom would have otherwise been forced to ditch their aircraft at sea with roughly a 50% chance of surviving.
Today
This rusty M4A3 still sits on Iwo Jima today. The white sections on the hull sides is the concrete layer which of course does not rust.
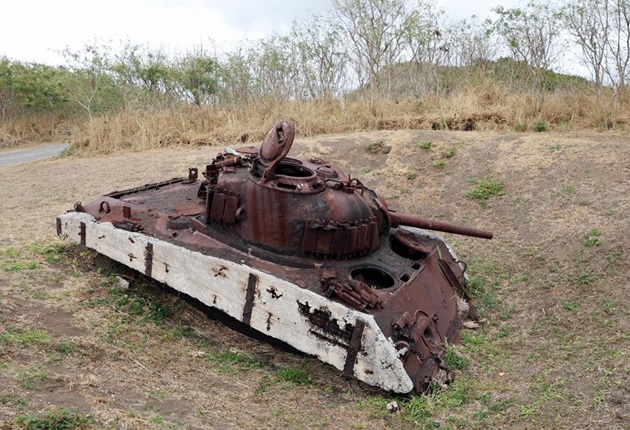
This tank was number 39, named the “COUNT” of C Company, 4th Marine Tank Battalion. It was commanded by Lieutenant Henry L. Bellmon when it was destroyed by a 47mm anti-tank gun, south of Airfield No. 2 on February 23rd.
Fully operational M4A3 serial number 49606, a Iwo Jima survivor that served with 5th Marine Tank Battalion, is currently on displayed at Battlefield Vegas , Nevada.
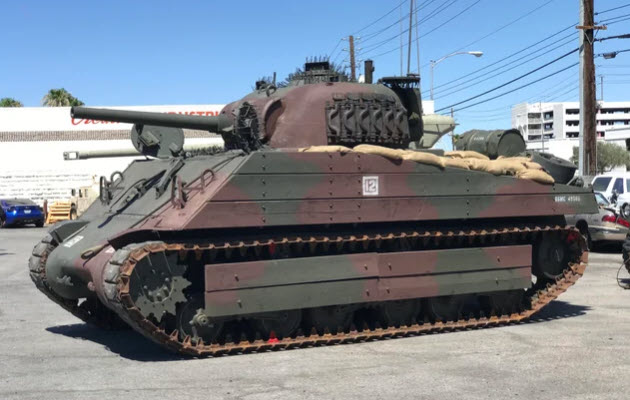
This tank was in 1st platoon of A Company and it was named “SCORPION” (See above). It is one of the 24 M4A3s of the 5th Marine Tank Battalion which had the bow-mounted E4-5 Flamethrower.
Video: Welcome to Battlefield Vegas
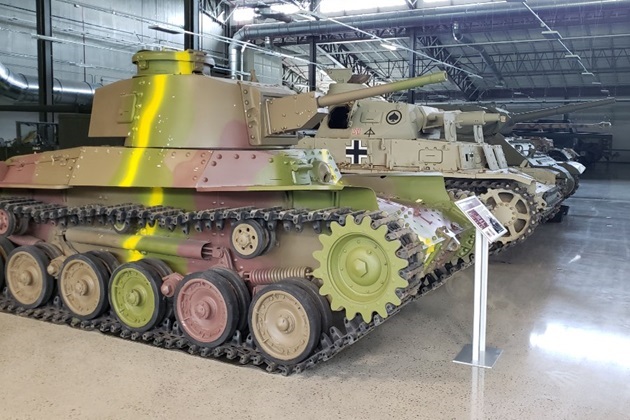
This Type 97 Shinhōtō Chi-Ha tank is currently at the US Army Ordnance Training Support Facility (TSF), at Fort Lee (formerly Fort Gregg-Adams) in Virginia. This tank was at the US Army Ordnance Museum (Aberdeen Proving Ground) in Maryland.
Because the US Army Ordnance TSF primary mission is the active training of military personnel, it is only open to the general public during select Open House days held a few times each year.
Video: Lucky: The Iwo Jima Survivor Sherman Tank
Video: This M4 Sherman Tank is Not What You Think.
Book: Four-Footed Sergeant: The Most Famous Dog in World War II by Howard L. Dalton
Model Kits and Decals
1/35:
Academy 13203 M4A2 Sherman U.S. Marines – 2004
Italeri 6583 M4 Sherman U.S. Marine Corps – 2020
Italeri 6755 LCM 3 Landing Craft Mechanized – 2024
Archer AR35287 USMC Iwo Jima Shermans 3rd Tank Battalion (Decals) – 2008
Bison Decals 35081 USMC M4A2 and M32B2 ARV Sherman
Bison Decals 35082 USMC M4A3 on IWO JIMA
Star Decals 35-C1366 US Pacific Battles – Iwo Jima M4A2 & M4A3 Shermans – 2023
1/72:
Armourfast 99014 M4A3 Sherman 75mm (2 quickbuild kits per box) – 2006
Armourfast 99021 M4A2 Sherman 75mm (2 quickbuild kits per box) – 2006
UM (Uni Models) 214 M4A2 Sherman with M1 Dozer Blade – 2011
UM (Uni Models) 372 Medium tank M4A2 Sherman – 2016
Bison Decals 72014 Iwo Jima
Star Decals 72-A1124 US Pacific Wars – Iwo Jima – 2023
Star Decals 72-A1125 US Pacific Wars – Iwo Jima – 2023